Set Up an Auto Attendant
In the Admin Portal, use auto attendants to efficiently manage incoming calls. Present callers with a menu of options and direct them to the appropriate department or extension based on their selections. Enhance the caller experience and ensure timely call routing.
Create a New Auto Attendant
To create a new auto attendant, follow these steps:
-
Log in to the Admin Portal.
-
Navigate to Features > Auto Attendants from the left-side menu.
-
Click New in the options bar to start creating a new auto attendant.
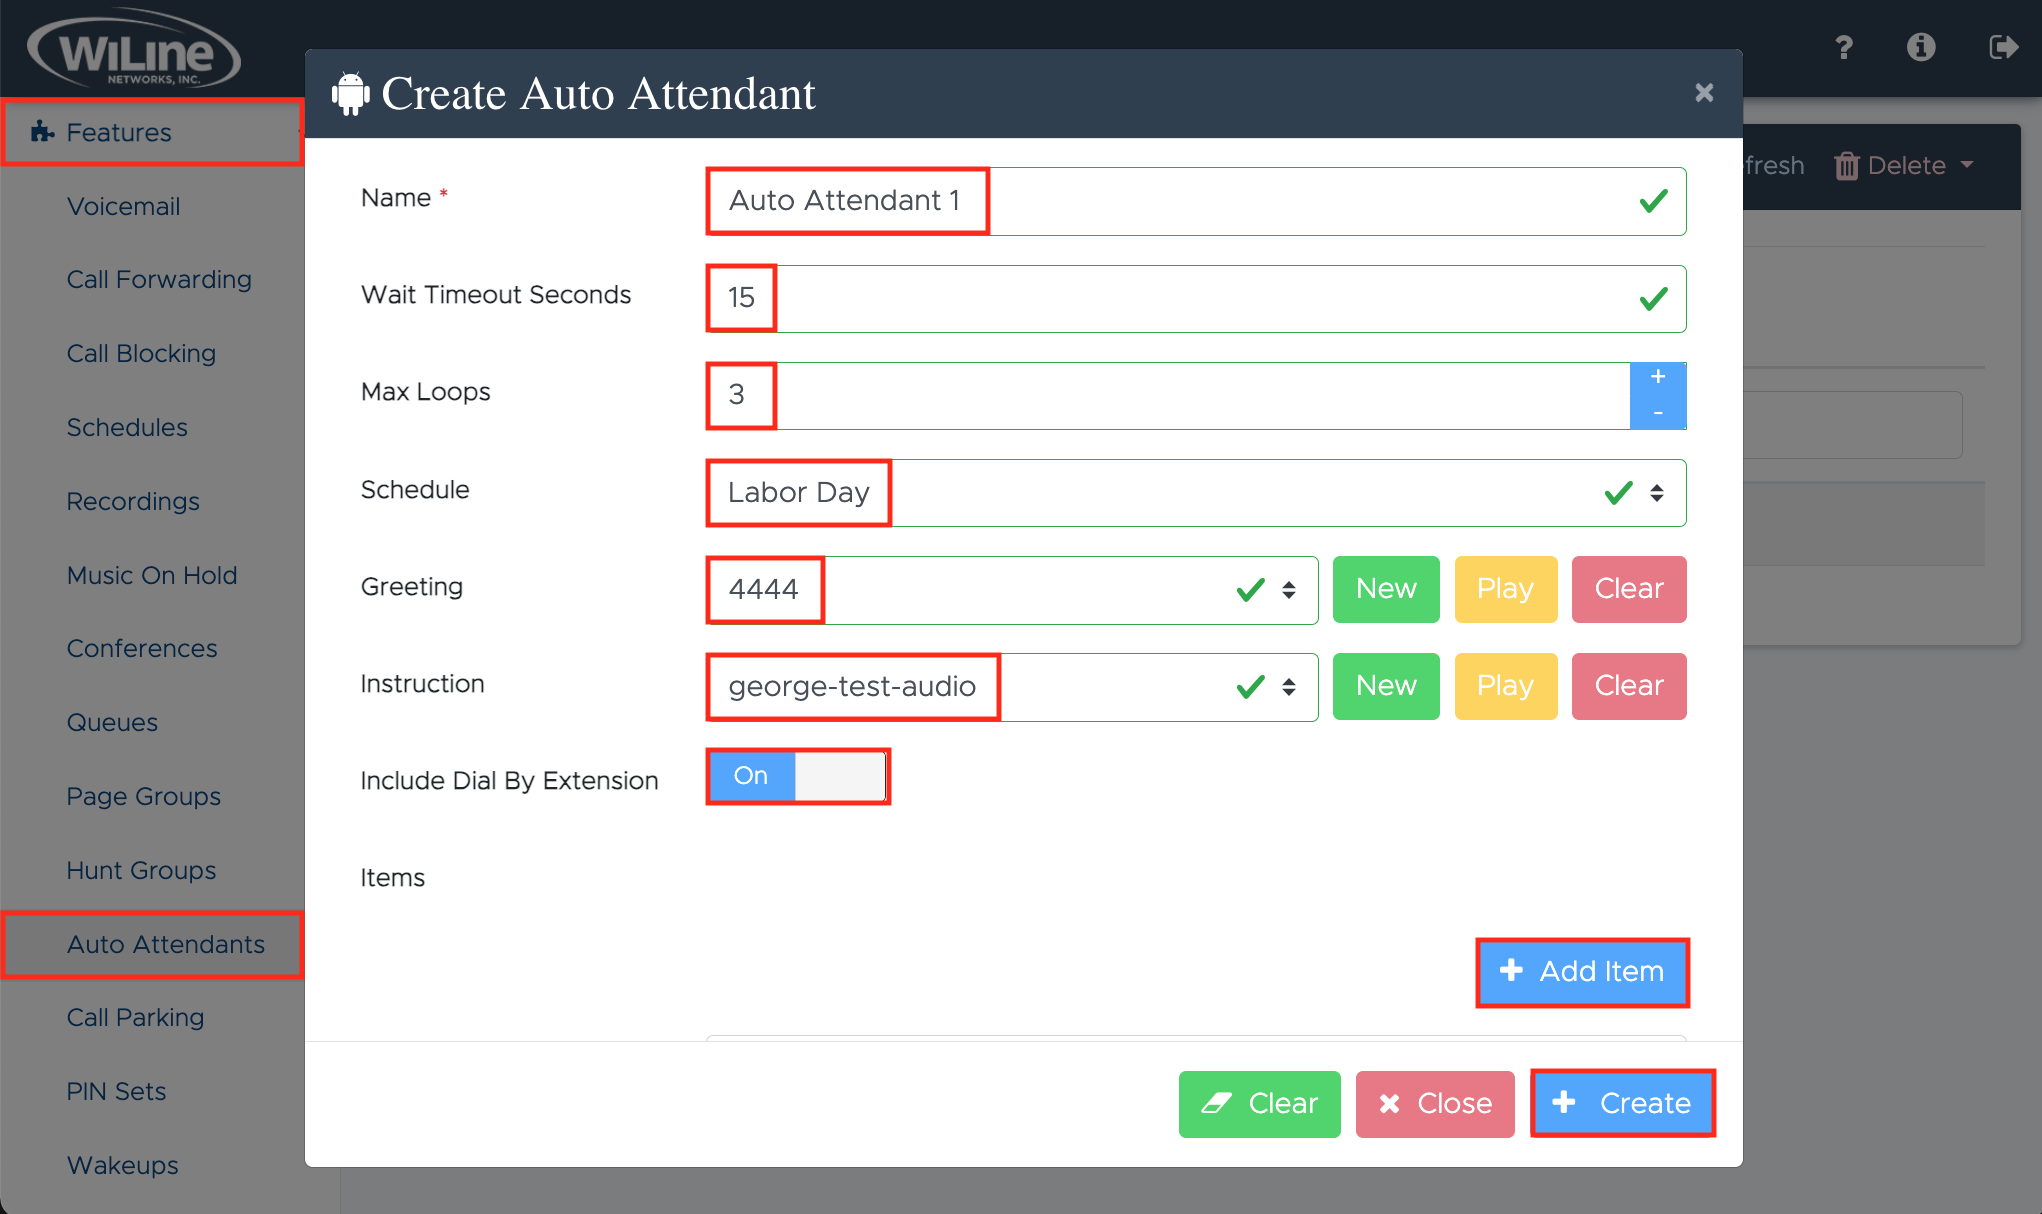
Figure 1. Creating a new auto attendant. -
Fill in the required information for the auto attendant:
- Name (required): Assign a name to the auto attendant (e.g.,
Auto Attendant 1). - Wait Timeout Seconds: Specify the duration (in seconds) the system should wait for a response before moving to the next action (e.g.,
15seconds). - Max Loops: Enter the maximum number of times the auto attendant will repeat the instructions before taking further action (e.g.,
3loops). - Schedule: Choose an applicable schedule that you created or one of the holidays (e.g.,
Labor Day) to define the auto attendant's availability. - Greeting: Input the audio file or number for the greeting (e.g.,
4444). - Instruction: Input the audio with instructions for the caller (e.g.,
george-test-audio).
noteTo upload a new file, click en New. A window will guide you through the process, as in the Recordings section. To listen to a recording, click Play, or click Clear to delete it.
- Include Dial By Extension: Toggle this option to allow callers to dial by extension.
- Name (required): Assign a name to the auto attendant (e.g.,
-
Next, Choose an Action for the auto attendant by clicking + Add Item under Items. Select an Action Type from the dropdown menu:
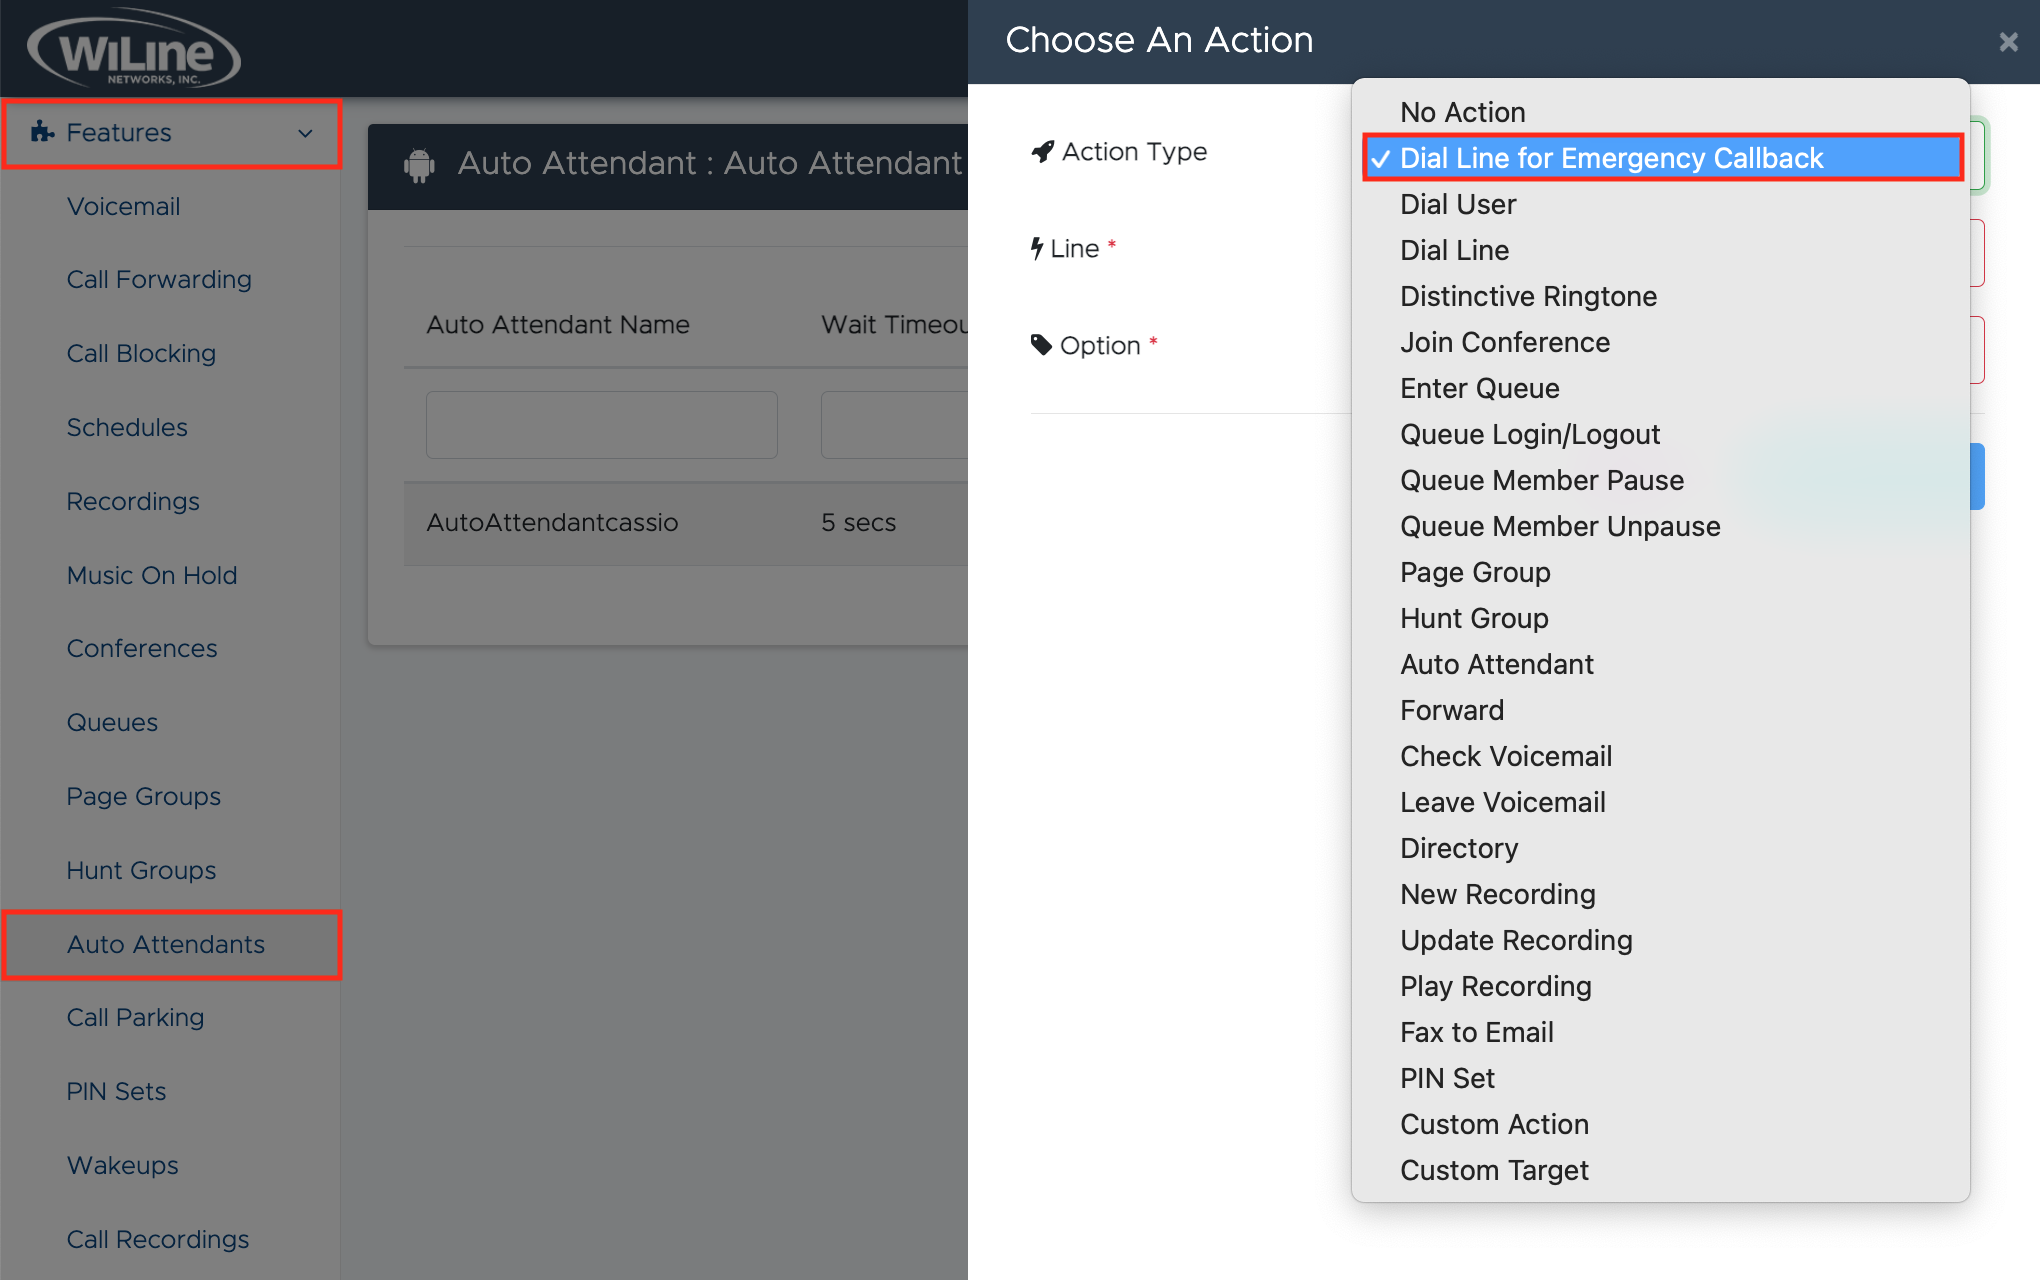
Figure 2. Choosing an action for the auto attendant. Choose from the following options:
- No Action: No specific action will be taken.
- Dial Line for Emergency Callback: Connect to a designated emergency line.
- Dial User: Route the call to a specific user.
- Dial Line: Direct the call to a specific line.
- Distinctive Ringtone: Play a unique ringtone for incoming calls.
- Join Conference: Allow the caller to join a conference call.
- Enter Queue: Place the caller in a queue for assistance.
- Queue Login/Logout: Manage agent availability in the queue.
- Queue Member Pause: Temporarily pause an agent's participation in the queue.
- Queue Member Unpause: Resume an agent's participation in the queue.
- Page Group: Send a page to a defined group of users.
- Hunt Group: Route the call to a hunt group.
- Auto Attendant: Direct the caller to another auto attendant.
- Forward: Forward the call to another number.
- Check Voicemail: Allow the caller to check their voicemail.
- Leave Voicemail: Enable the caller to leave a voicemail message.
- Directory: Provide a directory for caller navigation.
- New Recording: Start a new audio recording for greetings or messages.
- Update Recording: Modify an existing recording.
- Play Recording: Play a specific audio recording to the caller.
- Fax to Email: Send a fax to an email address.
- PIN Set: Require a PIN for accessing certain features.
- Custom Action: Execute a predefined custom action.
- Custom Target: Route the call to a specific custom target.
-
After selecting the first option, an additional field will appear based on your choice. For example, if you select Dial Line for Emergency Callback, you will be prompted to choose a Line. If you select Enter Queue, a dropdown will be displayed for you to select a Queue, etc.
-
Enter an Option to activate this action (e.g.,
1) and click Update Action to create the auto attendant. If you wish to cancel, click Close. -
Finally, choose a Final action for the auto attendant:
- Hang up or
- Leave a voicemail (you will be prompted to choose the Voicemail audio file).
-
When you’re done configuring the auto attendant, click Create. To start over, click Clear. To cancel, click Close.
View Auto Attendants List
To view a list with your auto attendants:
- Log in to the Admin Portal.
- Go to Features > Auto Attendants from the left-side menu.
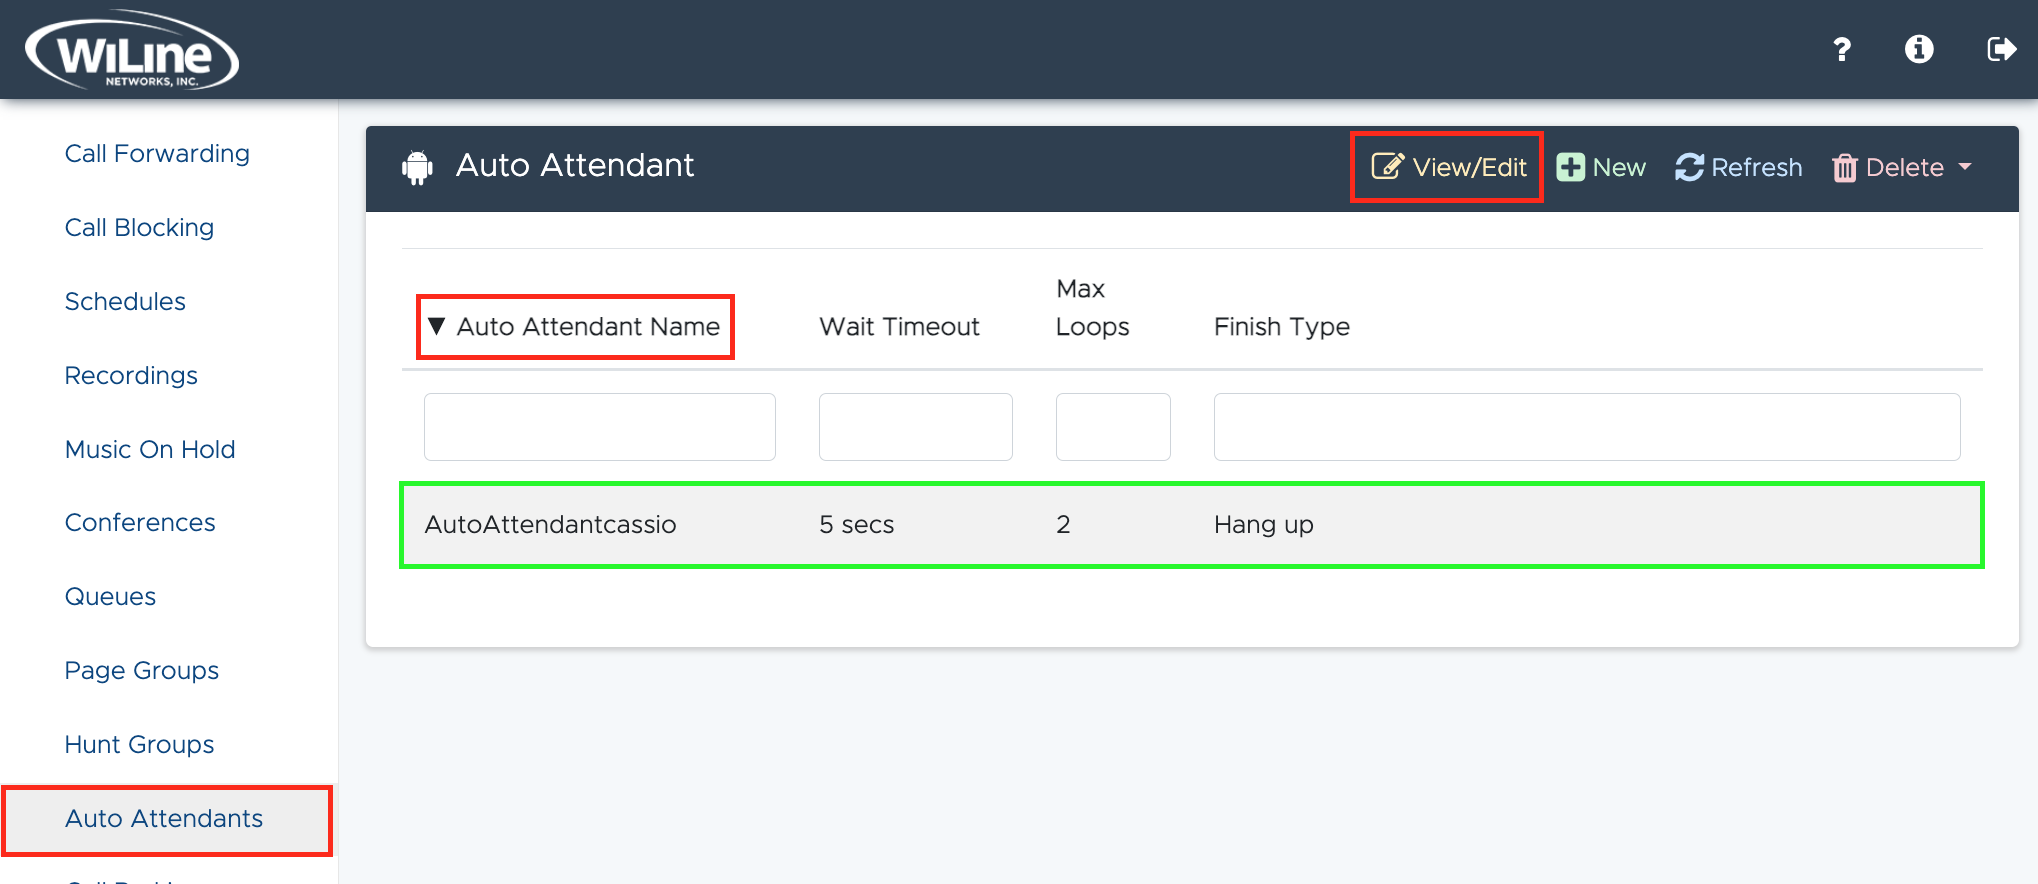
A list of all your created auto attendants will appear on your dashboard:
- To reorder or filter the results:
- Click the column headers Auto Attendant Name, Wait Timeout, Max Loops, or Finish Type to organize the results in ascending or descending order.
- To filter or search for specific items, type in the fields under the corresponding headers.
Edit an Auto Attendant
To edit an auto attendant:
- Double-click an item from the list, or
- Select an auto attendant and click the yellow View/Edit button in the top blue bar.
An Edit Auto Attendant pop-up window will open, allowing you to modify the hunt group details.
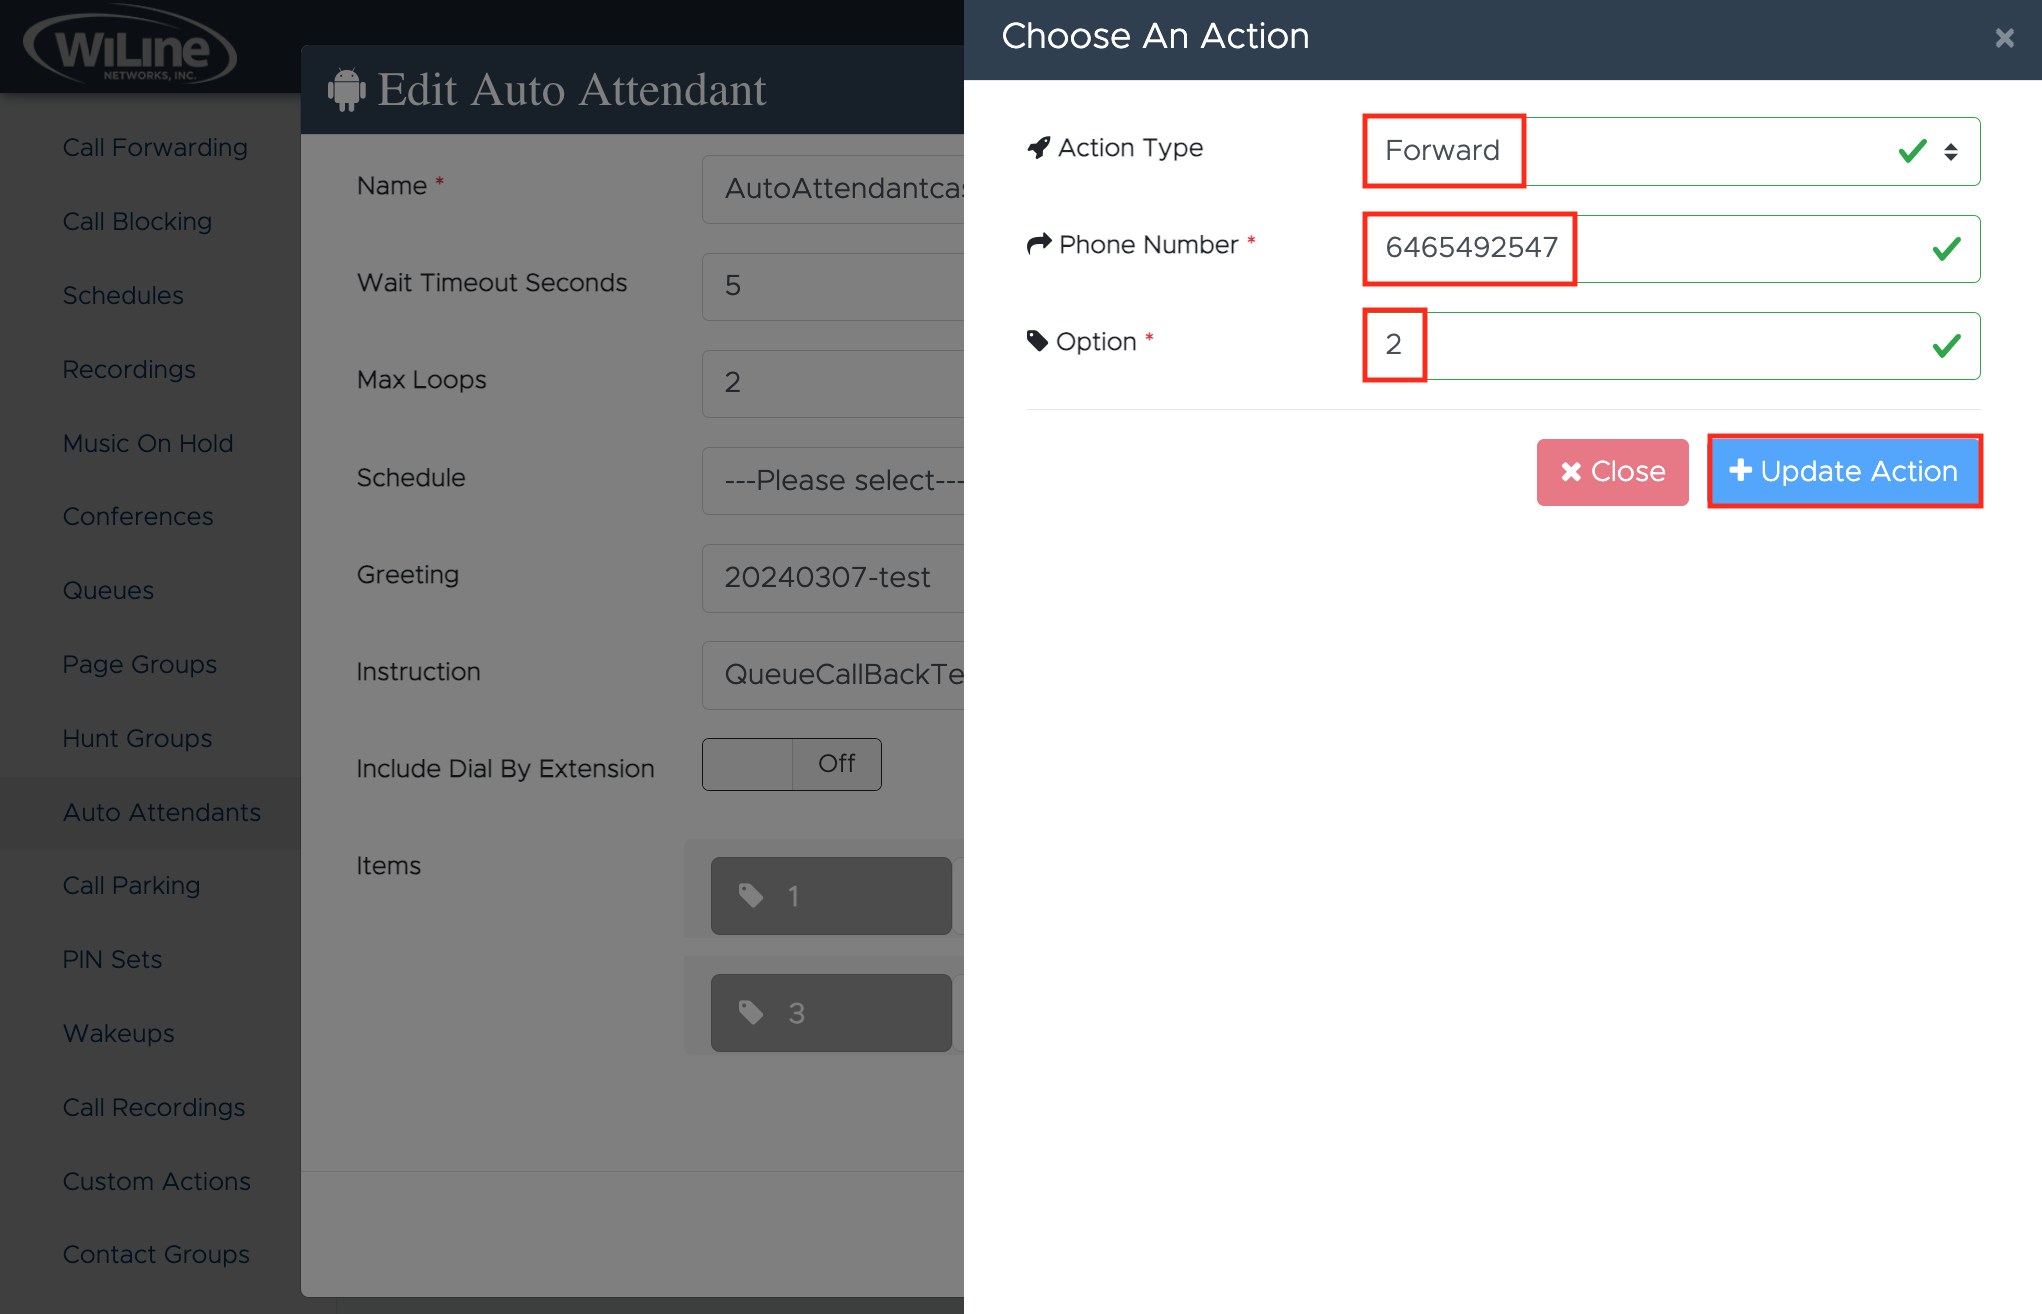
- Follow these steps, similar to the instructions in the Create a New Auto Attendant section, to update the hunt group details:
-
Name (required): Assign a new name to the auto attendant.
-
Wait Timeout Seconds: Set the time (e.g.,
10secs) the system waits for a response. -
Max Loops: Specify the number times (e.g.,
2) to repeat instructions before taking action. -
Schedule: Select a created schedule or holiday for the auto attendant's availability.
-
Greeting: Enter the audio file or number for the greeting.
-
Instruction: Enter the audio instructions for the caller.
-
Enable Include Dial By Extension.
-
Under Items, select the items to edit or click Add Item.
-
Next, Choose an Action for the auto attendant:
- No Action: No action taken.
- Dial Line for Emergency Callback: Connect to an emergency line.
- Dial User: Route to a specific user.
- Dial Line: Direct to a specific line.
- Distinctive Ringtone: Play a unique ringtone.
- Join Conference: Allow joining a conference call.
- Enter Queue: Place the caller in a queue.
- Queue Login/Logout: Manage agent status.
- Queue Member Pause/Unpause: Pause or resume an agent.
- Page Group: Page a group of users.
- Hunt Group: Route to a hunt group.
- Auto Attendant: Direct to another auto attendant.
- Forward: Forward the call.
- Check/Leave Voicemail: Access or leave a voicemail.
- Directory: Provide a caller directory.
- New/Update/Play Recording: Manage audio recordings.
- Fax to Email: Send a fax to email.
- PIN Set: Require a PIN for features.
- Custom Action/Target: Execute or route to a custom action.
-
After selecting an option, additional fields may appear based on your choice. For instance, choosing Dial Line for Emergency Callback will prompt you to select a Line.
-
Edit an activation Option (e.g.,
2) for your auto attendant, then click Update Action to proceed. Click Close to cancel. -
Finally, choose a Final action:
hang uporleave a voicemail(you'll select the voicemail audio file). -
Once done, click Create. To start over, click Clear, or to cancel, click Close.
Delete an Auto Attendant
To delete an auto attendant, follow these steps:
- Select the auto attendant from the list.
- Click the red Delete button in the top blue bar.
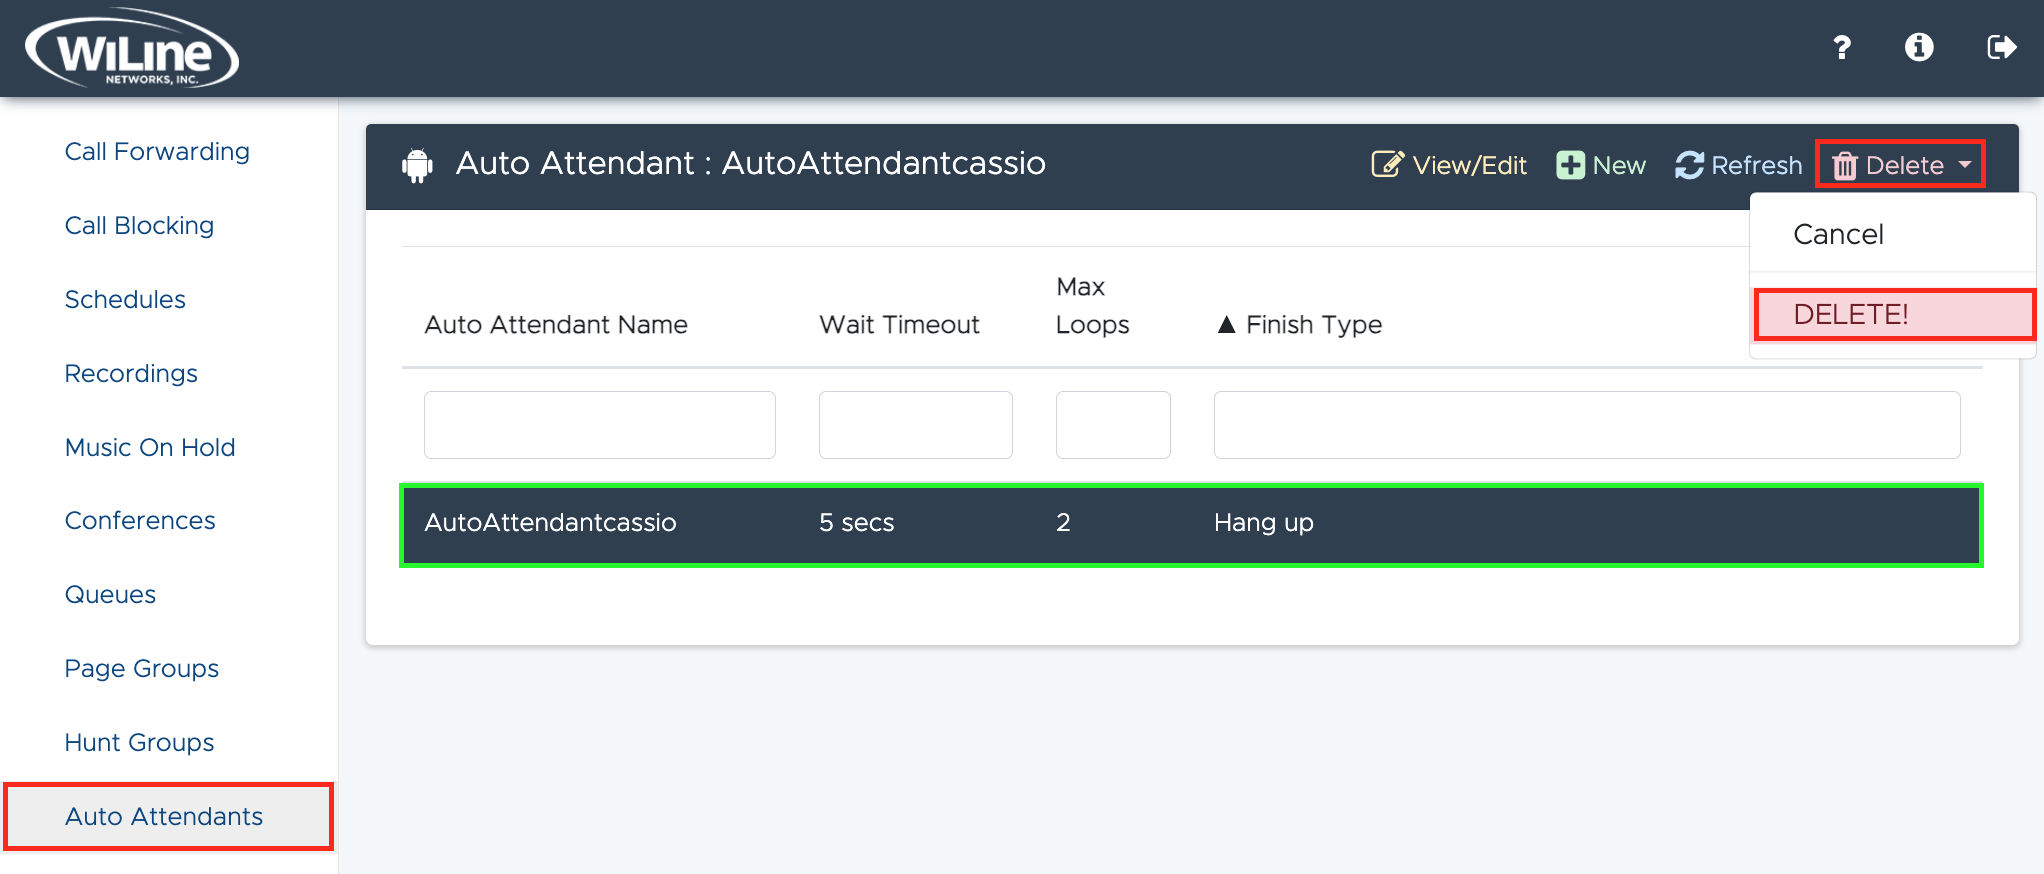
A confirmation pop-up will appear. Click Delete to confirm, or Cancel to return to the queue list.
You can only delete auto attendants that you created.
By following these steps, you can effectively create and configure a new auto attendant to streamline call management.