Manage Users Effectively
The Admin Portal allows administrators to create and manage user accounts easily. This guide outlines the steps for creating user accounts, setting essential details, and customizing preferences to align with your organization’s needs.
Create a New User
Follow these steps to create a new user:
- Log in to the Admin Portal.
- Navigate to Activations > Users from the sidebar menu.
- Click the New button in the top blue bar.
A Create User pop-up will guide you through the different settings options:
- General
- Caller Presentation
- Restrictions
- Trunkings
- Web Access
- Other
General Settings
Fill out the user profile and their communication preference:
-
User Group (required): Select an existing user group from the dropdown menu.
E.g.,Group 1 -
First Name (required): Enter the user's first name.
E.g.,Rafael -
Last Name (optional): Enter the user's last name.
E.g.,Fernandes -
Email (optional): Enter the user's email address.
E.g.,rafael.fer@wiline.com -
Cell Phone Number (optional): Enter the user's cellphone number.
E.g.,6465230987importantEntering a cell phone number is crucial for enabling the Cellular Mode feature. This feature allows incoming calls to be redirected to your mobile phone when an internet connection is unavailable. Additionally, if you experience poor call quality due to network issues, you can activate Cellular Mode during an active call by dialing
*28. The system will then bridge your mobile number with the intended recipient, ensuring a seamless connection. -
Primary Extension (optional): Choose a unique extension from the dropdown menu.
E.g.,152 -
Include in Directory (optional): Check this option to include the user in the directory.
-
Primary DID (optional): Assign a primary Direct Inward Dialing (DID) number if applicable.
-
Ring Timeout Seconds (optional): Define the ring timeout duration in seconds.
E.g.,15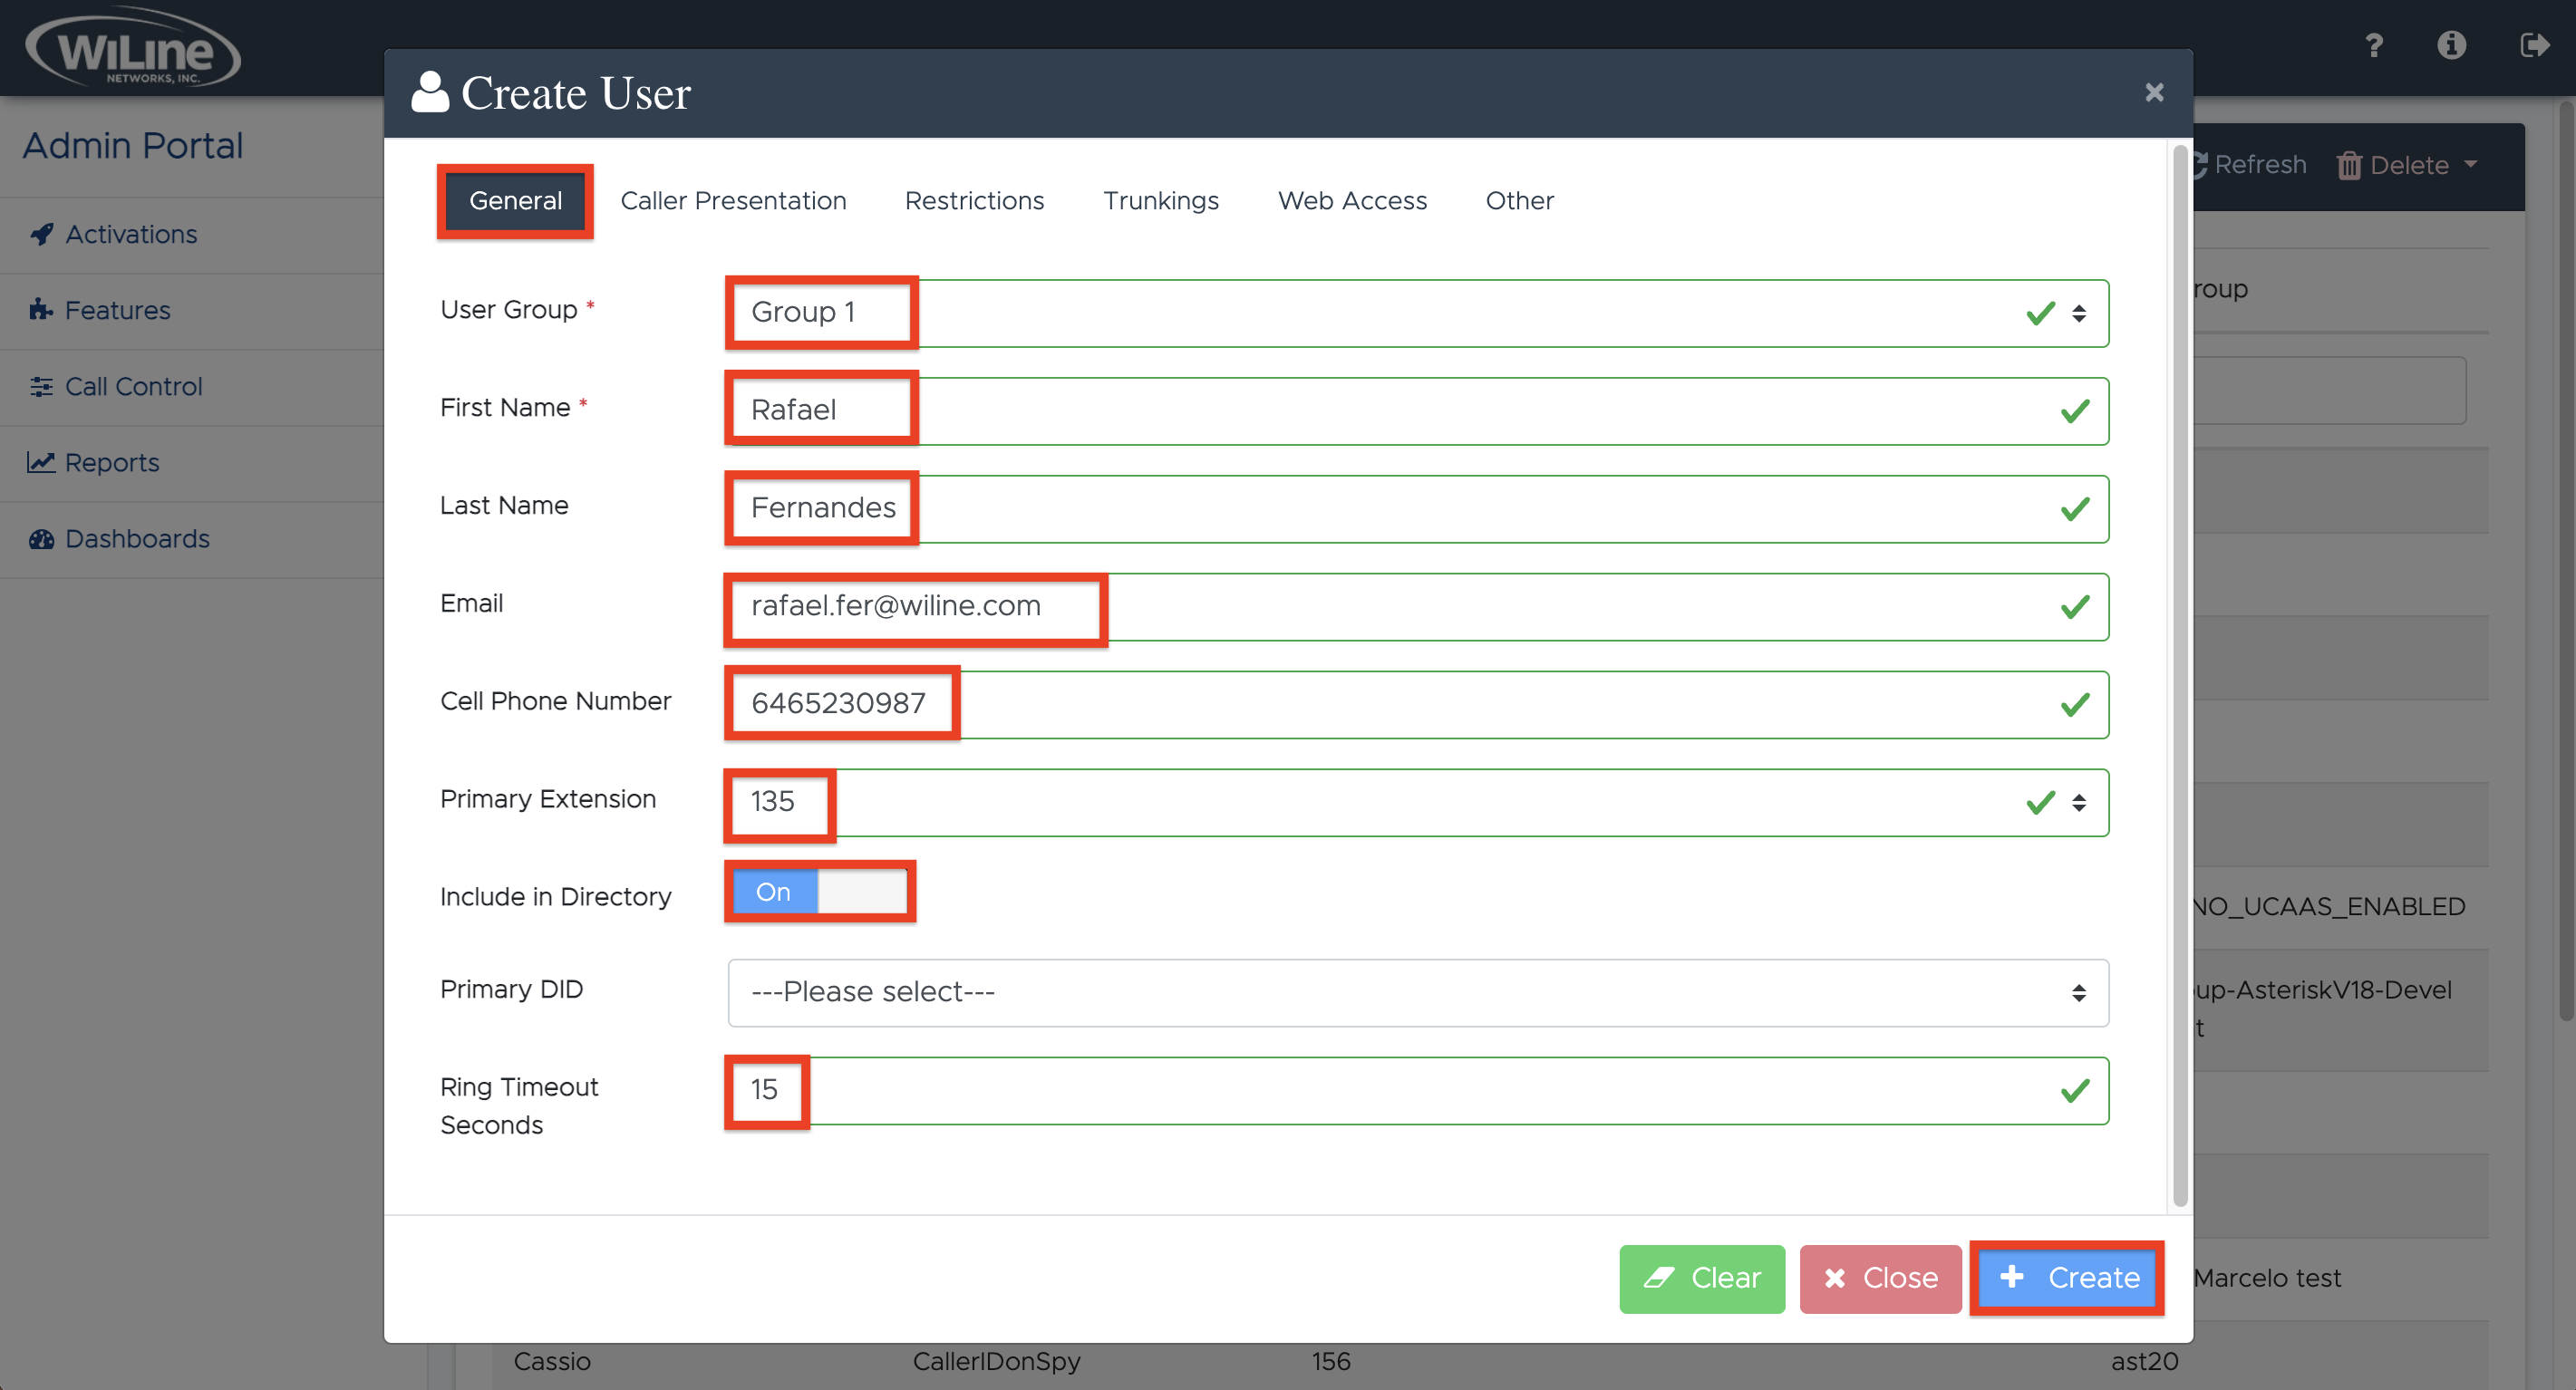
Figure 1: Creating a new user: general settings.
Caller Presentation Settings
Configure how outbound calls from this user will be presented:
-
Is Anonymous (optional): Enable this option to hide the caller's identity from recipients.
-
Caller Name: Specify the name displayed for outbound calls.
E.g.,WiLine Sales -
Caller Number: Enter the phone number appearing to call recipients.
E.g.,6502944121 -
Emergency Caller Number: Assign a specific phone number for emergency calls, ensuring compliance with emergency response requirements.
E.g.,6502944121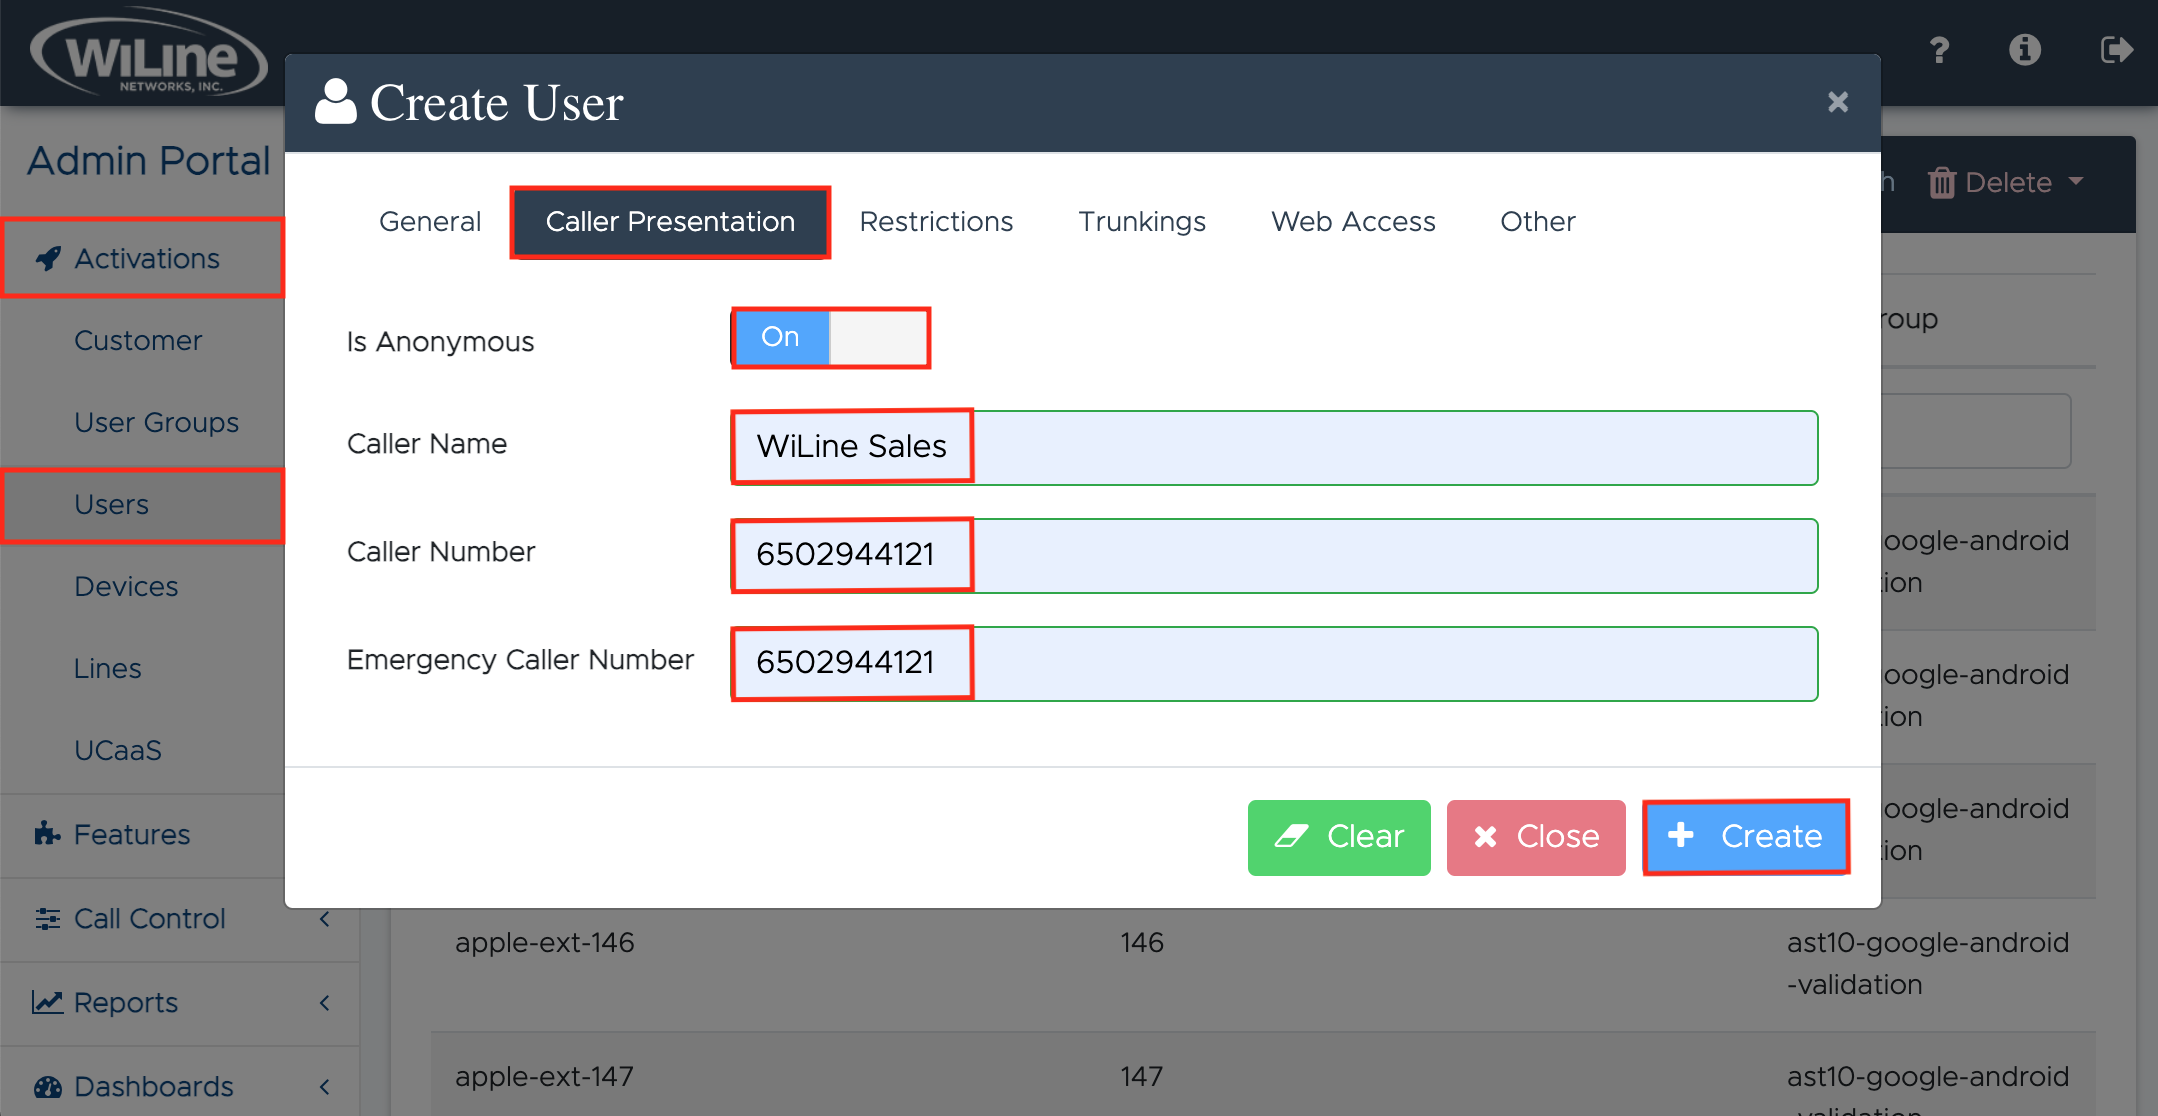
Figure 2: Creating a new user: caller presentation settings.
Restrictions Settings
Manage the user’s calling capabilities with the following settings:
-
Disable Domestic: Restrict all domestic calls.
-
Disable International: Block international calls.
-
Disable 411: Disable access to directory assistance.
-
Disable N11: Restrict access to N11 services (e.g.,
211or311). -
Disable Operator Assist: Block access to operator assistance.
-
Restricted Patterns: Define specific patterns or numbers users are restricted from calling. Use the following pattern key for allowed characters:
- N: Any digit from 2 to 9
- X: Any digit from 0 to 9
- Z: Zero or the digit 1
- [ ]: Specifies a range or set of digits
- .: Any number of additional digits
- !: End of the dialed number
- ,: Adds a pause in the dialing sequence
Example:
[9]XXXrestricts calls starting with 9 followed by three additional digits. -
Outbound PIN Set: Assign an outbound PIN to secure external calls, ensuring that only authorized users can make them.
Trunking Settings
Trunking controls call routing and caller ID presentation. Configure trunking settings to customize caller ID handling and inbound call routing for the user.
-
Caller ID Passthru (required): Select how caller ID is handled:
- Never: Caller ID is never passed through.
- All Calls: Caller ID is passed through for all calls.
- Internal Only: Caller ID is passed through for internal calls only.
-
Inbound Dial Rules: Create custom matching and replacement patterns for inbound calls. Define rules using the Match and Replace fields:
- Match: Define the pattern that inbound numbers should match.
- Replace: Specify the digits or format to replace the matched pattern.
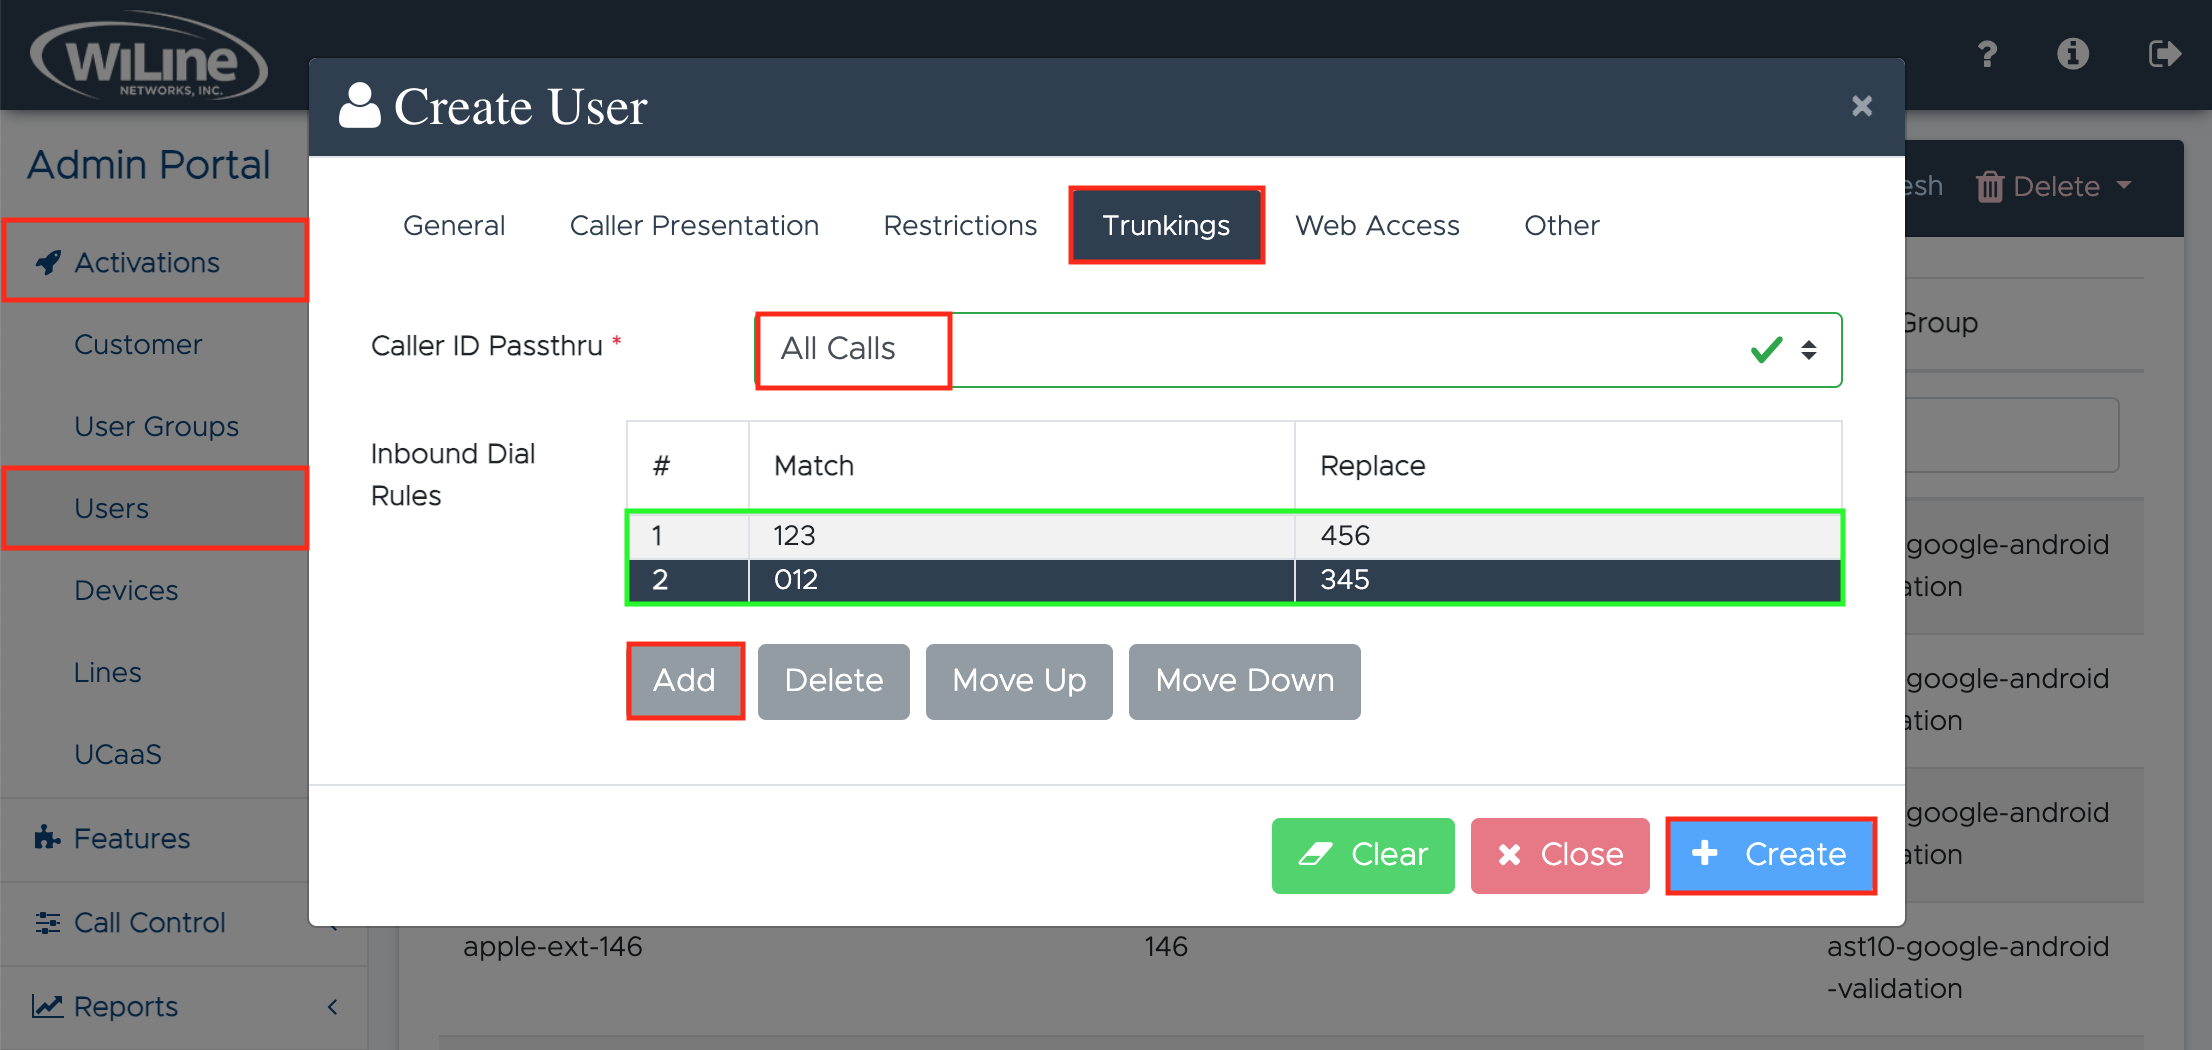
Figure 4: Creating a new user: trunkings settings.
Click Add to add a new pattern, and Delete to remove an existing one. Use Move Up and Move Down to adjust pattern priorities.
Example: To replace numbers starting with 123 with 456, enter 123 in the Match field and 456 in the Replace field.
Web Access Settings
Configure the user’s web access credentials:
-
Login Name: Enter a unique username for the user.
Example:rafael_fern -
Login Type: Select the user’s role within the portal:
- End User: Limited access for personal use.
- Administrator: Full access with administrative privileges.
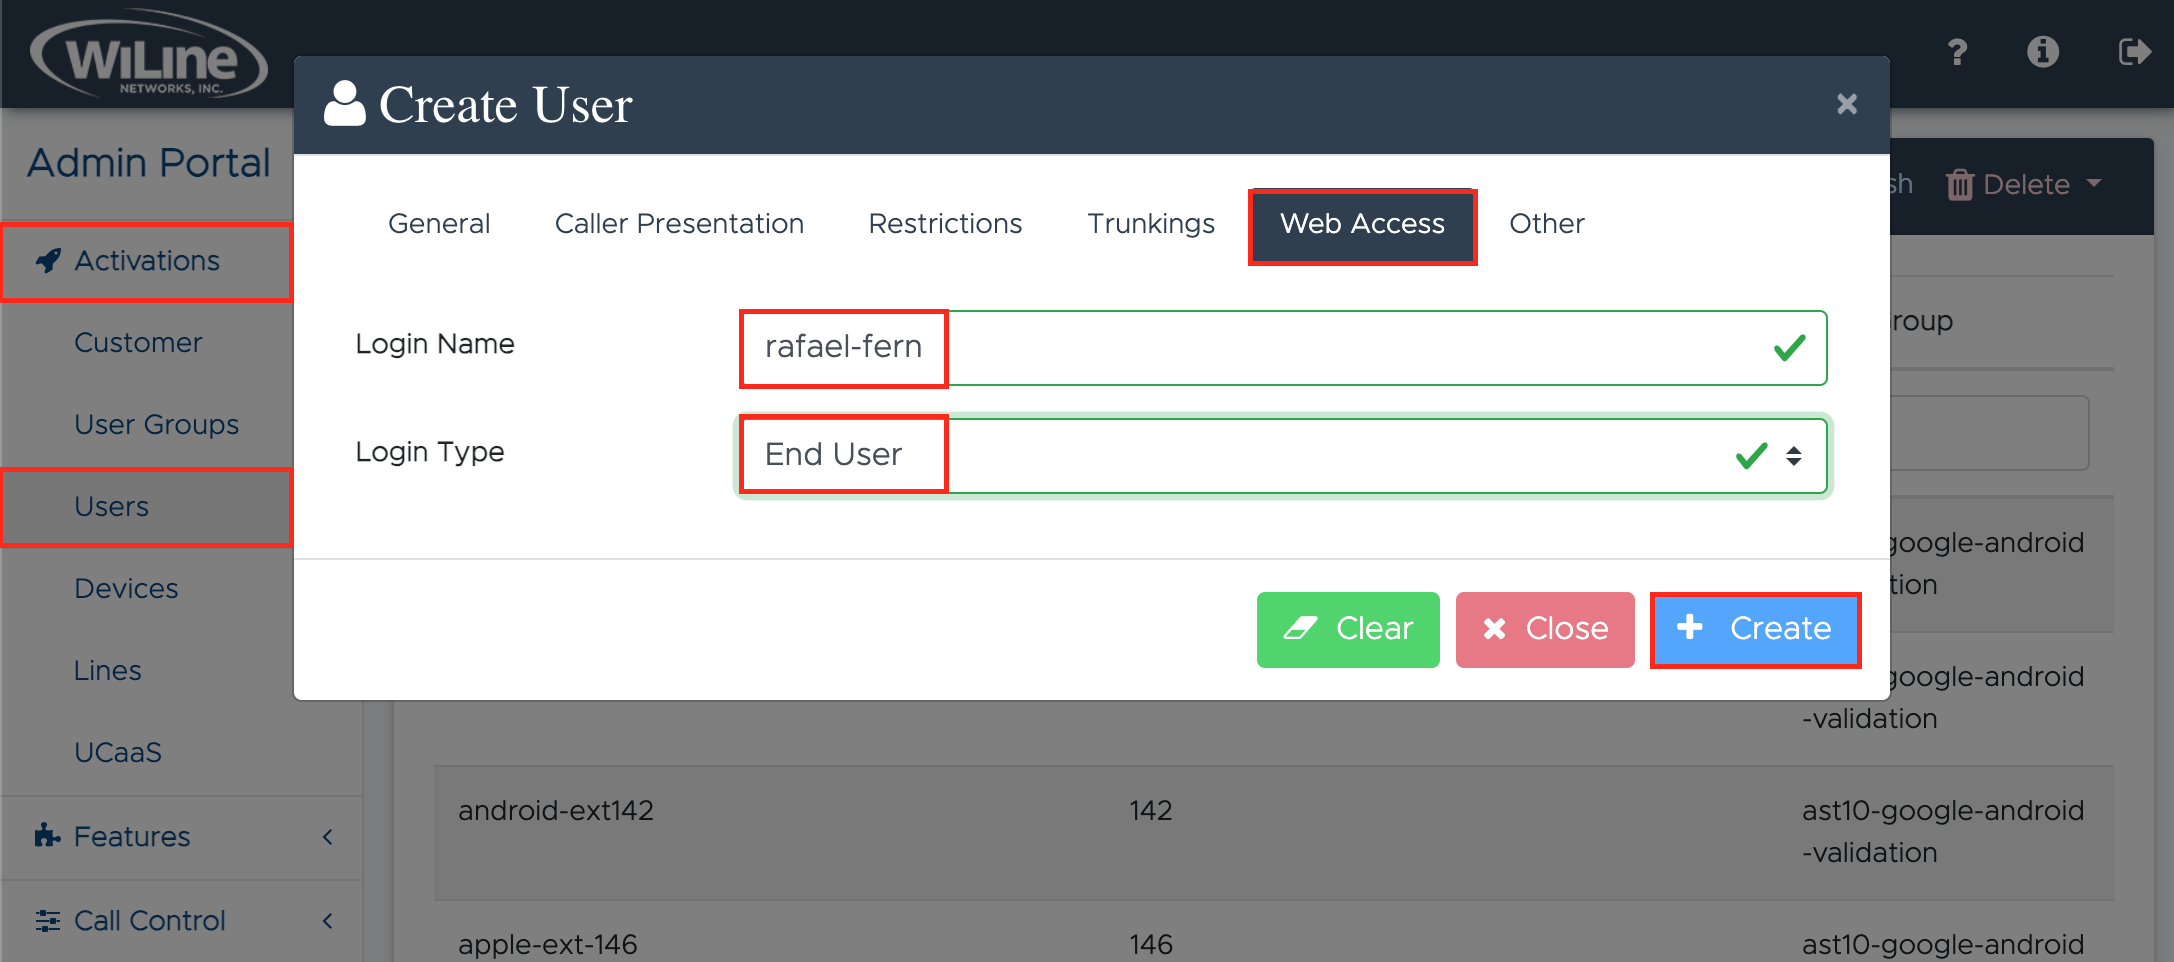
Figure 5: Creating a new user: web access settings.
Other Settings
Configure additional options to optimize voice call functionality and user preferences:
-
Preferred Codec: Select the audio codec for voice calls from the dropdown menu.
Example:G.711 -
Toggle to Enable:
- Allow BLF: Enable to allow users to view line status (busy/available).
- Disable Fax Reinvites: Prevent reinvite requests for fax calls.
- Record Outbound Calls: Enable to record all outbound calls for compliance.
-
Call Recording Message: Choose a pre-defined message that informs callers they are being recorded.
Example:test10 -
Enable UCaaS SMS: Activate SMS functionality for sending and receiving text messages.
Once all the details are entered, click Create. To start over, click Clear, or select Close to exit without saving.
View or Edit a User
To view your users list, follow these steps:
- Log in to the Admin Portal.
- Navigate to Activations > Users from the left-side menu.
A list of all your created users will appear on your dashboard.
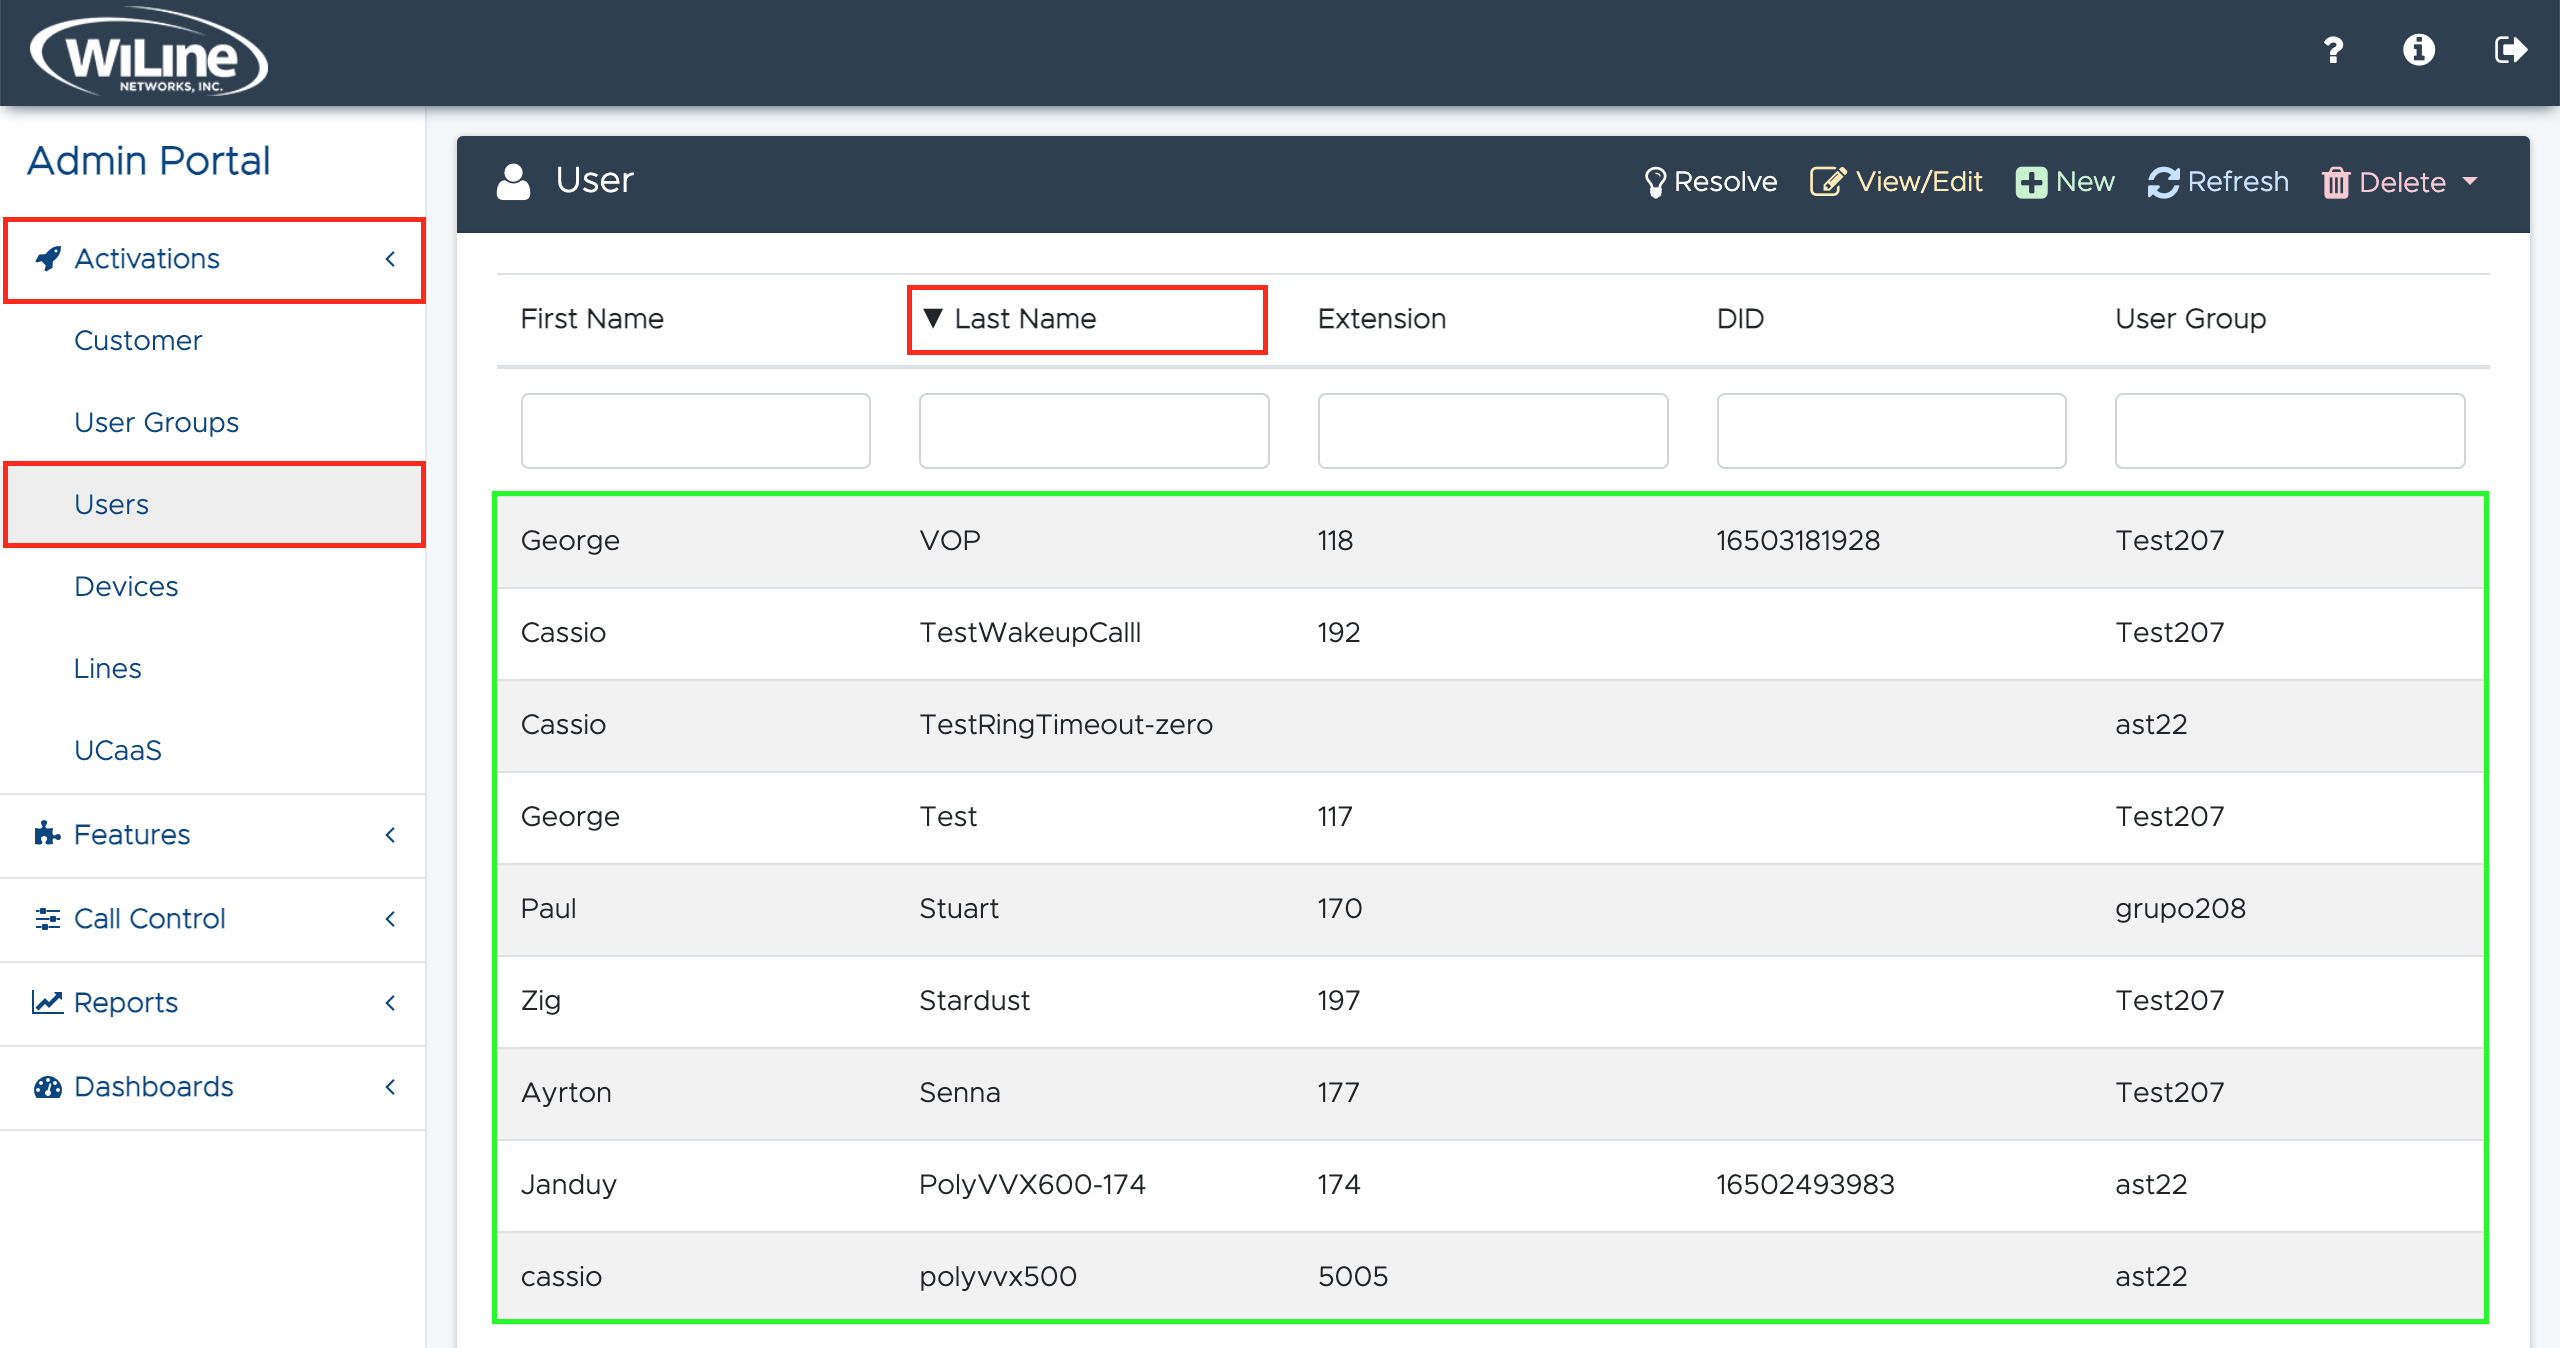
- To reorder or filter the results:
- Click the column headers such as First Name, Last Name and Extension to organize the results in ascending or descending order.
- To filter or search for specific items, type in the fields under the corresponding headers.
Edit a User
To edit a user:
- Double-click an item from the list, or
- Select a user and click the yellow View/Edit button in the options bar.
An Edit User pop-up window will open, allowing you to modify the user details.
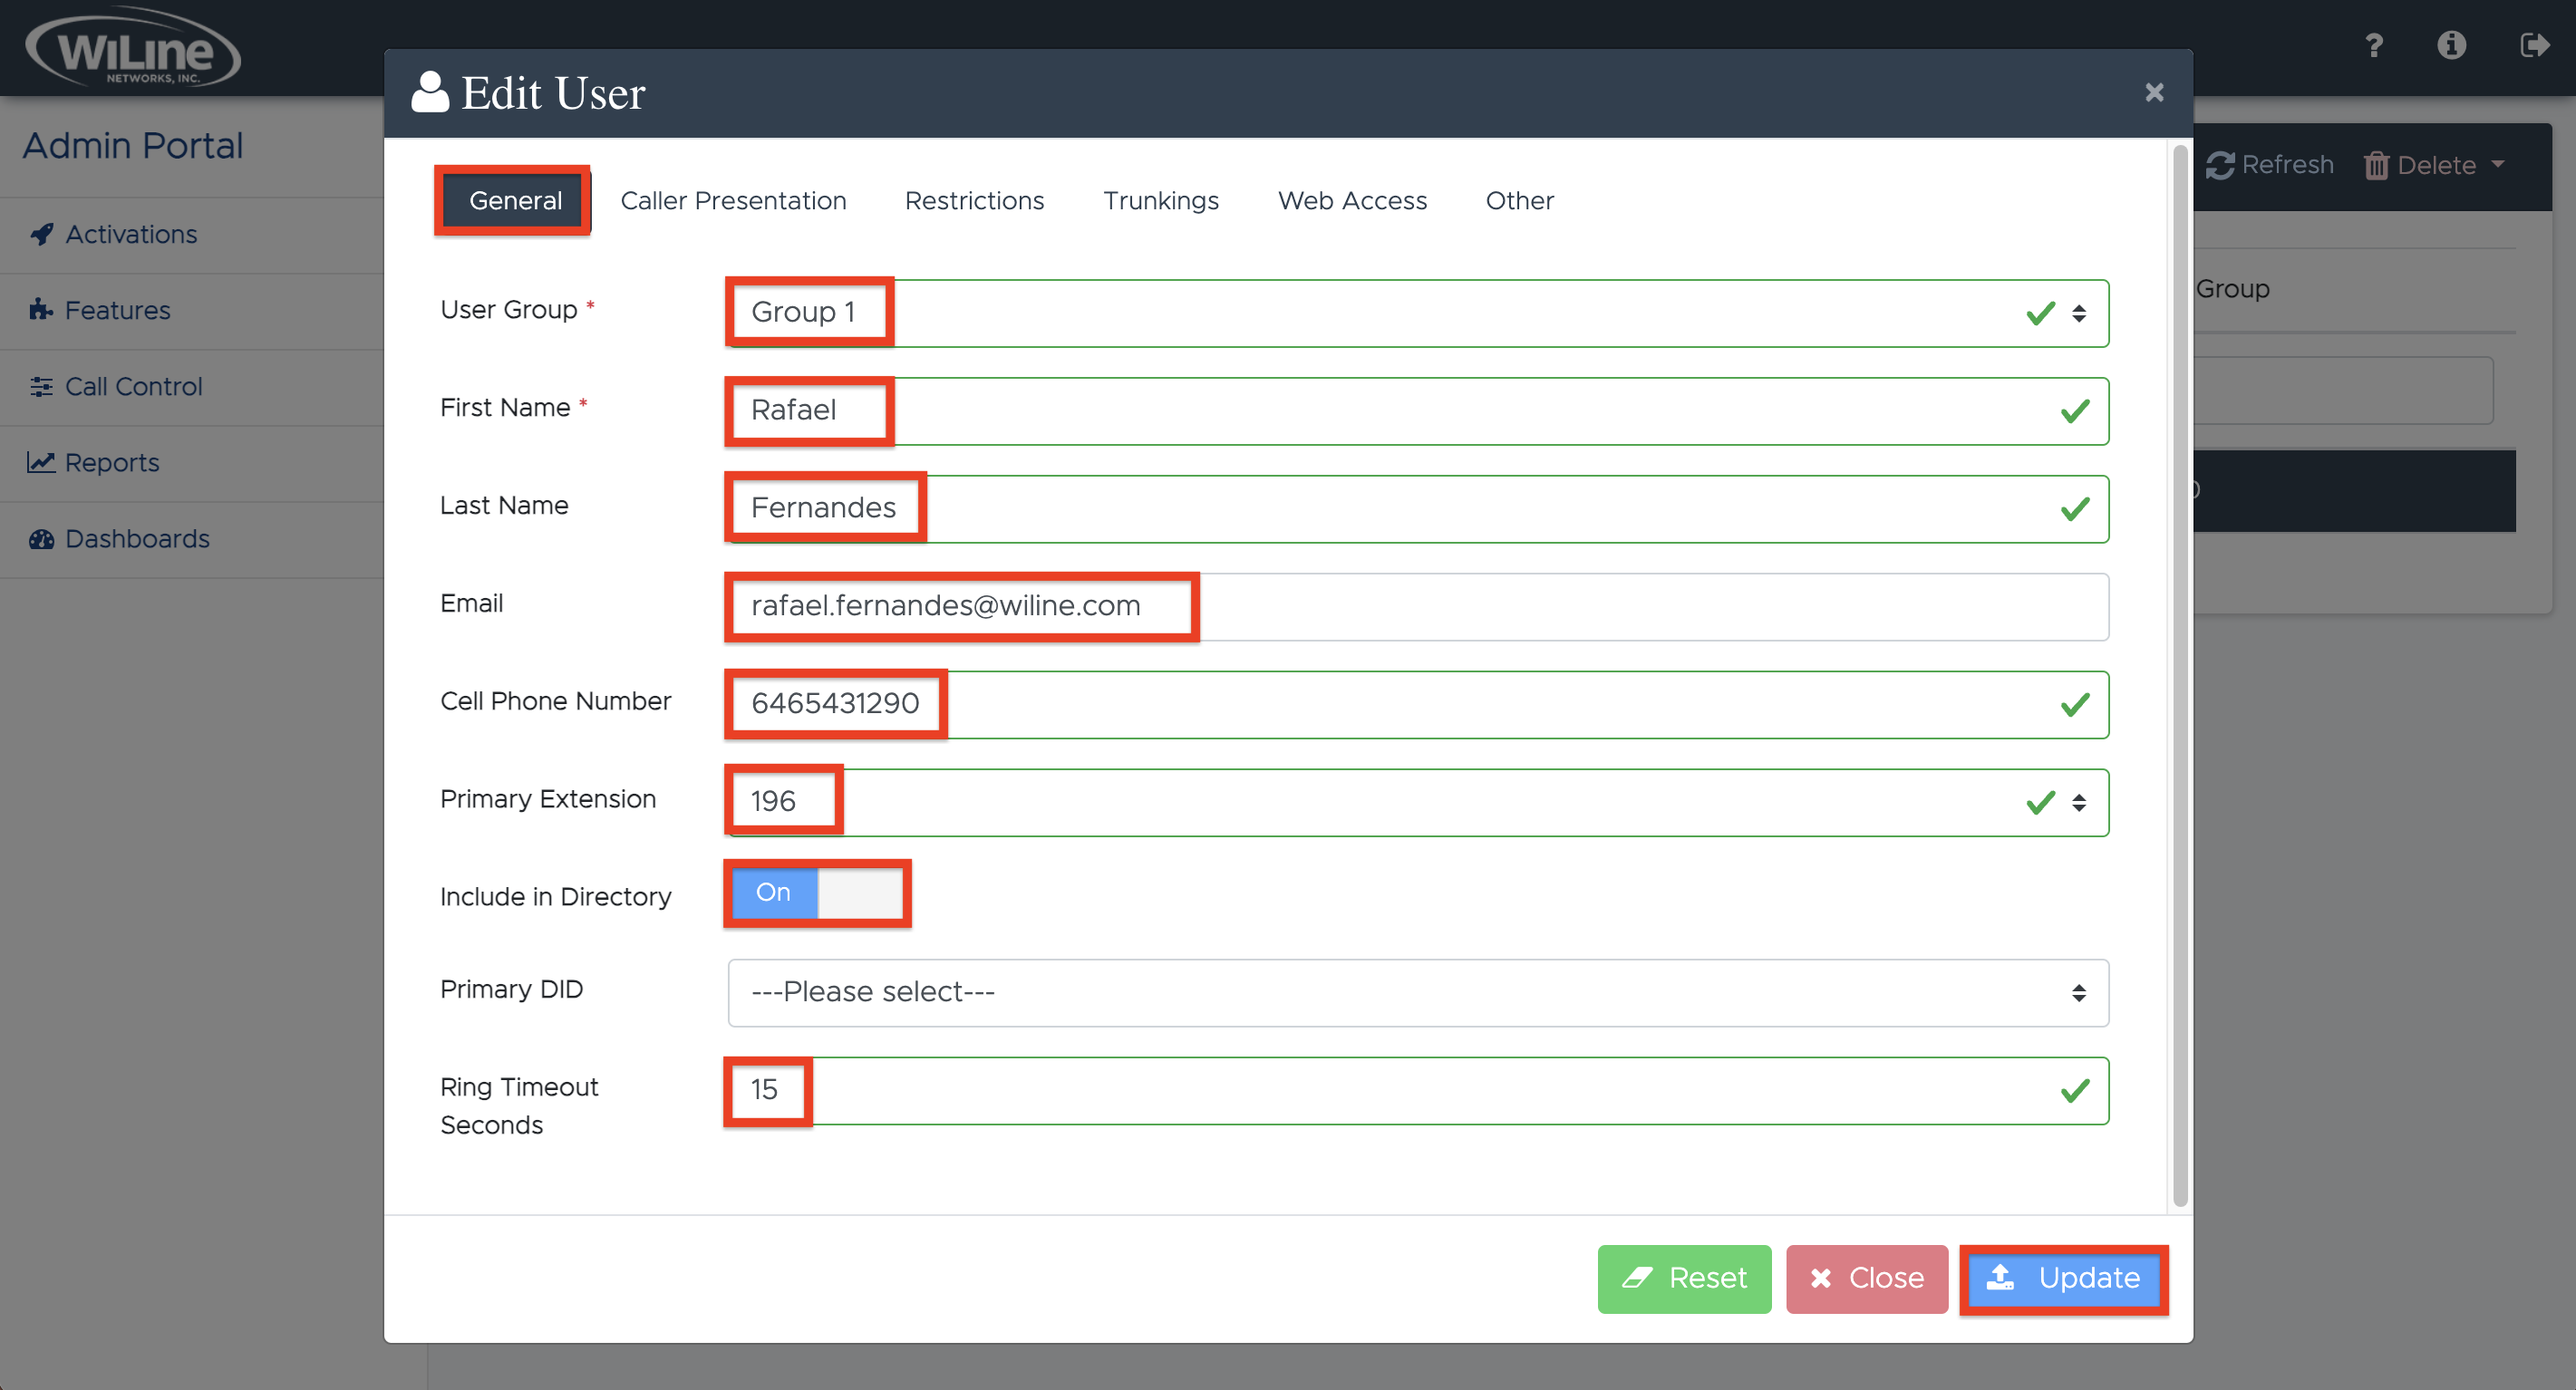
- Follow these steps, similar to the instructions in the Create a New User section, to update the user details:
- General
- Caller Presentation
- Restrictions
- Trunkings
- Web Access
- Other
General Settings
Edit the user's basic details:
-
Modify the User Group name (e.g.,
Group 1). -
Update First Name and Last Name (e.g.,
Raphael Fernandez). -
Email (optional): Modify the user's email.
E.g.,raphaelf@wiline.com -
Cell Phone Number (optional): Modify the user's cellphone number.
E.g.,6465230987importantEnsure the Cell Phone Number is correctly entered and up to date to enable the Cellular Mode feature. This feature allows calls to be redirected to the user's mobile phone when an internet connection is unavailable. Additionally, if the user experiences poor call quality, they can activate Cellular Mode during an active call by dialing
*28. The system will then bridge the user's mobile number with the intended recipient, ensuring uninterrupted communication. -
Primary Extension (optional): Modify the extension from the dropdown menu.
E.g.,152 -
Include in Directory (optional): Check to list or unlist the user in the directory.
-
Primary DID (optional): Assign or unassign a Direct Inward Dialing (DID) number.
-
Ring Timeout Seconds (optional): Modify the ring timeout duration.
E.g.,10
Caller Presentation Settings
Edit how user outbound calls appear to recipients:
- Is Anonymous (optional): Toggle to hide or show the caller's identity.
- Caller Name: Modify the user's name for outbound calls.
E.g.,WiLine Support - Caller Number: Modify the user's phone number for recipients to see.
E.g.,6465492564 - Emergency Caller Number: Modify the user's number for emergency calls.
E.g.,6465492564
Restrictions Settings
Edit the user's calling capabilities:
- Disable Domestic: Restrict or unrestrict all domestic calls.
- Disable International: Block or unblock international calls.
- Disable 411: Restrict or unrestrict access to directory assistance.
- Disable N11: Block or unblock N11 services (e.g.,
211,311). - Disable Operator Assist: Restrict or unrestrict operator assistance.
- Restricted Patterns: Define or redefine restricted calling patterns.
- Pattern Key:
- N: Digit 2 to 9
- X: Digit 0 to 9
- Z: Zero or 1
- [ ]: Range or set of digits
- .: Any number of additional digits
- !: End of the number
- ,: Adds a pause
Example:[8]XXrestricts calls starting with 8 and followed by two digits.
- Pattern Key:
- Outbound PIN Set: Set a PIN for external calls to ensure security.
Trunking
Edit caller ID handling and inbound call routing for the user:
- Caller ID Passthru (required): Define or redefine caller ID passthrough options.
- Never: No passthrough.
- All Calls: Passthrough for all calls.
- Internal Only: Passthrough for internal calls only.
- Inbound Dial Rules: Define custom patterns for inbound calls.
- Match: Define a pattern to match.
- Replace: Specify the replacement format.
Web Access
Edit the user’s web access credentials:
- Login Name: Modify the username.
Example:rafael_fernandes - Login Type: Modify the user role:
- End User: Limited access.
- Administrator: Full access.
Other Settings
Edit additional options and user preferences:
- Preferred Codec: Modify the audio codec.
Example:G.711 - Toggle Options:
- Allow BLF: Enable or disable line status view.
- Disable Fax Reinvites: Enable or disable fax reinvites.
- Record Outbound Calls: Enable or disable call recording.
- Call Recording Message: Select a recording message.
Example:test10 - Enable UCaaS SMS: Enable or disable SMS features.
Once all necessary edits are made, click Update. To start over, click Reset, or select Close to exit without saving.
Delete a User
To delete a user, follow these steps:
- Log in to the Admin Portal.
- Navigate to Activations > Users from the left-side menu.
- Select the user from the list.
- Click the red Delete button in the options bar.
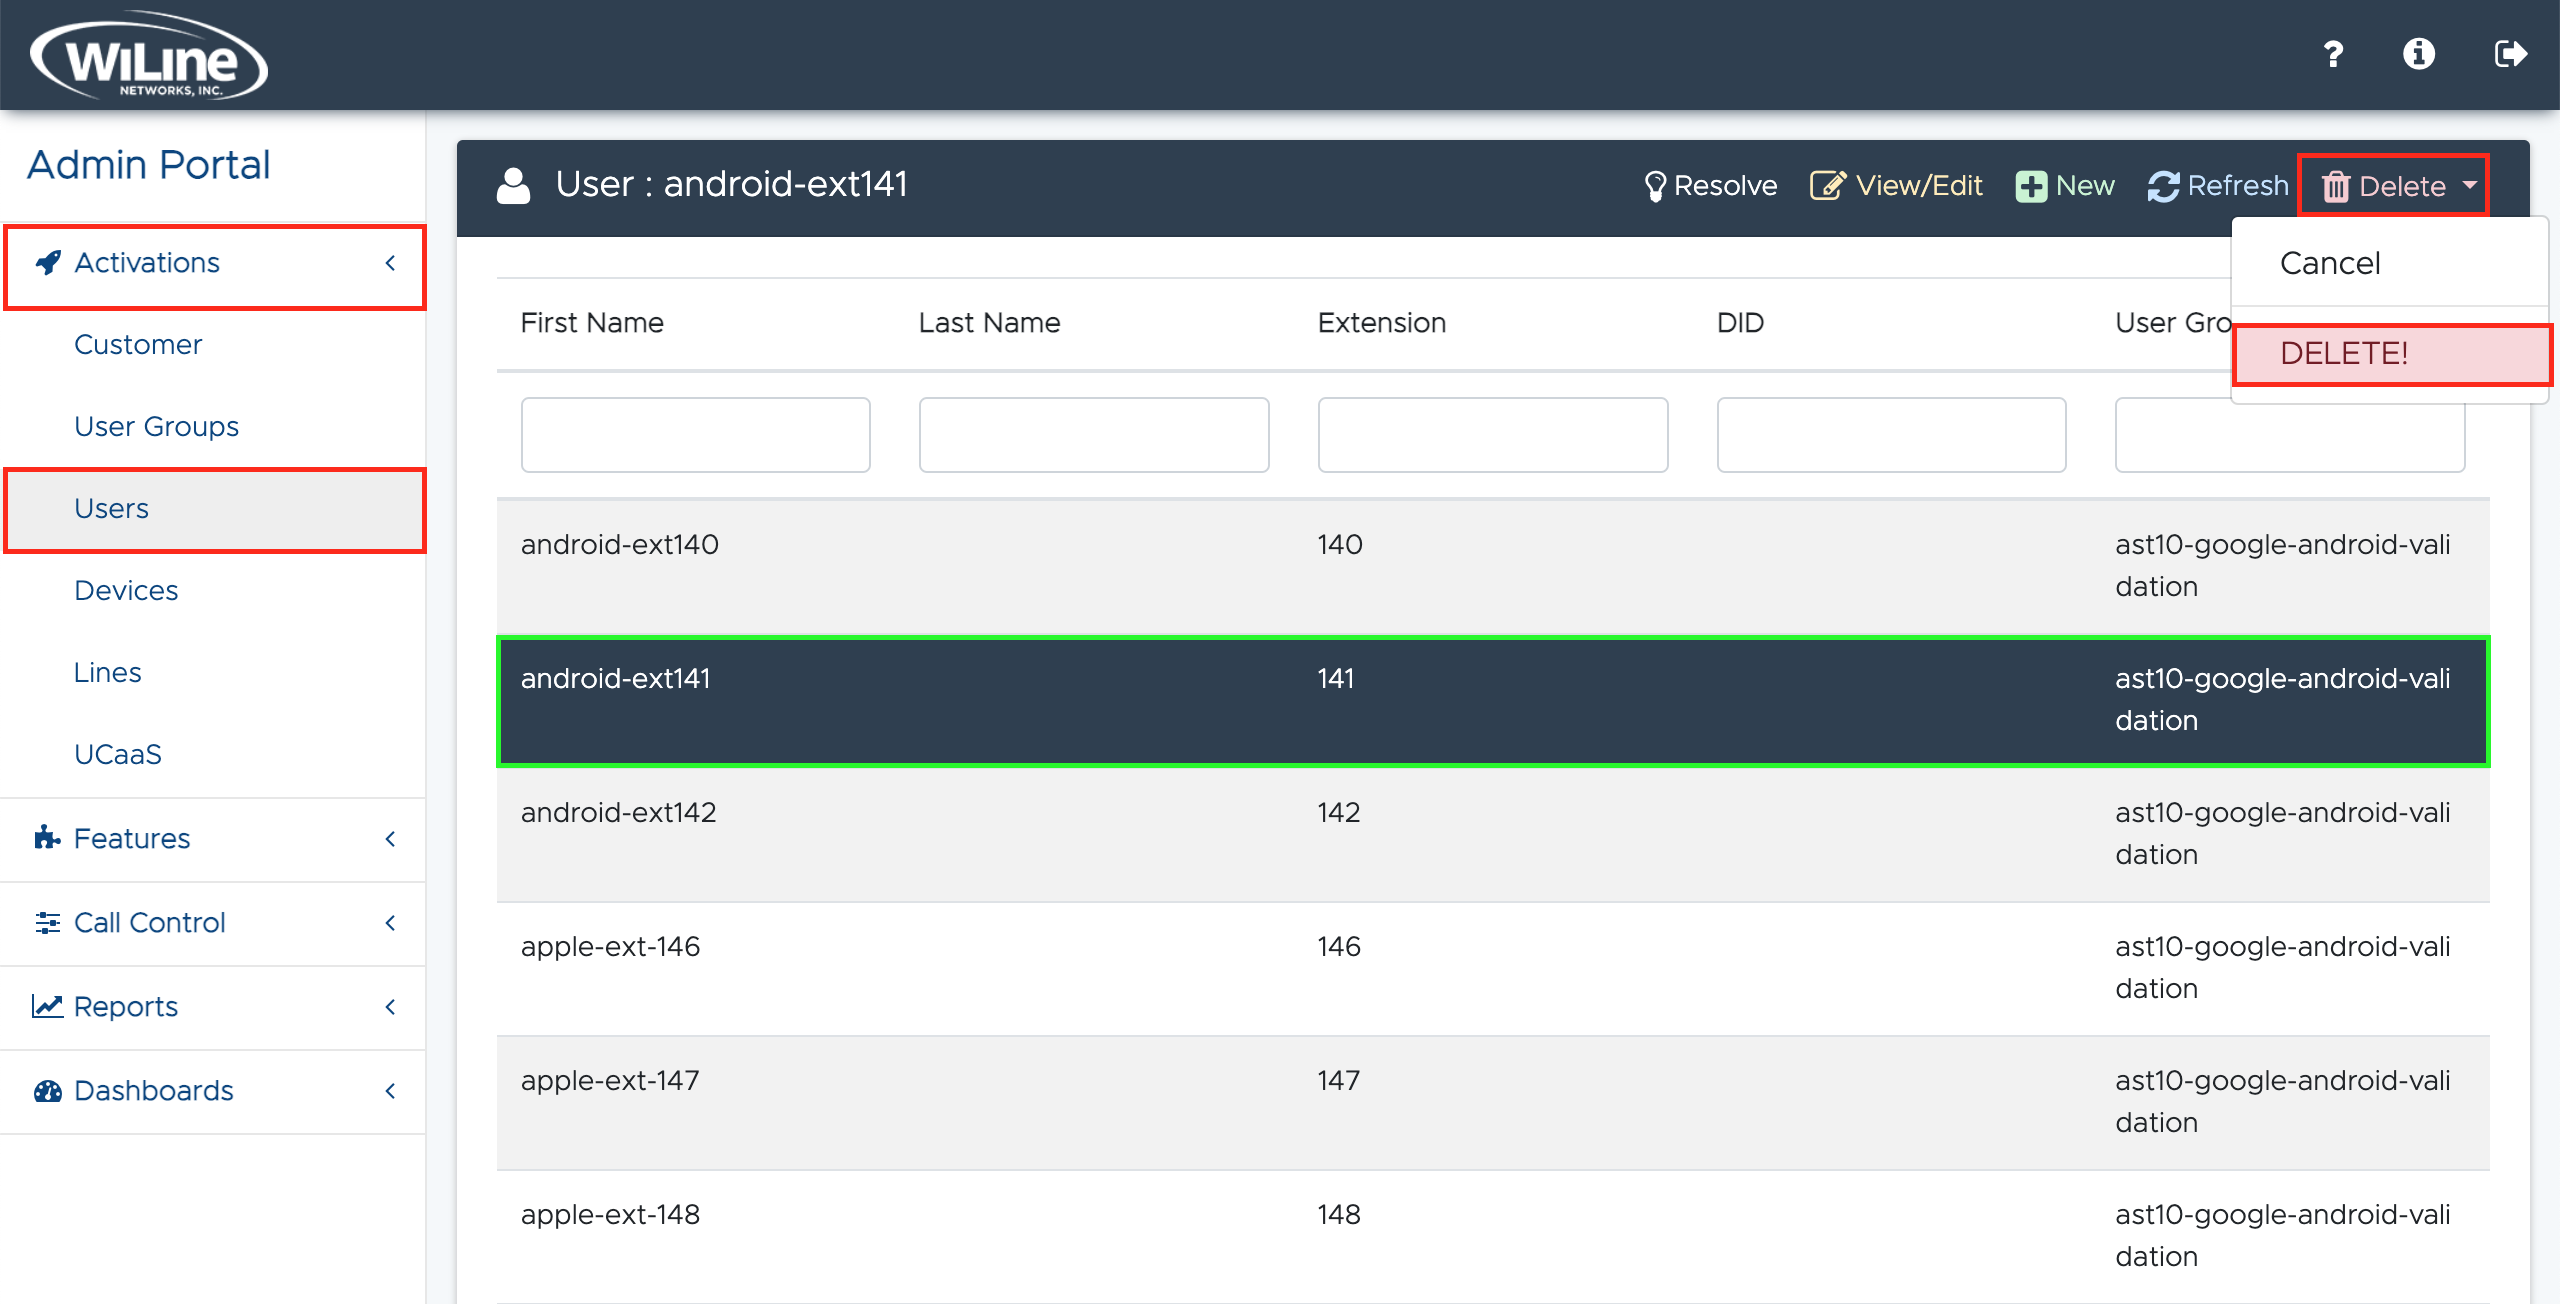
A confirmation pop-up will appear. Click Delete to confirm, or Cancel to stop the process.
You can only delete users that you created.
By following this guide, you can efficiently manage user accounts within the Admin Portal, ensuring that their settings align with your organization's specific needs and preferences.