Manage Devices
The Admin Portal provides tools to easily create, configure, and manage devices for your organization. This guide walks you through the steps needed to add new devices, customize settings, and optimize configurations to meet your organization’s requirements.
Create a New Device
Follow these steps to create a new device:
- Log in to the Admin Portal.
- Navigate to Activations > Devices from the sidebar menu.
- Click the New button in the options bar.
A Create Devices pop-up will guide you through the different settings options:
- General
- Provisioning
- Other
- TDM Trunks
- Emergency Locations
- Background
General Settings
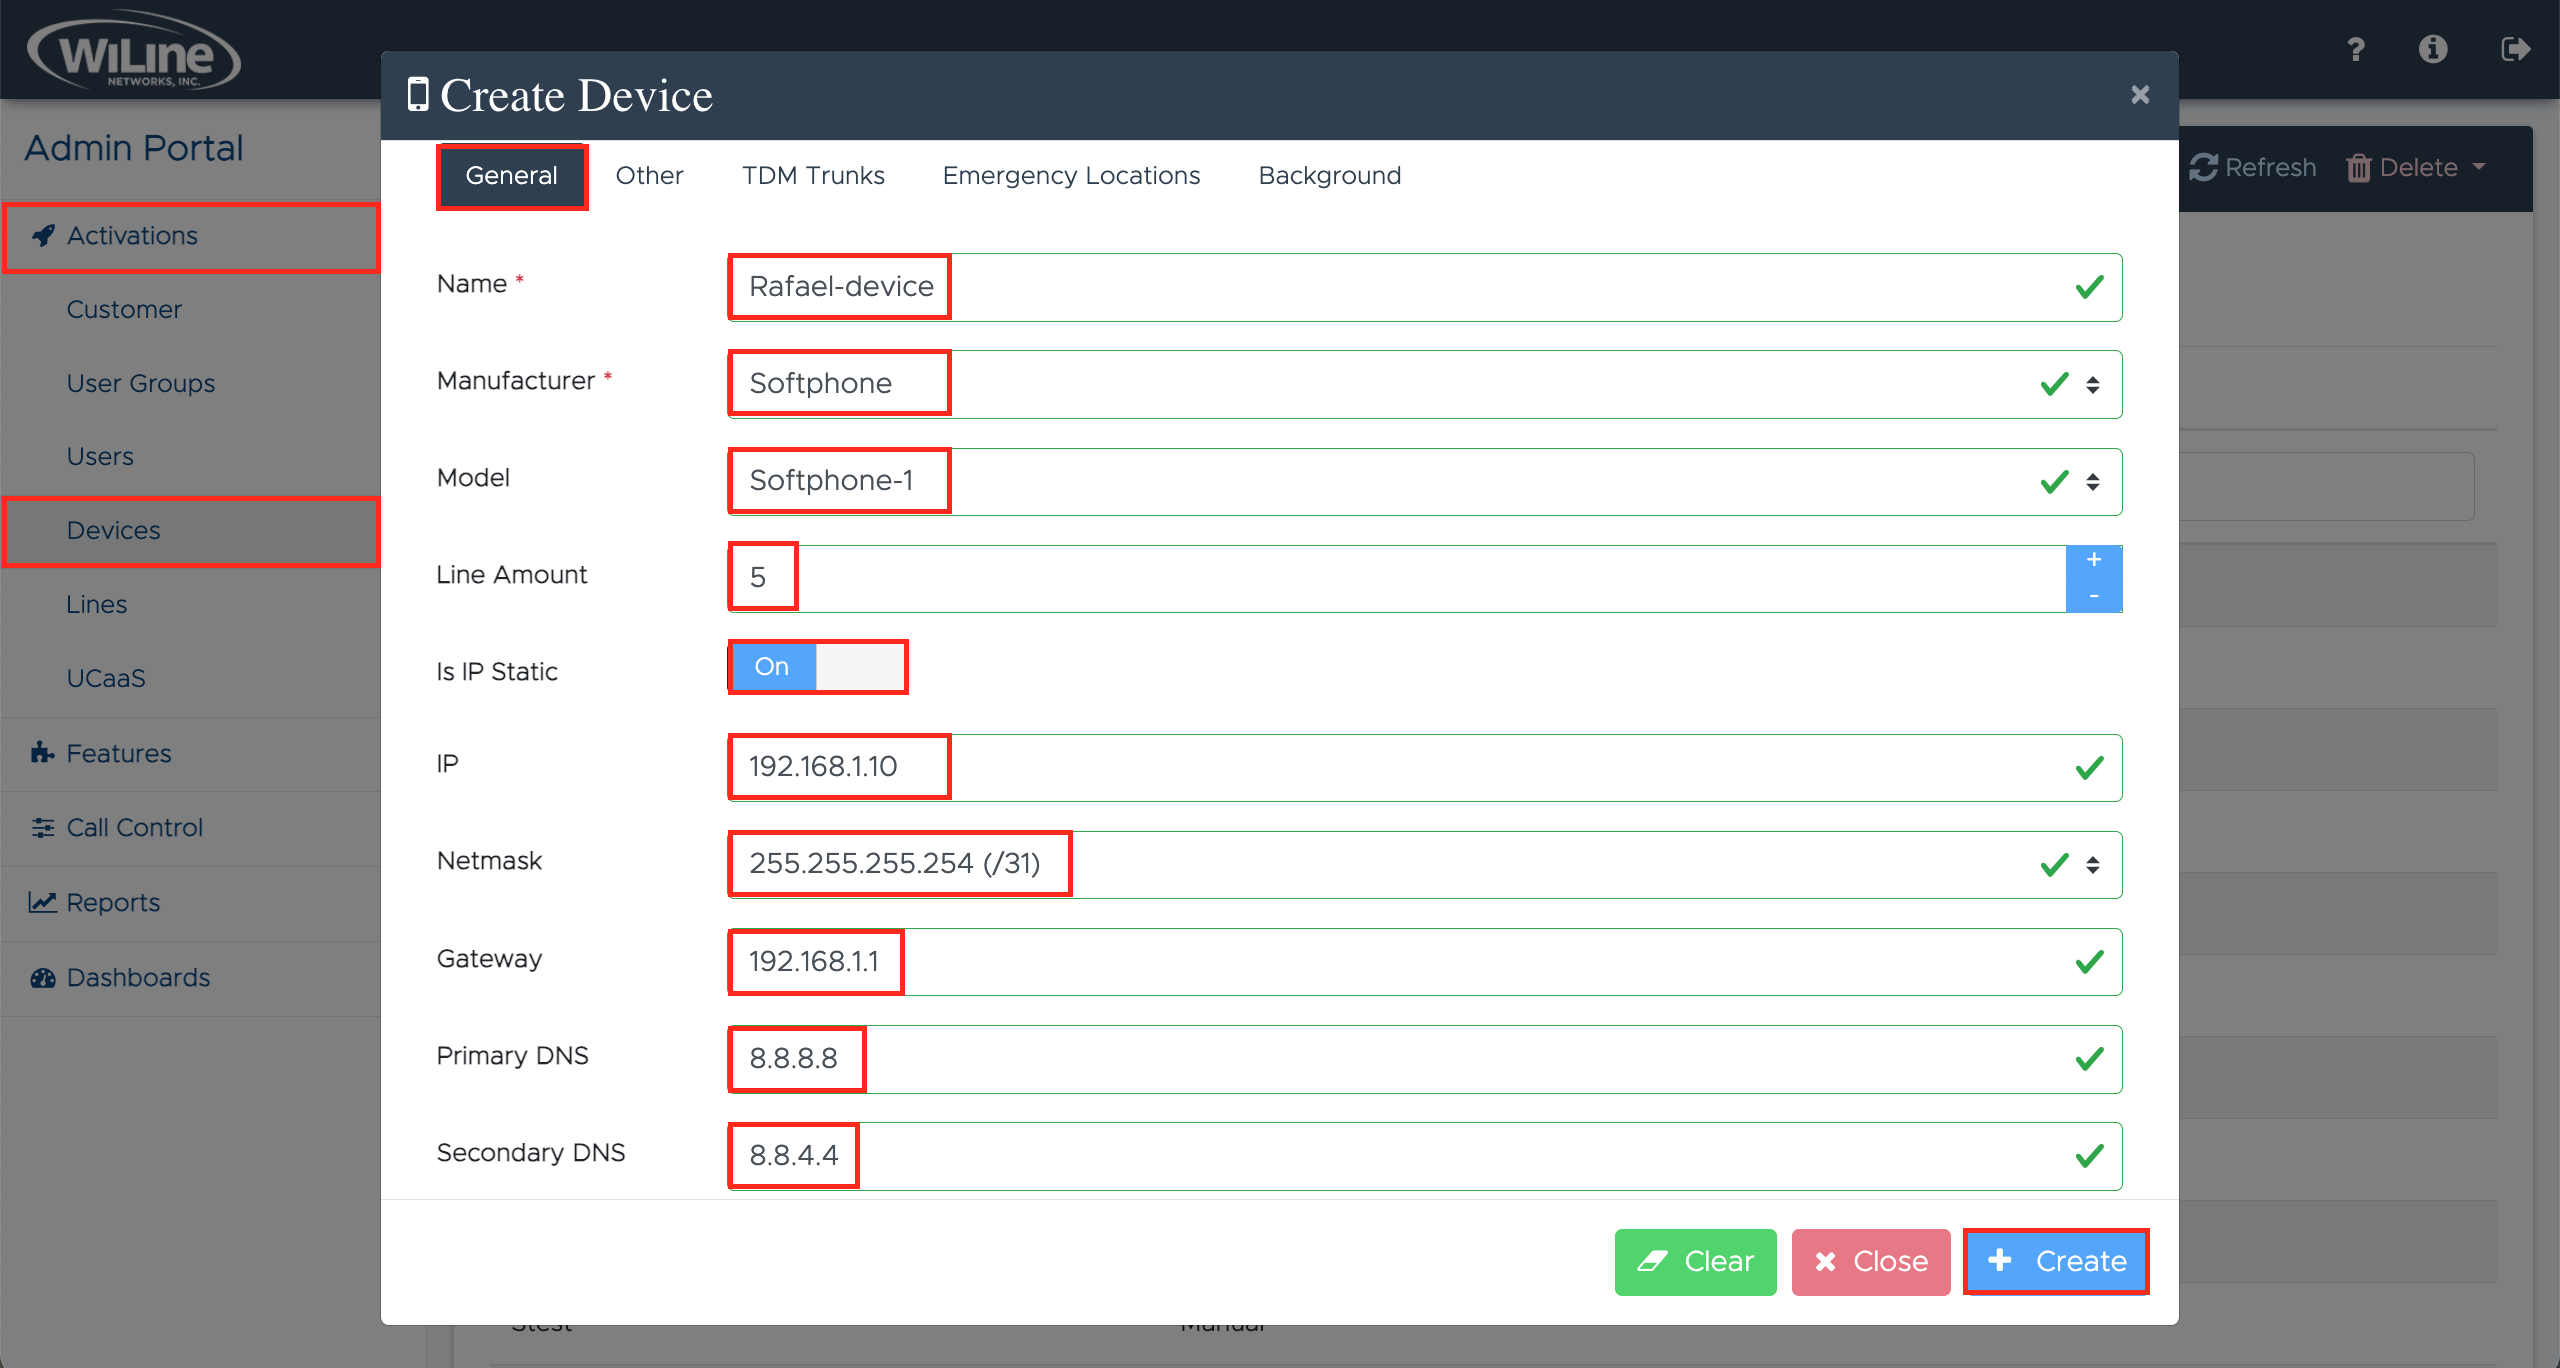
Fill out the new device's general settings:
-
Name (required): Enter a descriptive name for the device.
E.g.,Rafael-deviceFORMAT GUIDELINESAllowed characters: letters, numbers, spaces, underscores (_), and hyphens (-).
-
Manufacturer (required): Select the manufacturer of the device from the dropdown menu.
E.g.,Softphone -
Model (optional): Enter the model name or number of the device.
E.g.,Softphone-1 -
Line Amount (optional): Specify the number of concurrent lines the device can handle.
E.g.,5 -
Is IP Static (optional): Toggle the switch to
OnorOffto specify whether the IP address assigned to the device is static. -
IP (optional): Enter the IP address assigned to the device.
E.g.,192.168.1.10 -
Netmask (optional): Select the subnet mask for the network from the dropdown.
E.g.,255.255.255.254 (/31) -
Gateway (optional): Enter the IP address of the network gateway.
E.g.,192.168.1.1 -
Primary DNS (optional): Enter the IP address of the primary DNS server.
E.g.,8.8.8.8 -
Secondary DNS (optional): Enter the IP address of the secondary DNS server.
E.g.,8.8.4.4 -
MAC Address (optional): Input field for MAC Address.
E.g.,E05FB981FDFBFORMAT GUIDELINESMAC addresses should not include colons (:), dots (.), or hyphens (-).
-
Enable NAT (optional): Toggle switch to
Onto enable NAT. -
External NAT IP (optional): Input field for External NAT IP.
E.g.,203.0.113.1 -
Web Password (optional): Input field for Web Password or click Auto Generate to create one.
E.g.,LIHrWiLrQh -
Provision Key (optional): Input field for Provision Key.
E.g.,abc123456def -
Enrollment Date: Select the enrollment date from the dropdown calendar.
E.g.,October 10, 2024 -
Emergency Callback Number (optional): Select an Emergency Callback Number. This number will be associated with your device in case of an emergency call.
E.g.,+1-800-555-0199
Provisioning Settings
Use the provisioning settings to pre-configure devices before deployment, ensuring they are ready for use as soon as they are powered on. This process minimizes setup time and eliminates manual configuration errors.

-
Manufacturer (required):
Select the device manufacturer from the dropdown menu.
Example:GrandstreaminfoCurrently, provisioning is supported only for Grandstream and Yealink devices.
-
Model (optional):
Enter the model name or number.
Example:GXW4248 -
MAC Address (required):
Input the device's unique MAC address. Ensure the address does not include colons, dots, or hyphens.
Example:A1B2C3D4E5F6Format GuidelinesMAC addresses should not include colons (:), dots (.), or hyphens (-).
-
Serial Number (optional):
Enter the serial number of the device.
Example:SN12345678Click Register to add the new device.
-
Provision Key:
This key is auto-generated during the provisioning process.
Example:abc123456def -
Enrollment Date (optional):
Select the cutoff date for the device provisioning to be updated.
Example:October 10, 2024tipThis field can be edited later, even after the selected date has passed.
-
RPS Server Status:
Review the device's current Remote Provisioning Server (RPS) status. It will display as Not Registered or Offline until fully configured. -
Actions:
- Reboot: Restart the device.
- Factory Reset: Reset the device to its default settings.
- Diagnostics: Run connectivity diagnostic checks.
noteIf the Diagnostics action is disabled, it is not available for your device.
Other Settings
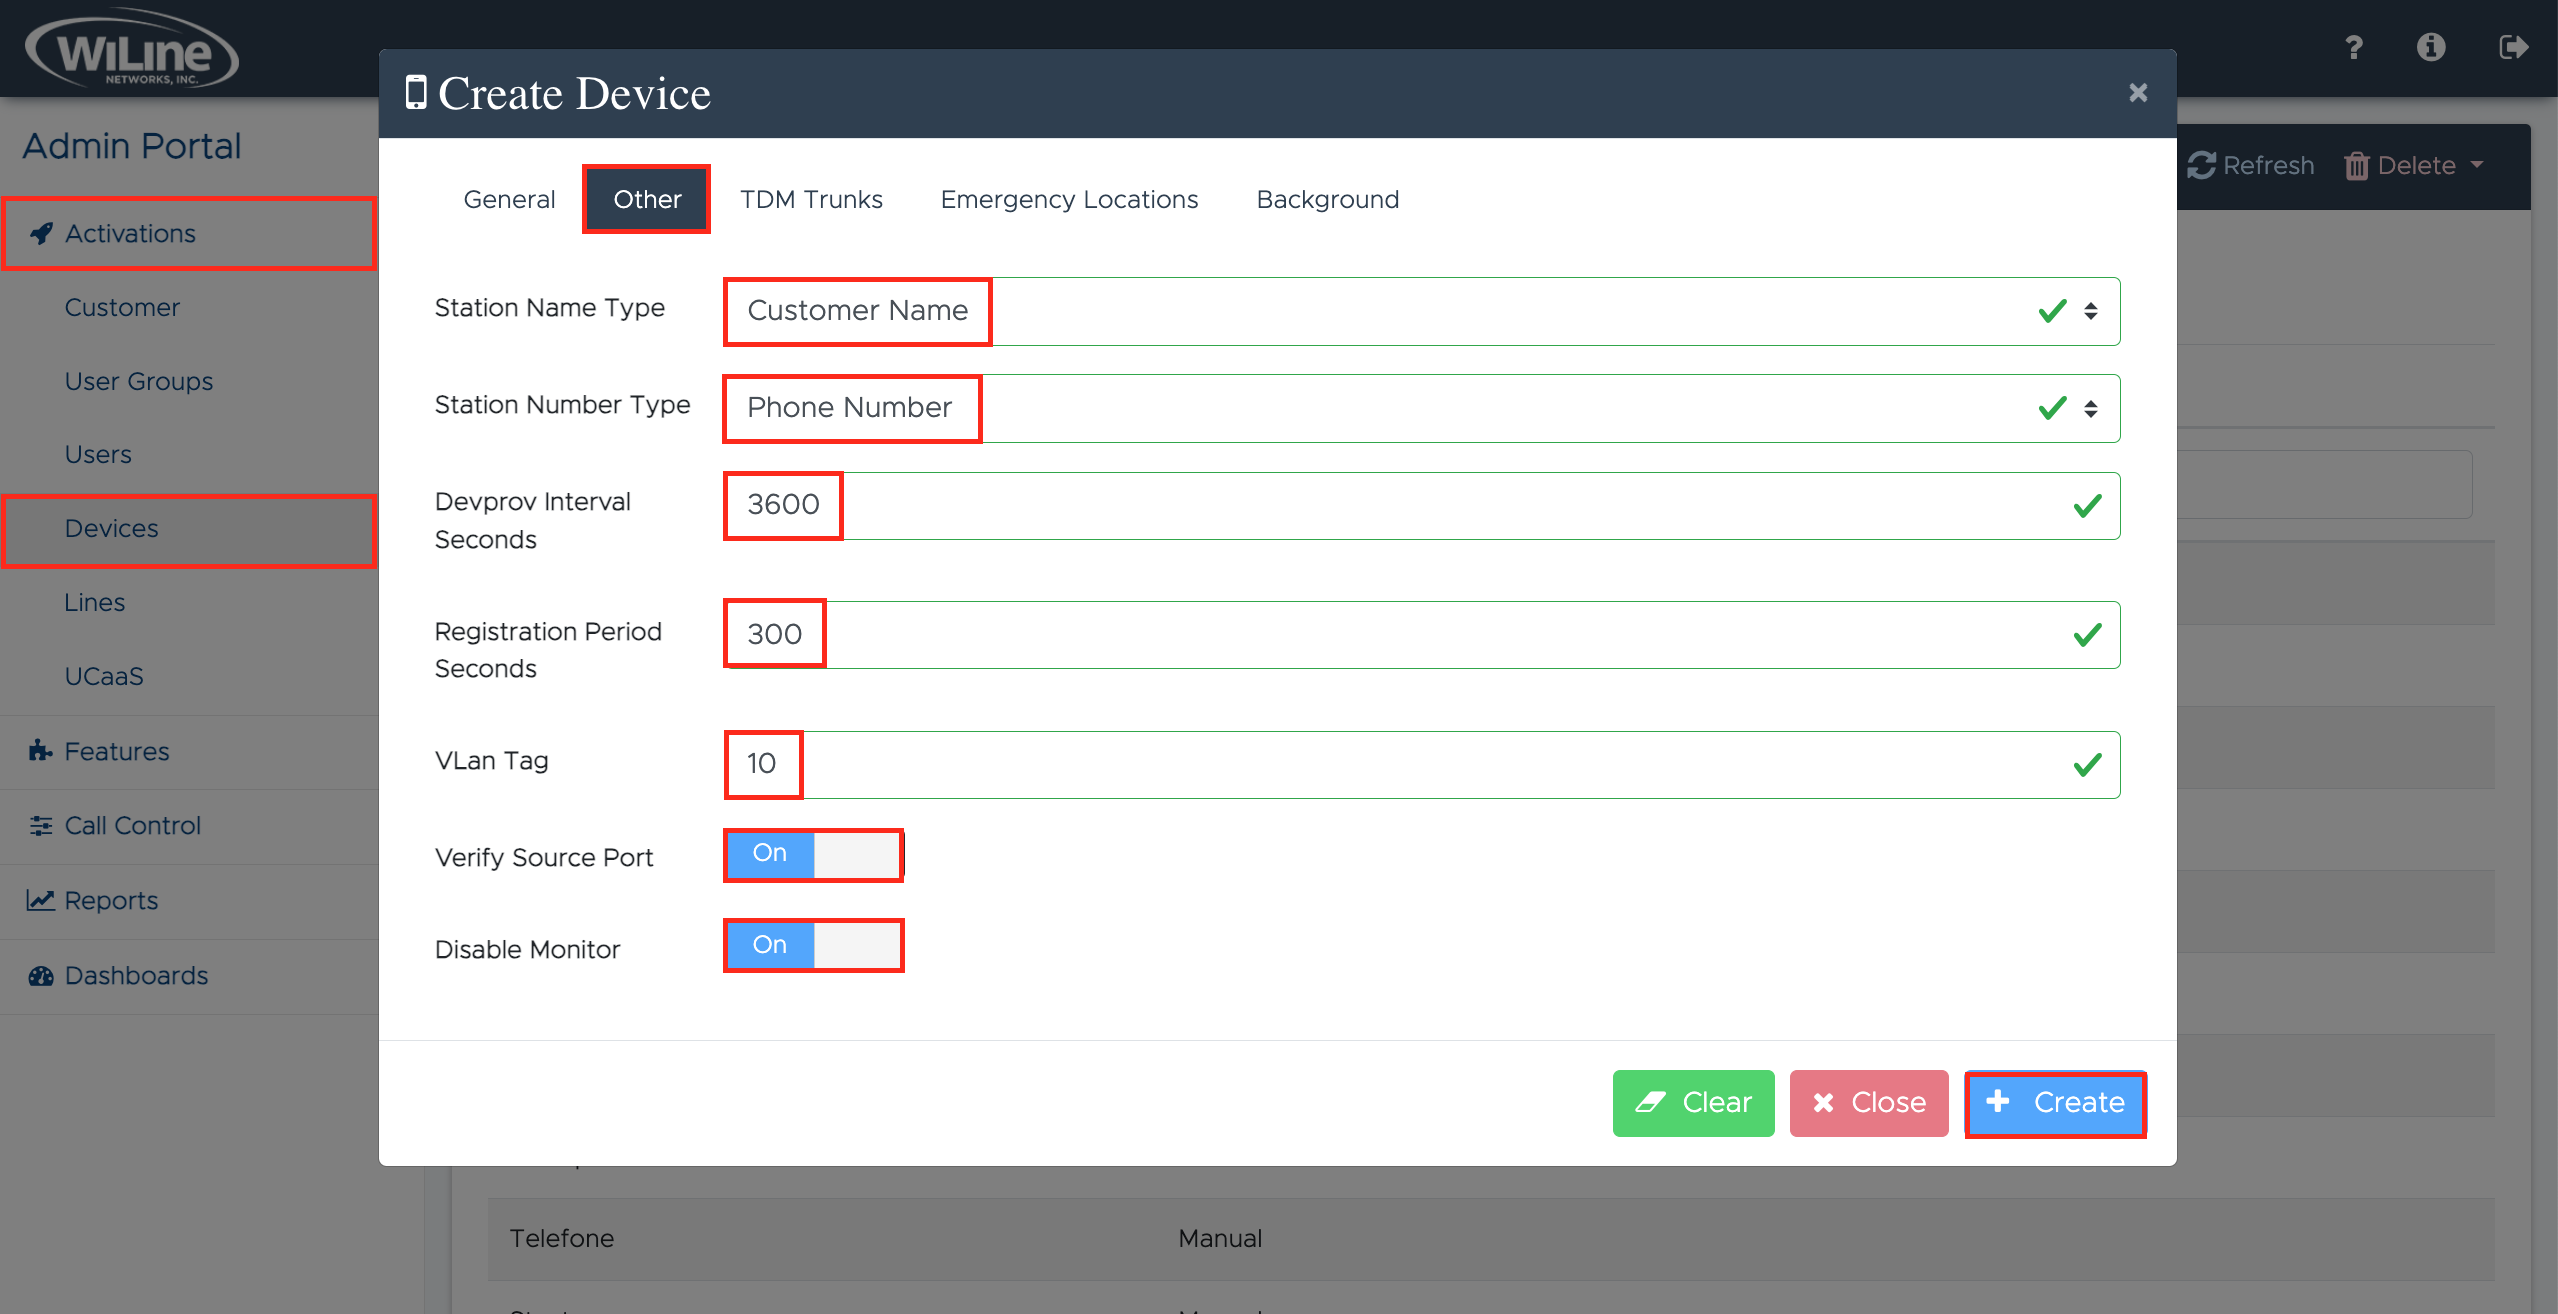
Fill out the new device's additional settings:
-
Station Name Type (required): Select the type of station name from the dropdown menu.
E.g.,Customer Name -
Station Number Type (required): Choose the type of station number from the dropdown menu.
E.g.,Phone Number -
Devprov Interval Seconds (optional): Specify the device provisioning interval in seconds. This determines how often the device checks for configuration updates.
E.g.,3600 -
Registration Period Seconds (optional): Enter the registration period in seconds. This defines how long the softphone remains registered before needing to re-register.
E.g.,300 -
VLAN Tag (optional): Enter the VLAN tag to associate the softphone with a specific Virtual Local Area Network (VLAN).
E.g.,10 -
Verify Source Port (optional): Check this option to enable verification of the source port for incoming traffic.
-
Disable Monitor (optional): Check this option to disable monitoring features for the softphone. This may affect performance and diagnostics.
TDM Trunks Settings
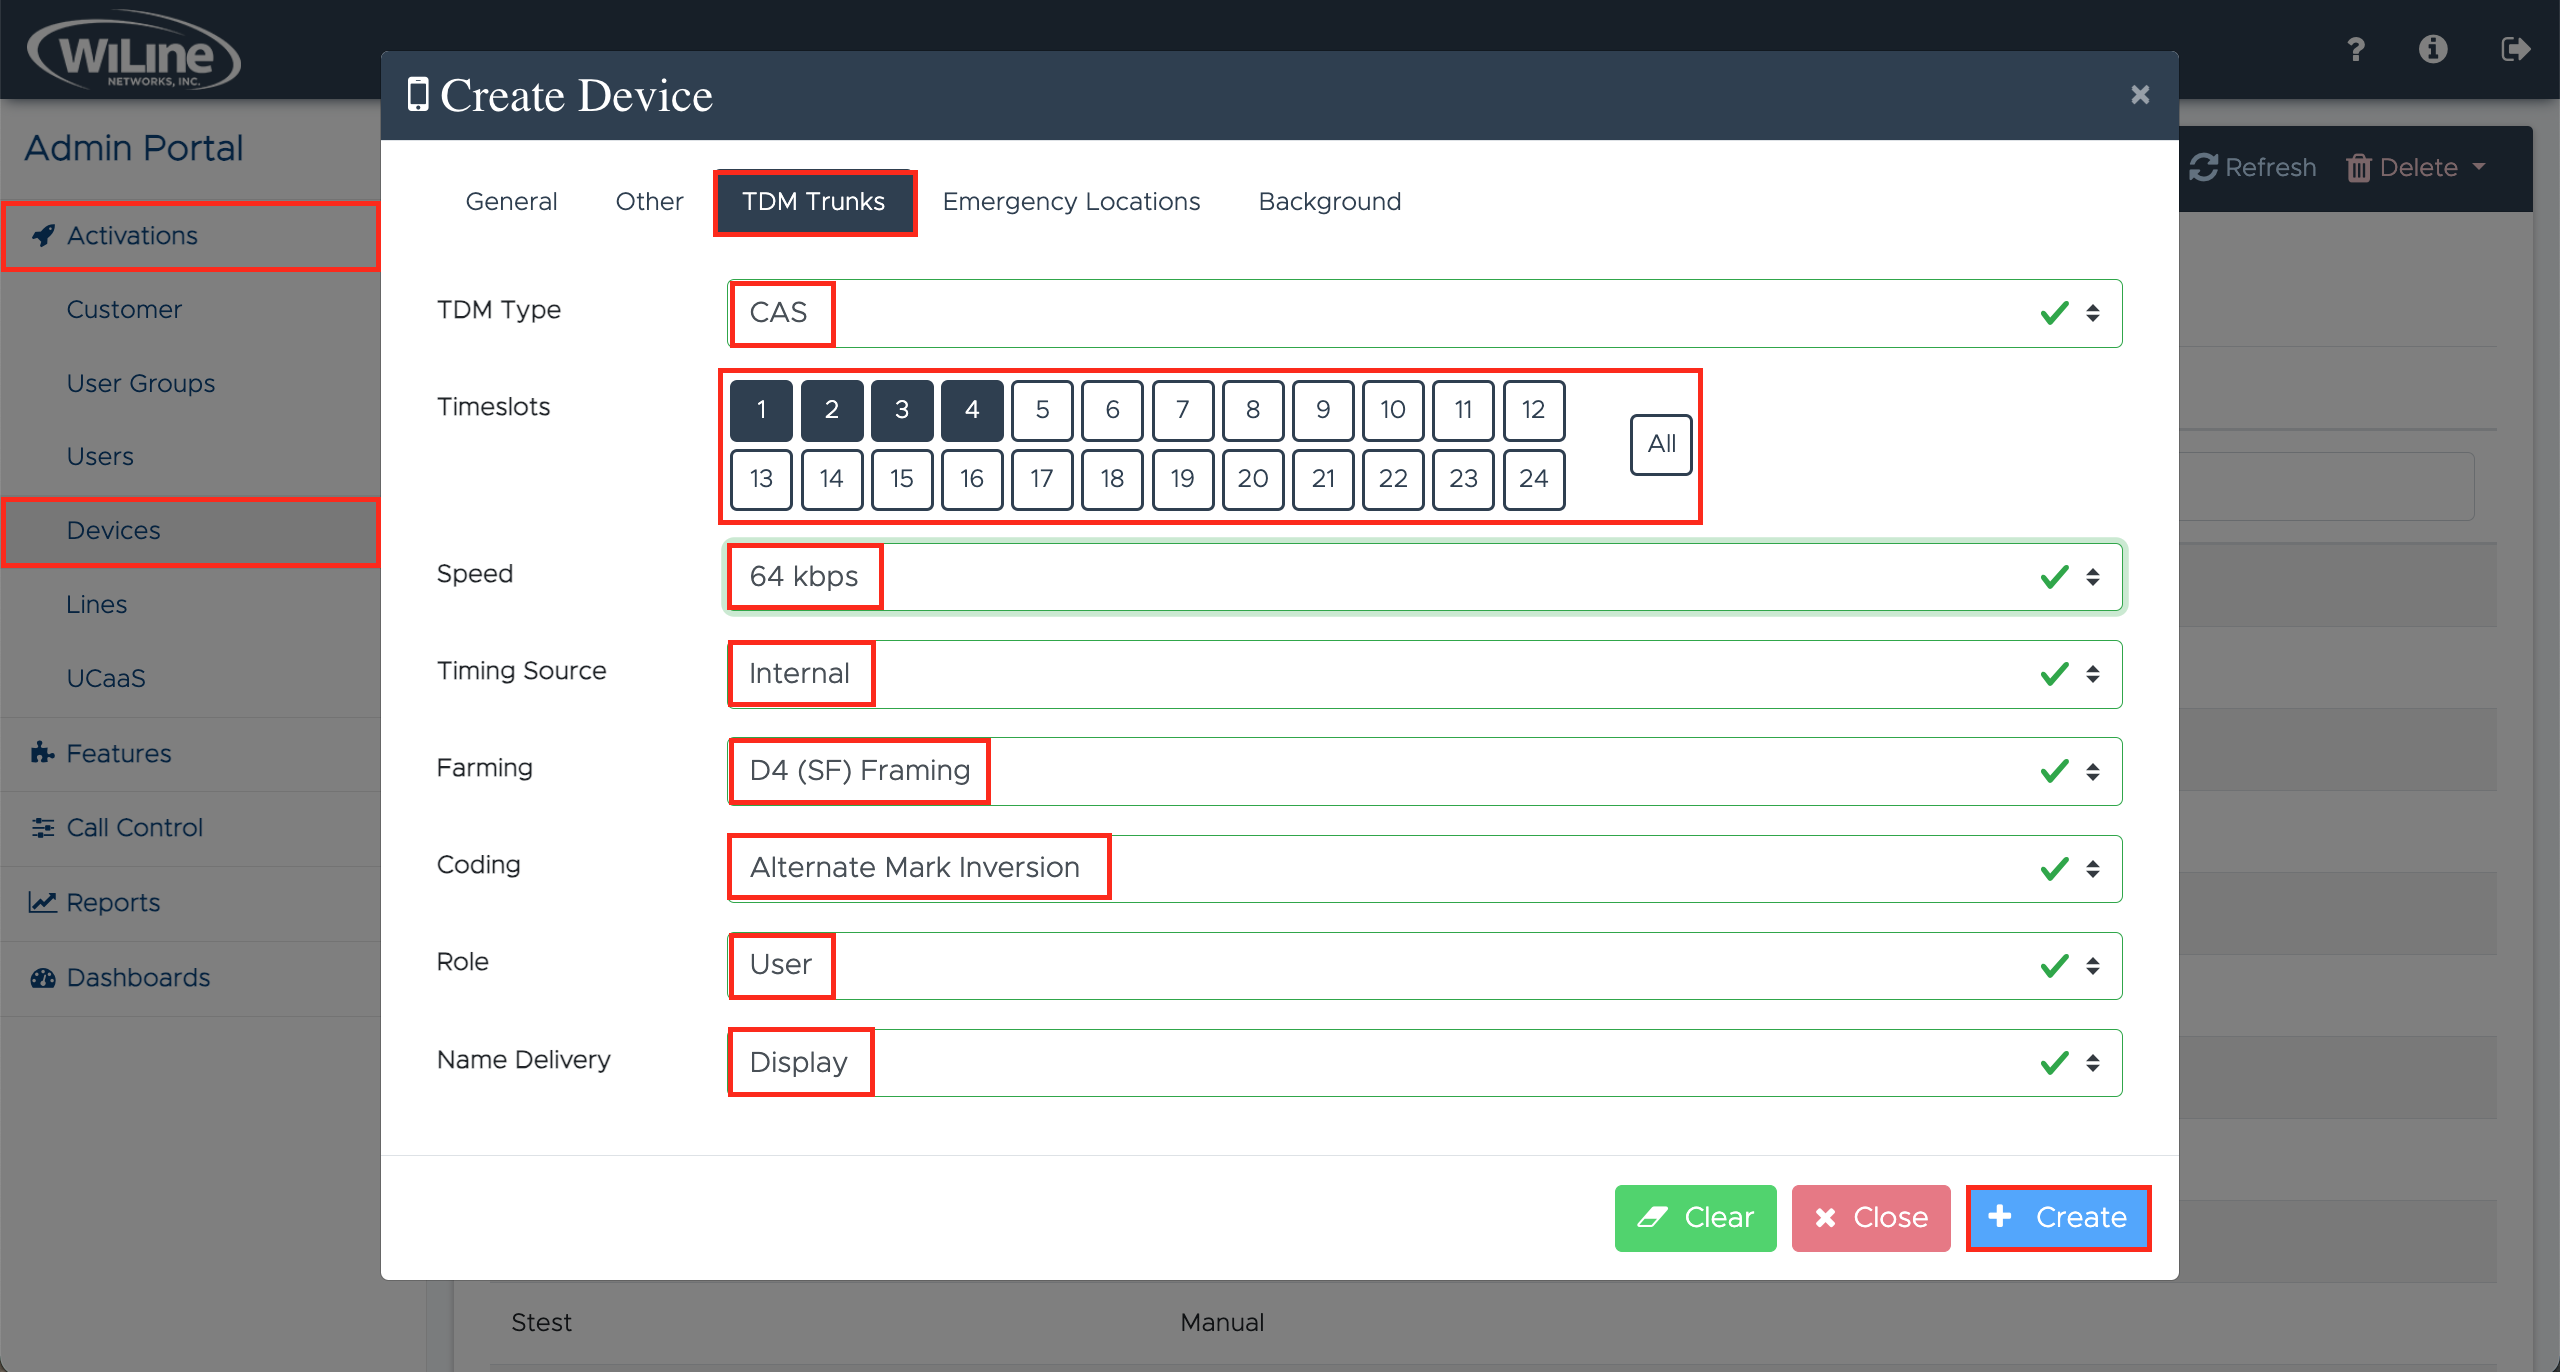
Configure the TDM trunk settings for the new device:
-
TDM Type (required): Select the type of TDM trunk from the dropdown menu.
E.g.,CAS -
Timeslots (optional): Choose the timeslots to be used for the trunk. You can select individual timeslots or choose
Allto include all available timeslots.
E.g.,1, 2, 3, 4 -
Speed (optional): Select the speed for the TDM trunk from the dropdown menu.
E.g.,64 kbps -
Timing Source (optional): Choose the timing source for synchronization from the dropdown menu.
E.g.,Internal -
Farming (optional): Select the farming option from the dropdown menu. This determines how calls are distributed among available trunks.
E.g.,D4 (SF) Framing -
Coding (optional): Choose the coding type from the dropdown menu for encoding voice signals.
E.g.,Alternate Mark Inversion -
Role (optional): Select the role of the trunk from the dropdown menu. This defines the function of the trunk in the system.
E.g.,User -
Name Delivery (optional): Choose the name delivery option to specify how caller IDs are presented.
E.g.,Display
Emergency Locations Settings
Configure the new device's location for emergency services:
Setting up the device's location details and keeping this information up to date is crucial as it allows 911 operators to accurately pinpoint your location in the event of an emergency.
- Click Add/Edit Location to select a pre-defined emergency location or to enter a new one.

Please first update the device with an Emergency Callback Number (in the General tab).
Background Settings
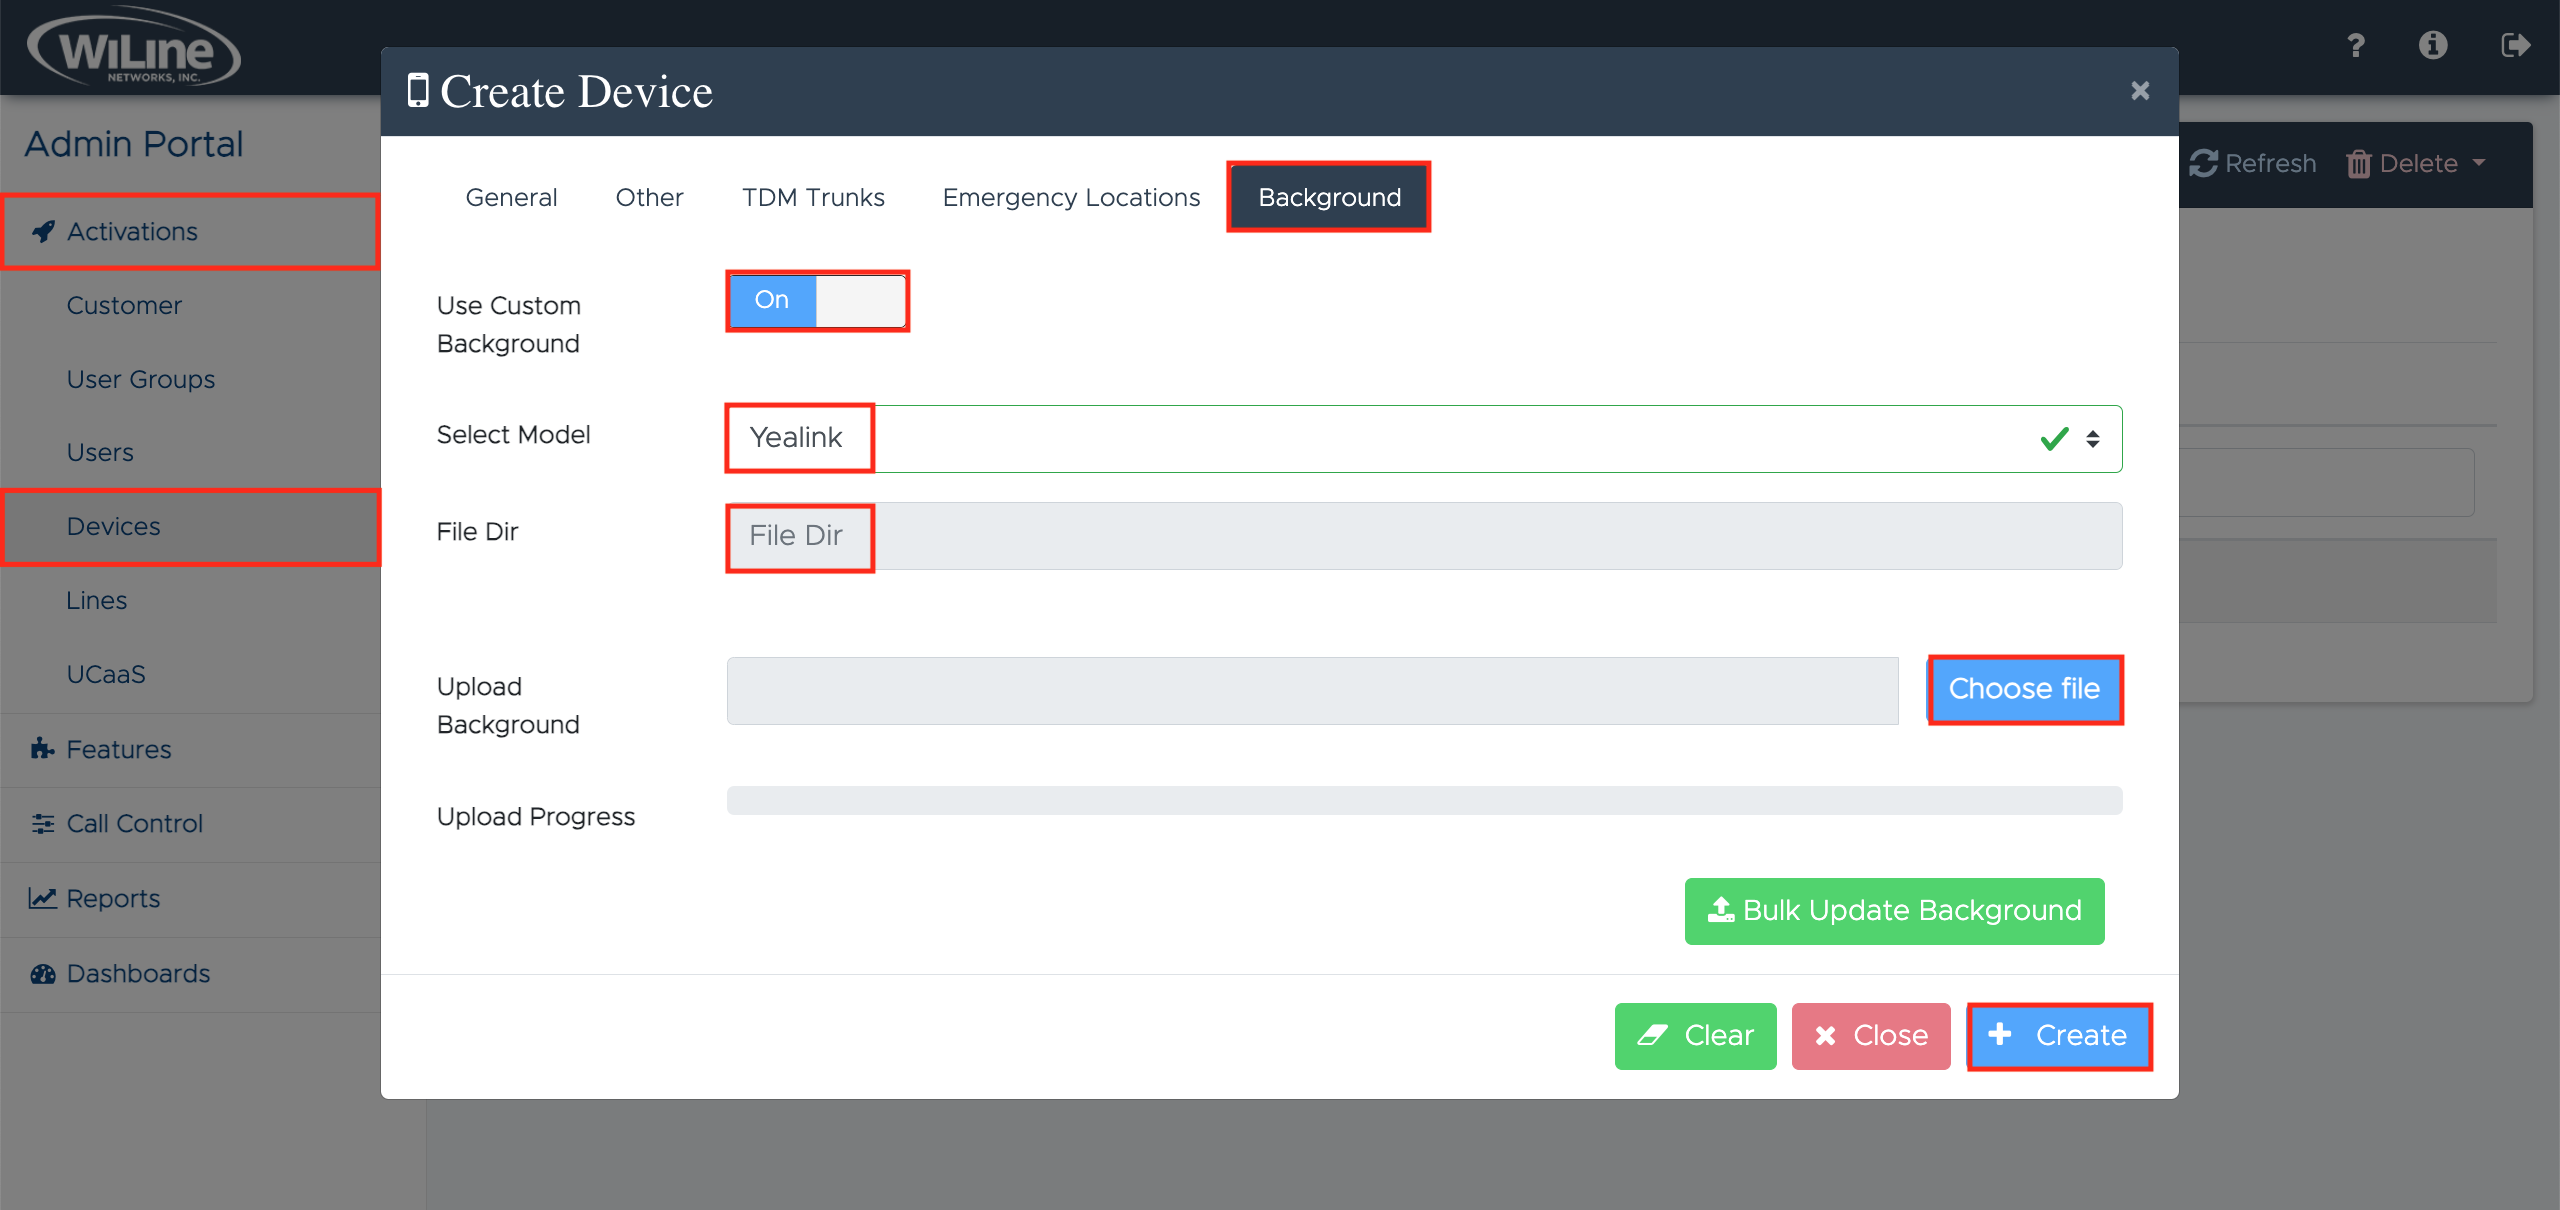
Configure the new device's background settings:
-
Use Custom Background: Toggle this option to enable the use of a custom background.
-
Select Model: Choose a model from the dropdown menu.
Options:Yealink,Spa,Polycom,Panasonic,Grandstream,Cpxxxx -
File Dir: It indicates the directory where background files are stored (cannot be altered).
-
Upload Background: Click the Choose File button to select a background image file from your device.
E.g.,background.jpg -
Upload Progress: This section shows the progress of the background image upload.
-
Bulk Update Background: Click to apply the same background to multiple devices at once.
Once you’ve filled in all fields, click Create to add the device. To clear all entries and start over, click Clear, or select Close to exit without saving changes.
View or Edit a Device
To view a device, follow these steps:
- Log in to the Admin Portal.
- Navigate to Activations > Devices from the left-side menu.
A list of all your created devices will appear on your dashboard:
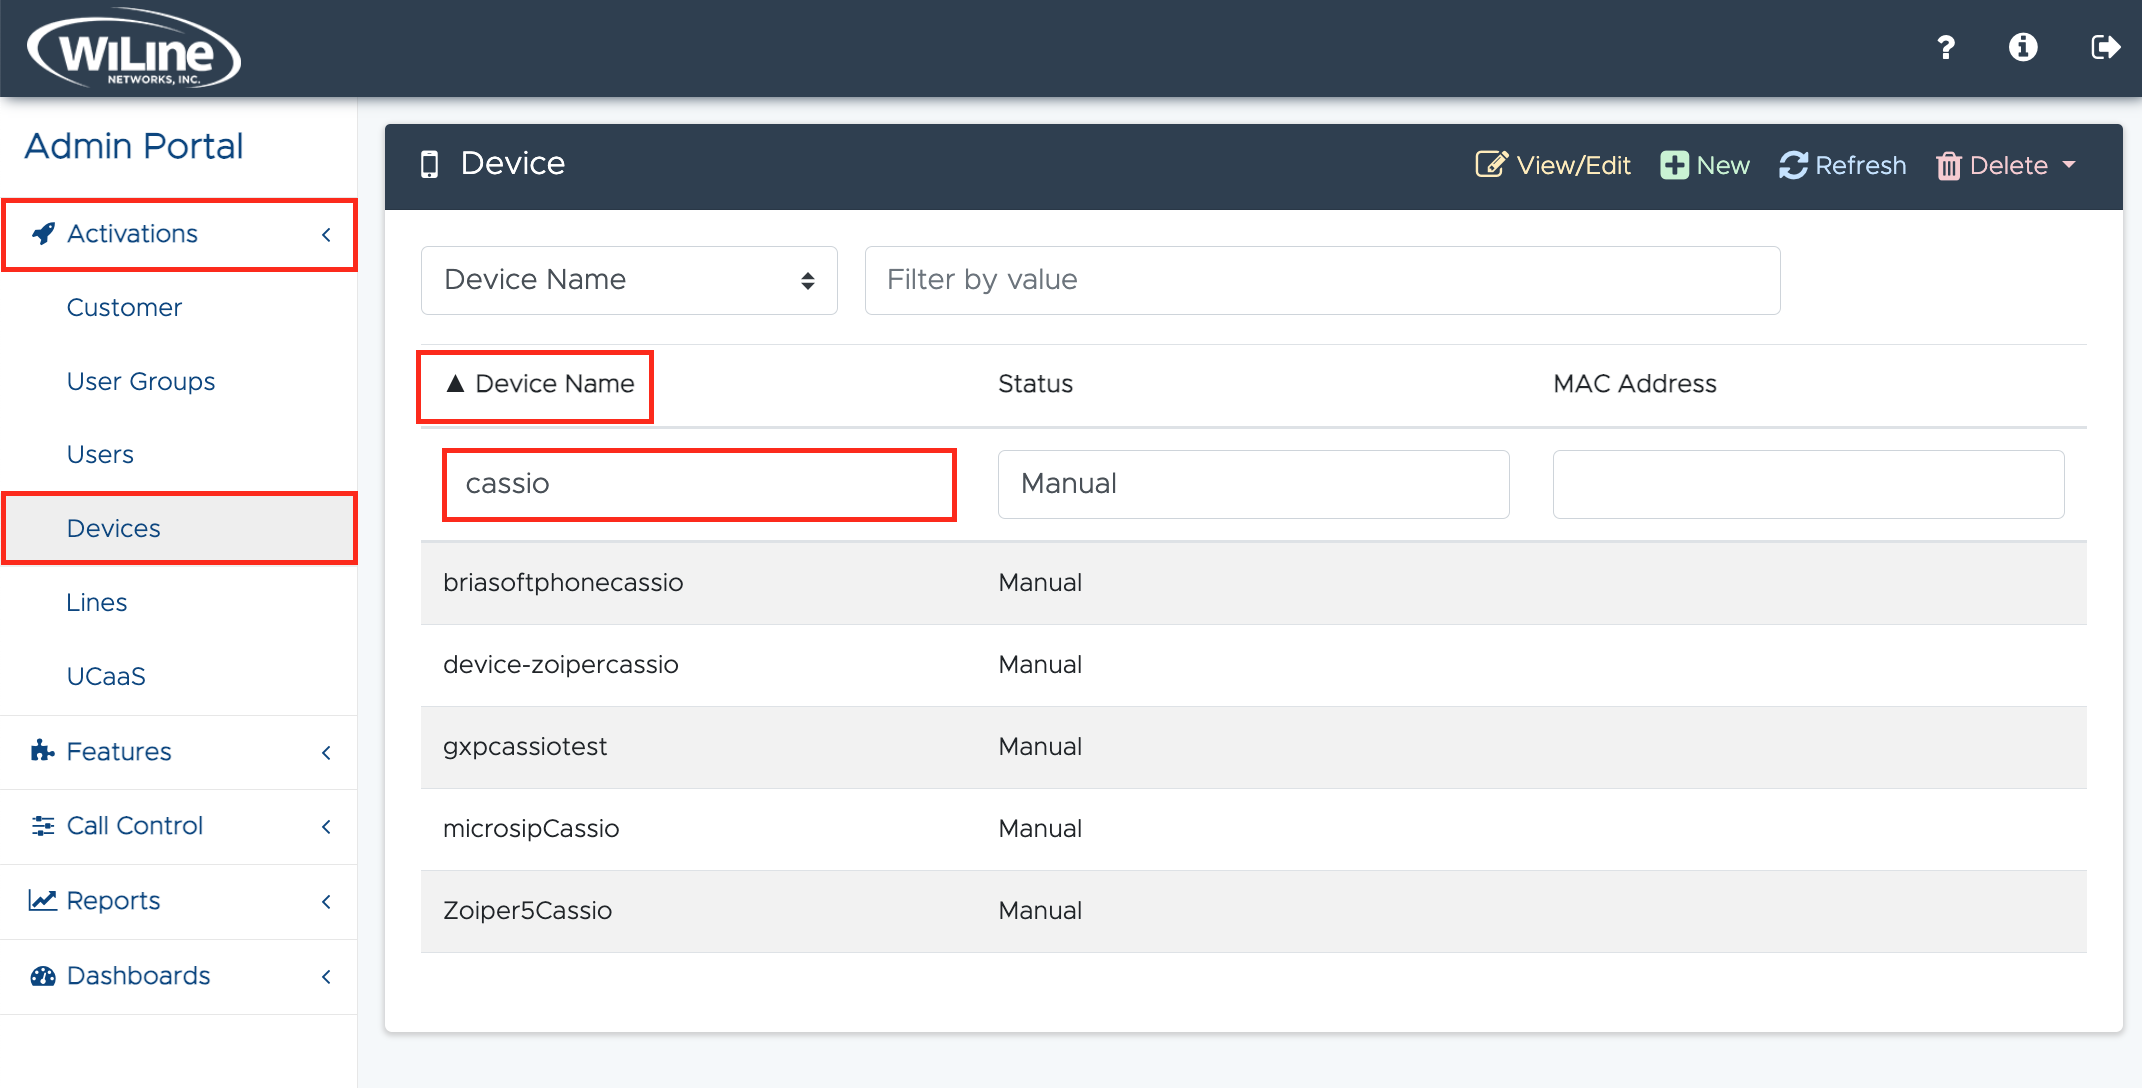
- To reorder or filter the results:
- Click the column headers Device Name, Status and MAC Address to organize the results in ascending or descending order.
- To filter or search for specific items, type in the fields under the corresponding headers. You can also choose a header from the dropdown under Device and type in the field on the right.
Edit a Device
To edit a device:
- Double-click an item from the list, or
- Select a device and click the yellow View/Edit button in the options bar.
An Edit Device pop-up will open, allowing you to modify the device details.
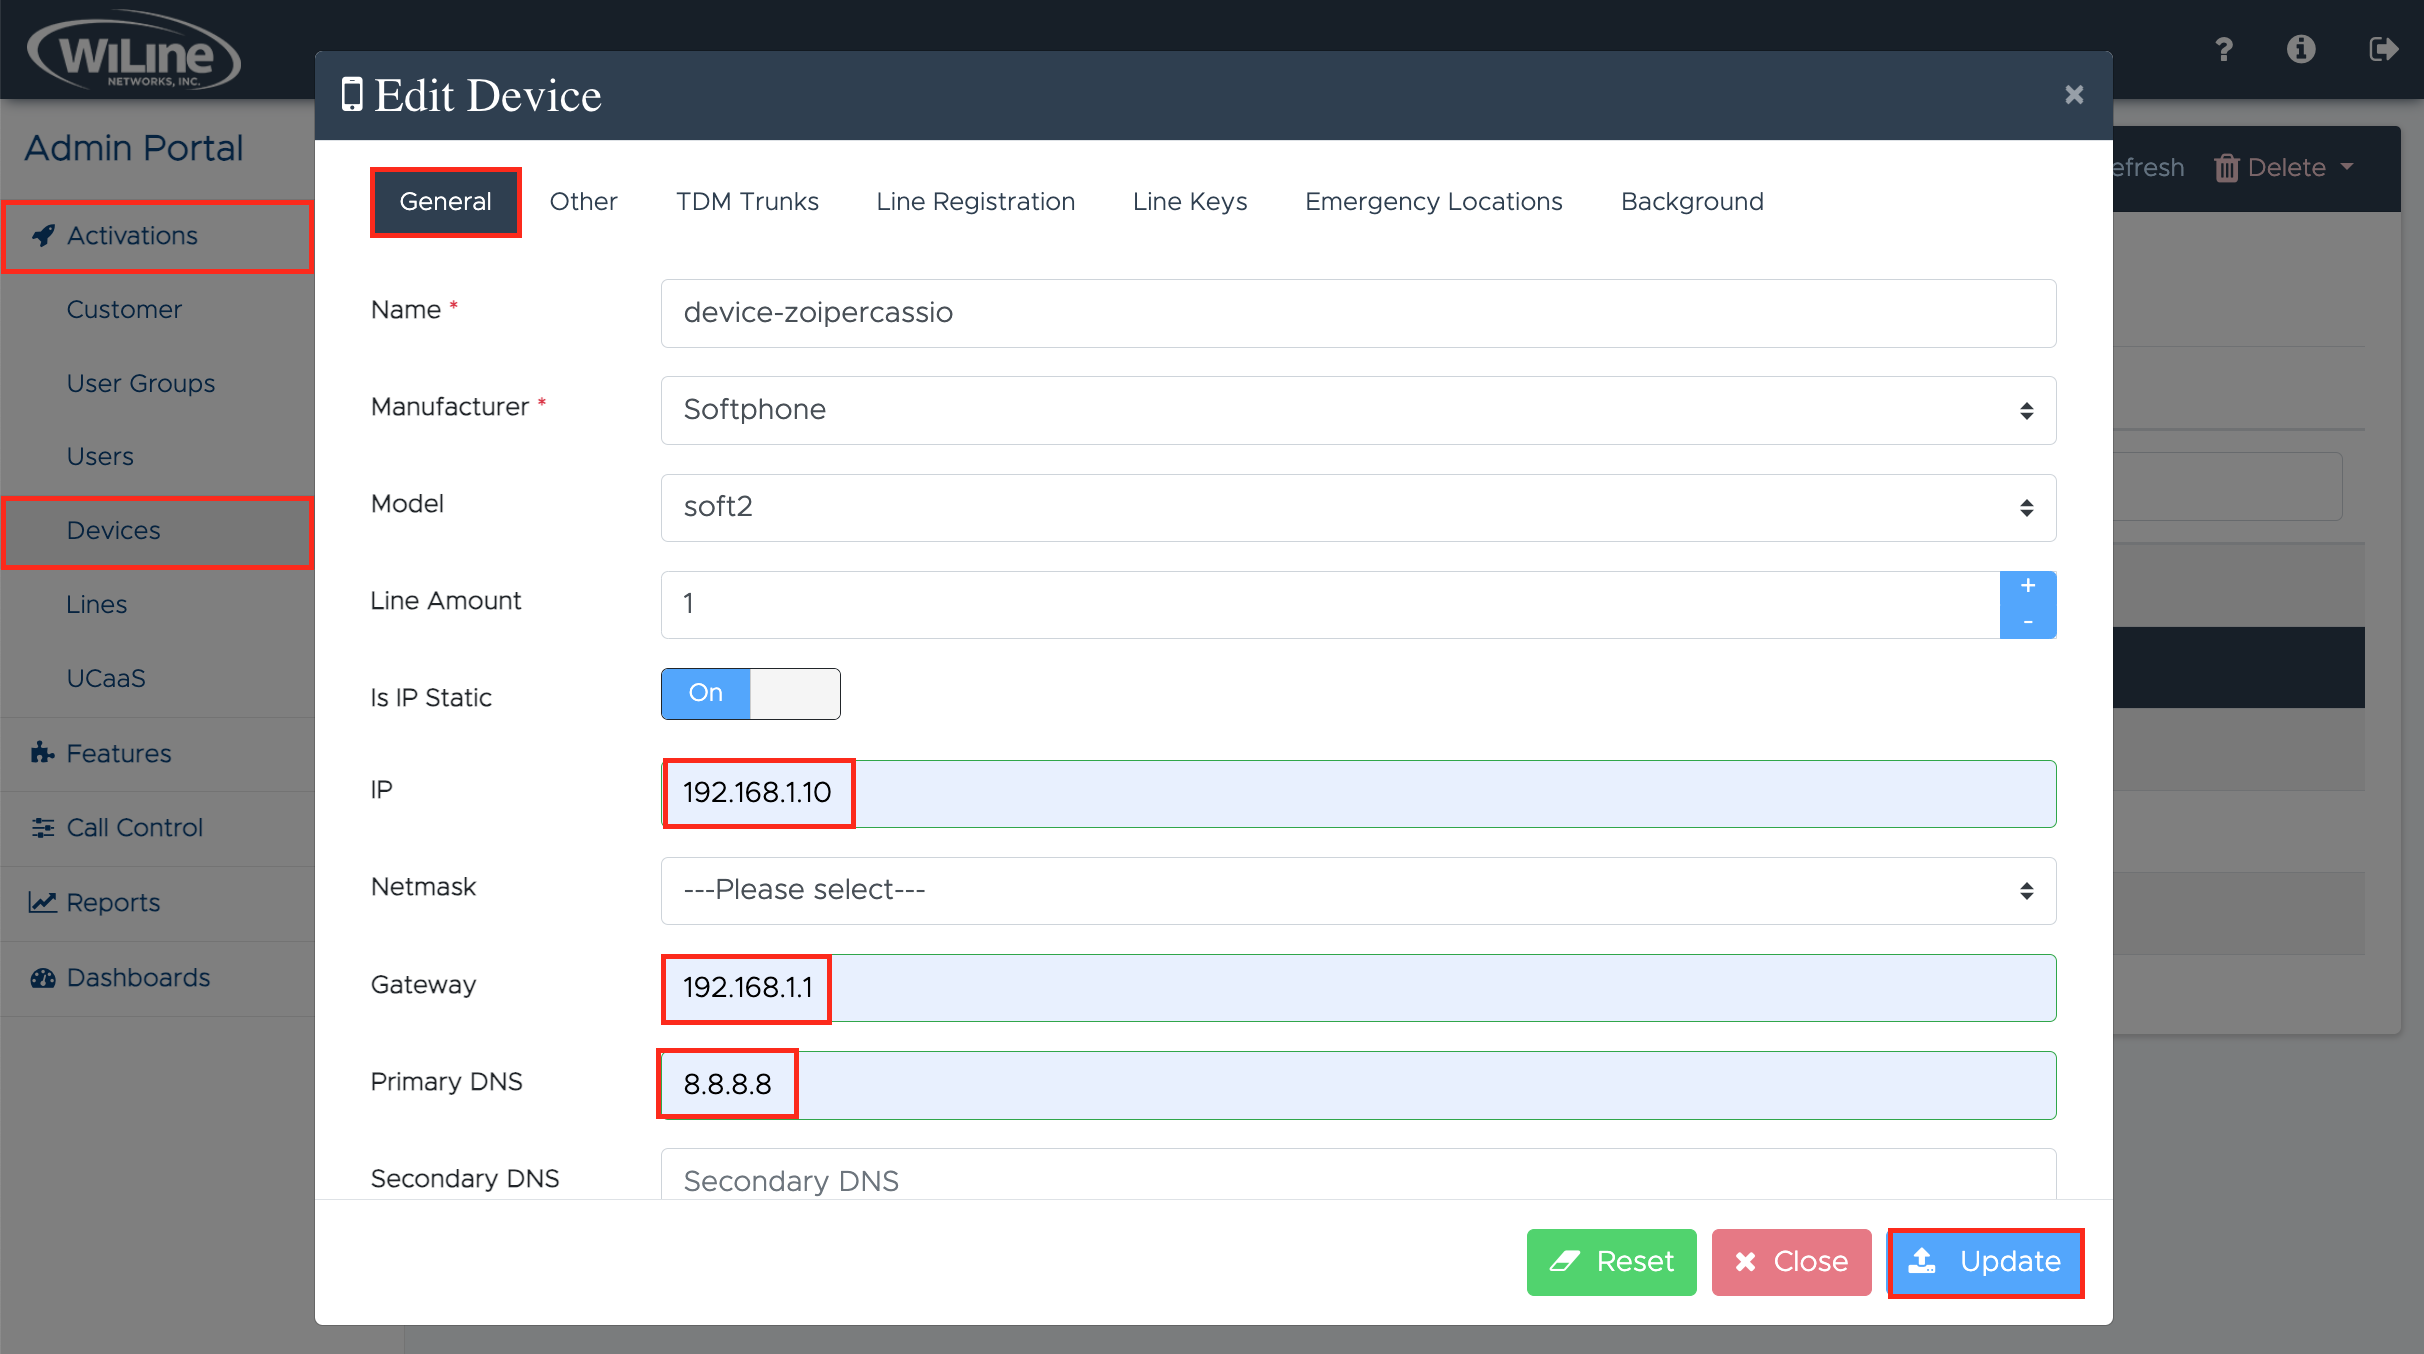
- Follow these steps, similar to the instructions in the Create a New Device section, to update the device details:
- General
- Provisioning
- Other Settings
- TDM Trunks
- Emergency Locations
- Background
General Settings
Adjust the device's general settings:
-
Name (required): Update the device name to a new identifier.
E.g.,Rafael-deviceInput GuidelinesThe name may contain letters, numbers, spaces, underscores (_), or hyphens (-).
-
Manufacturer (required): Select the manufacturer from the list.
E.g.,Softphone -
Model (optional): Enter or update the model specification.
E.g.,Softphone-1 -
Line Amount (optional): Indicate a different number of lines if needed.
E.g.,5 -
Is IP Static (optional): Enable or disable static IP assignment.
-
IP (optional): Modify the IP address as necessary.
E.g.,192.168.1.10 -
Netmask (optional): Choose a new subnet mask value.
E.g.,255.255.255.254 (/31) -
Gateway (optional): Update the gateway IP address.
E.g.,192.168.1.1 -
Primary DNS (optional): Change the primary DNS address.
E.g.,8.8.8.8 -
Secondary DNS (optional): Enter a secondary DNS IP address if applicable.
E.g.,8.8.4.4 -
MAC Address (optional): Adjust the MAC Address for the device.
E.g.,E05FB981FDFBFormat GuidelinesMAC addresses should be entered without colons (:), dots (.), or hyphens (-).
-
Enable NAT (optional): Switch NAT settings on or off.
-
External NAT IP (optional): Specify the external NAT IP address.
E.g.,203.0.113.1 -
Web Password (optional): Input or regenerate a new web password.
E.g.,LIHrWiLrQh -
Provision Key (optional): Modify the device's Provision Key.
E.g.,abc123456def -
Enrollment Date: Choose a new enrollment date.
E.g.,October 10, 2024 -
Emergency Callback Number (optional): Update the emergency callback number if required.
E.g.,+1-800-555-0199
Provisioning Settings
Edit provisioning settings to modify pre-configured devices. This helps reduce user setup time and prevents manual configuration errors.
-
Manufacturer (required):
Select the device manufacturer from the dropdown menu.
Example:GrandstreaminfoCurrently, provisioning is supported only for Grandstream and Yealink devices.
-
Model (optional):
Enter the device's model name or number.
Example:GXW4248 -
MAC Address (required):
Input the device's unique MAC address without colons, dots, or hyphens.
Example:A1B2C3D4E5F6Format GuidelinesMAC addresses must not include colons (:), dots (.), or hyphens (-).
-
Serial Number (optional):
Enter the device's serial number.
Example:SN12345678Click Register to add the new device.
-
Provision Key:
This key is auto-generated during the provisioning process.
Example:abc123456def -
Enrollment Date (optional):
Set the cutoff date for updating the device provisioning.
Example:October 10, 2024tipThis field can be updated later, even after the specified date has passed.
-
RPS Server Status:
Check the device's current Remote Provisioning Server (RPS) status, which will show as Not Registered or Offline until fully configured. -
Actions:
- Reboot: Restart the device.
- Factory Reset: Reset the device to its default settings.
- Diagnostics: Run connectivity diagnostic checks.
noteIf Diagnostics is disabled, it is unavailable for your device.
Other Settings
Customize further aspects of the device's configuration:
-
Station Name Type (required): Change the station name type according to preference.
E.g.,Customer Name -
Station Number Type (required): Update the number type for this device.
E.g.,Phone Number -
Devprov Interval Seconds (optional): Specify a new provisioning interval time.
E.g.,3600 -
Registration Period Seconds (optional): Adjust the registration period.
E.g.,300 -
VLAN Tag (optional): Enter a VLAN tag if necessary.
E.g.,10 -
Verify Source Port (optional): Turn on or off the source port verification.
-
Disable Monitor (optional): Enable or disable device monitoring.
TDM Trunks Configuration
Revise the settings related to TDM trunks:
-
TDM Type (required): Select the desired TDM trunk type.
E.g.,CAS -
Timeslots (optional): Specify the appropriate timeslots.
E.g.,1, 2, 3, 4 -
Speed (optional): Adjust the speed as needed.
E.g.,64 kbps -
Timing Source (optional): Select the timing source for synchronization.
E.g.,Internal -
Farming (optional): Configure the trunk farming options.
E.g.,D4 (SF) Framing -
Coding (optional): Update the coding method.
E.g.,Alternate Mark Inversion -
Role (optional): Assign a role to the trunk.
E.g.,User -
Name Delivery (optional): Set up name delivery preferences.
E.g.,Display
Emergency Location Configuration
Edit emergency location details for the device:
- Click Add/Edit Location to modify emergency location settings.
Ensure the Emergency Callback Number is filled in under General settings.
Background Configuration
Customize the background settings for the device:
-
Use Custom Background: Enable or disable the custom background option.
-
Select Model: Choose the specific model to apply the background.
Available models:Yealink,Spa,Polycom,Panasonic,Grandstream,Cpxxxx -
File Dir: Displays the directory path for the background file (read-only).
-
Upload Background: Upload a new image as the device background.
E.g.,background.jpg -
Upload Progress: Monitor the progress of the background upload.
-
Bulk Update Background: Apply the new background to multiple devices.
When you're done, click Update to save your edits. If you prefer to start over, click Reset, or select Close to exit without saving any modifications.
Delete a Device
To delete a device, follow these steps:
- Log in to the Admin Portal.
- Navigate to Activations > Devices from the left-side menu.
- Select the device from the list.
- Click the red Delete button in the options bar.
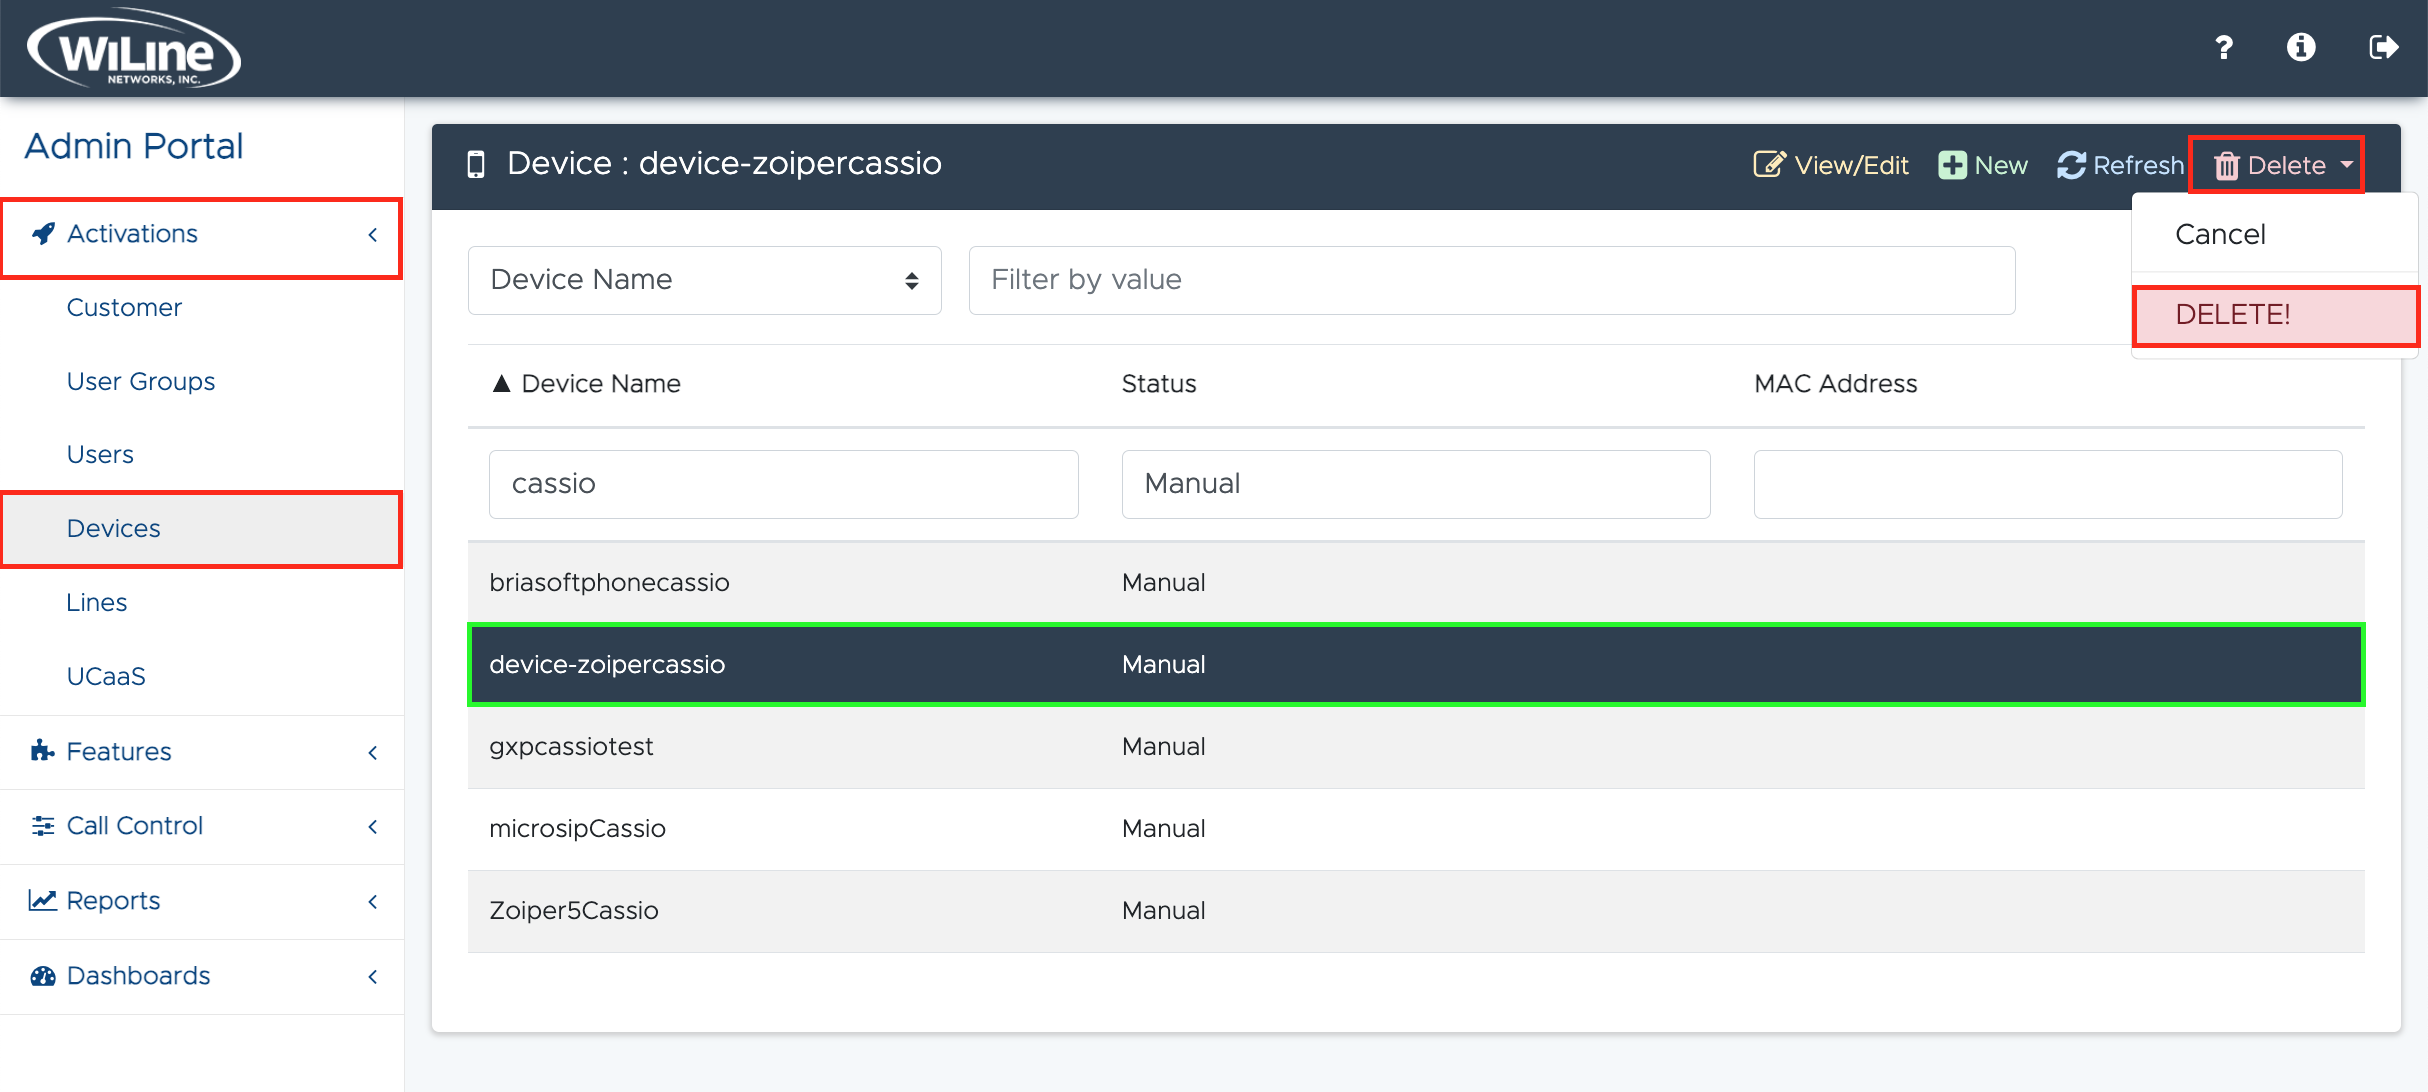
A confirmation pop-up will appear. Click Delete to confirm, or Cancel to stop the process.
You can only delete devices that you created.
By following these steps, administrators can effectively update and manage device configurations within the Admin Portal to ensure optimal performance and alignment with your specific requirements.