Manage User Groups
In the Admin Portal, administrators can create and customize user groups to organize users based on call preferences, restrictions, and presentation settings. For example, you could create a Sales Team group with unified caller ID settings for outbound calls. This feature helps manage settings across groups with similar needs efficiently.
Create a New User Group
To create a new user group, follow these steps:
- Log in to the Admin Portal.
- Navigate to Activations > User Groups from the left-side menu.
- Click the New button in the top blue bar to open the user group creation form.
A Create User pop-up will guide you through the different settings options:
- General
- Caller Presentation
- Restrictions
- Other
General Settings
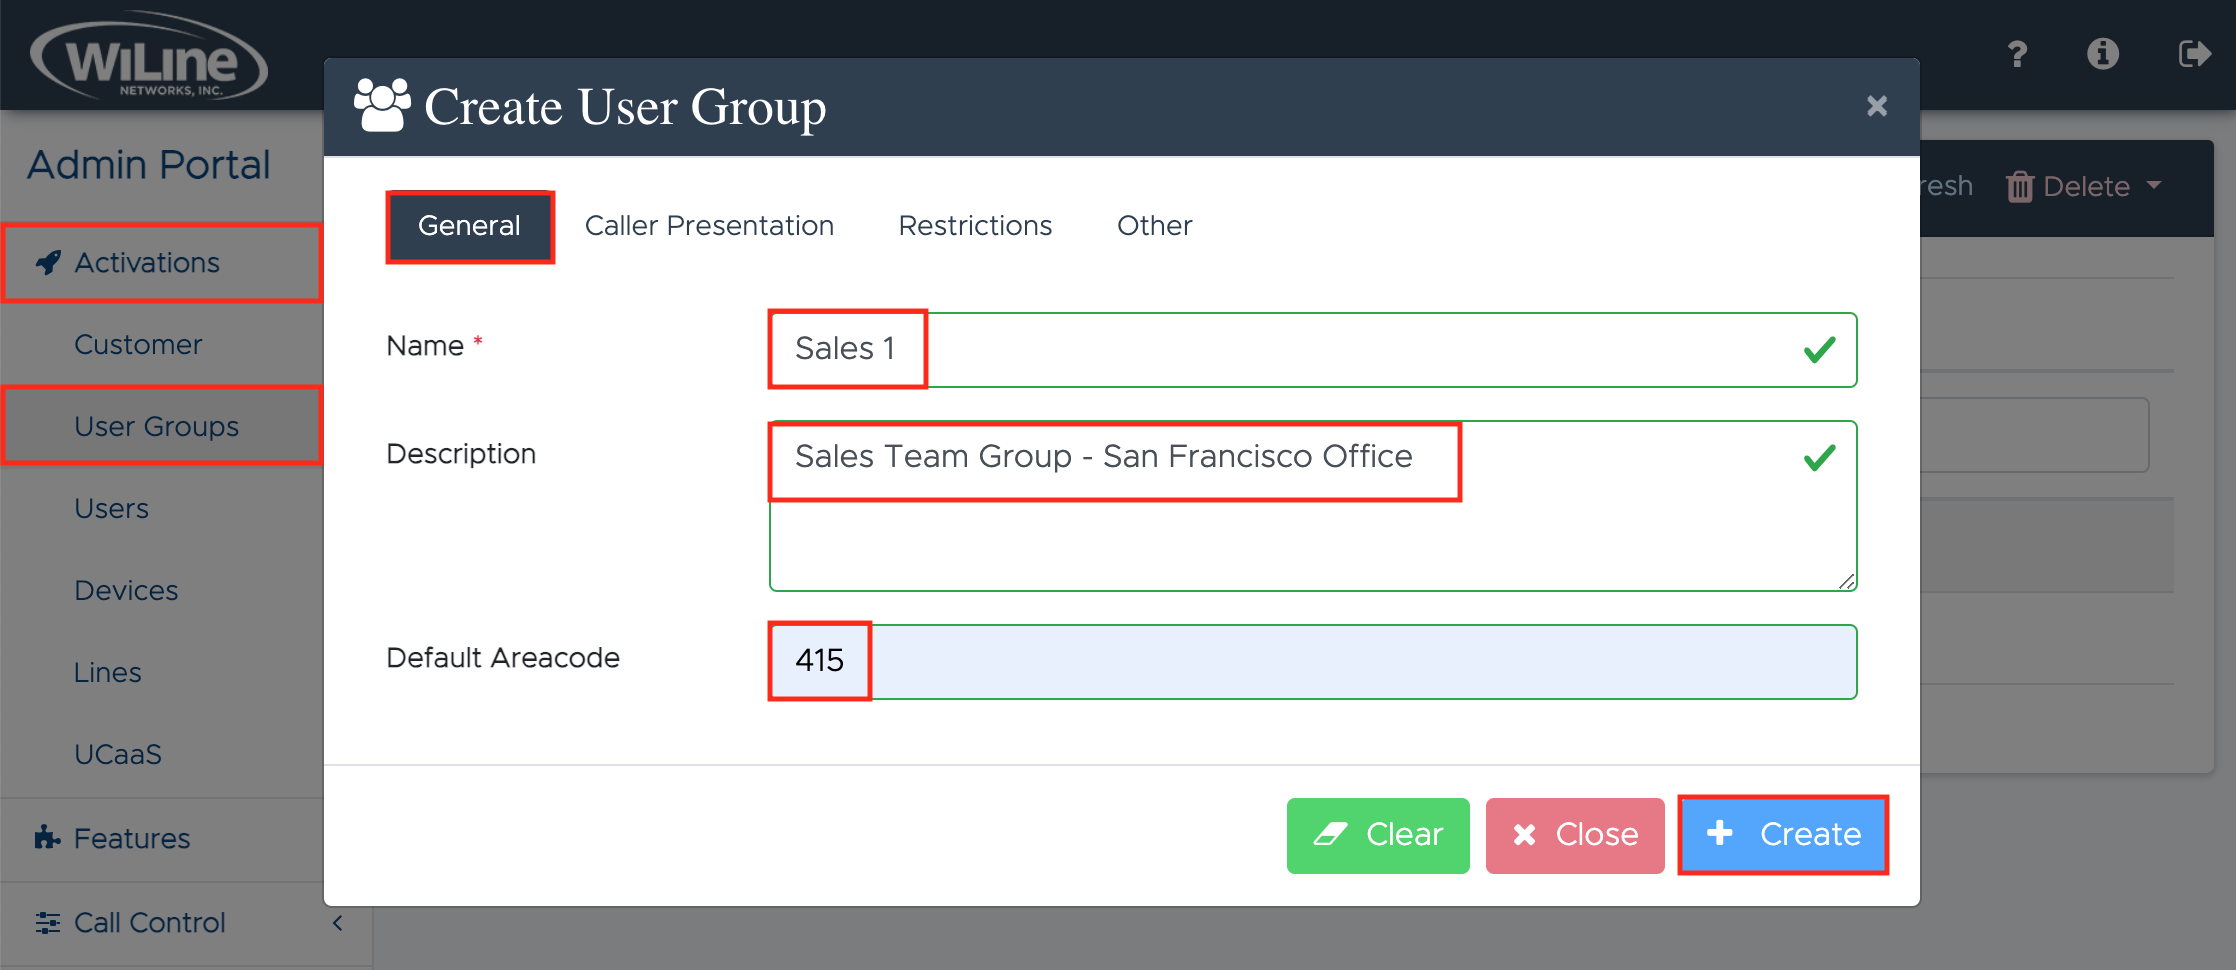
Configure the basic details of the user group:
- Name (required): Enter a unique name for the user group.
E.g.,Sales 1 - Description (optional): Add a brief description to help identify the group’s purpose or characteristics.
E.g.,Sales Team Group - San Francisco Office - Default Area Code: Set a default area code for users in this group, which will be applied to outbound calls when no other area code is specified.
E.g.,415
Caller Presentation Settings
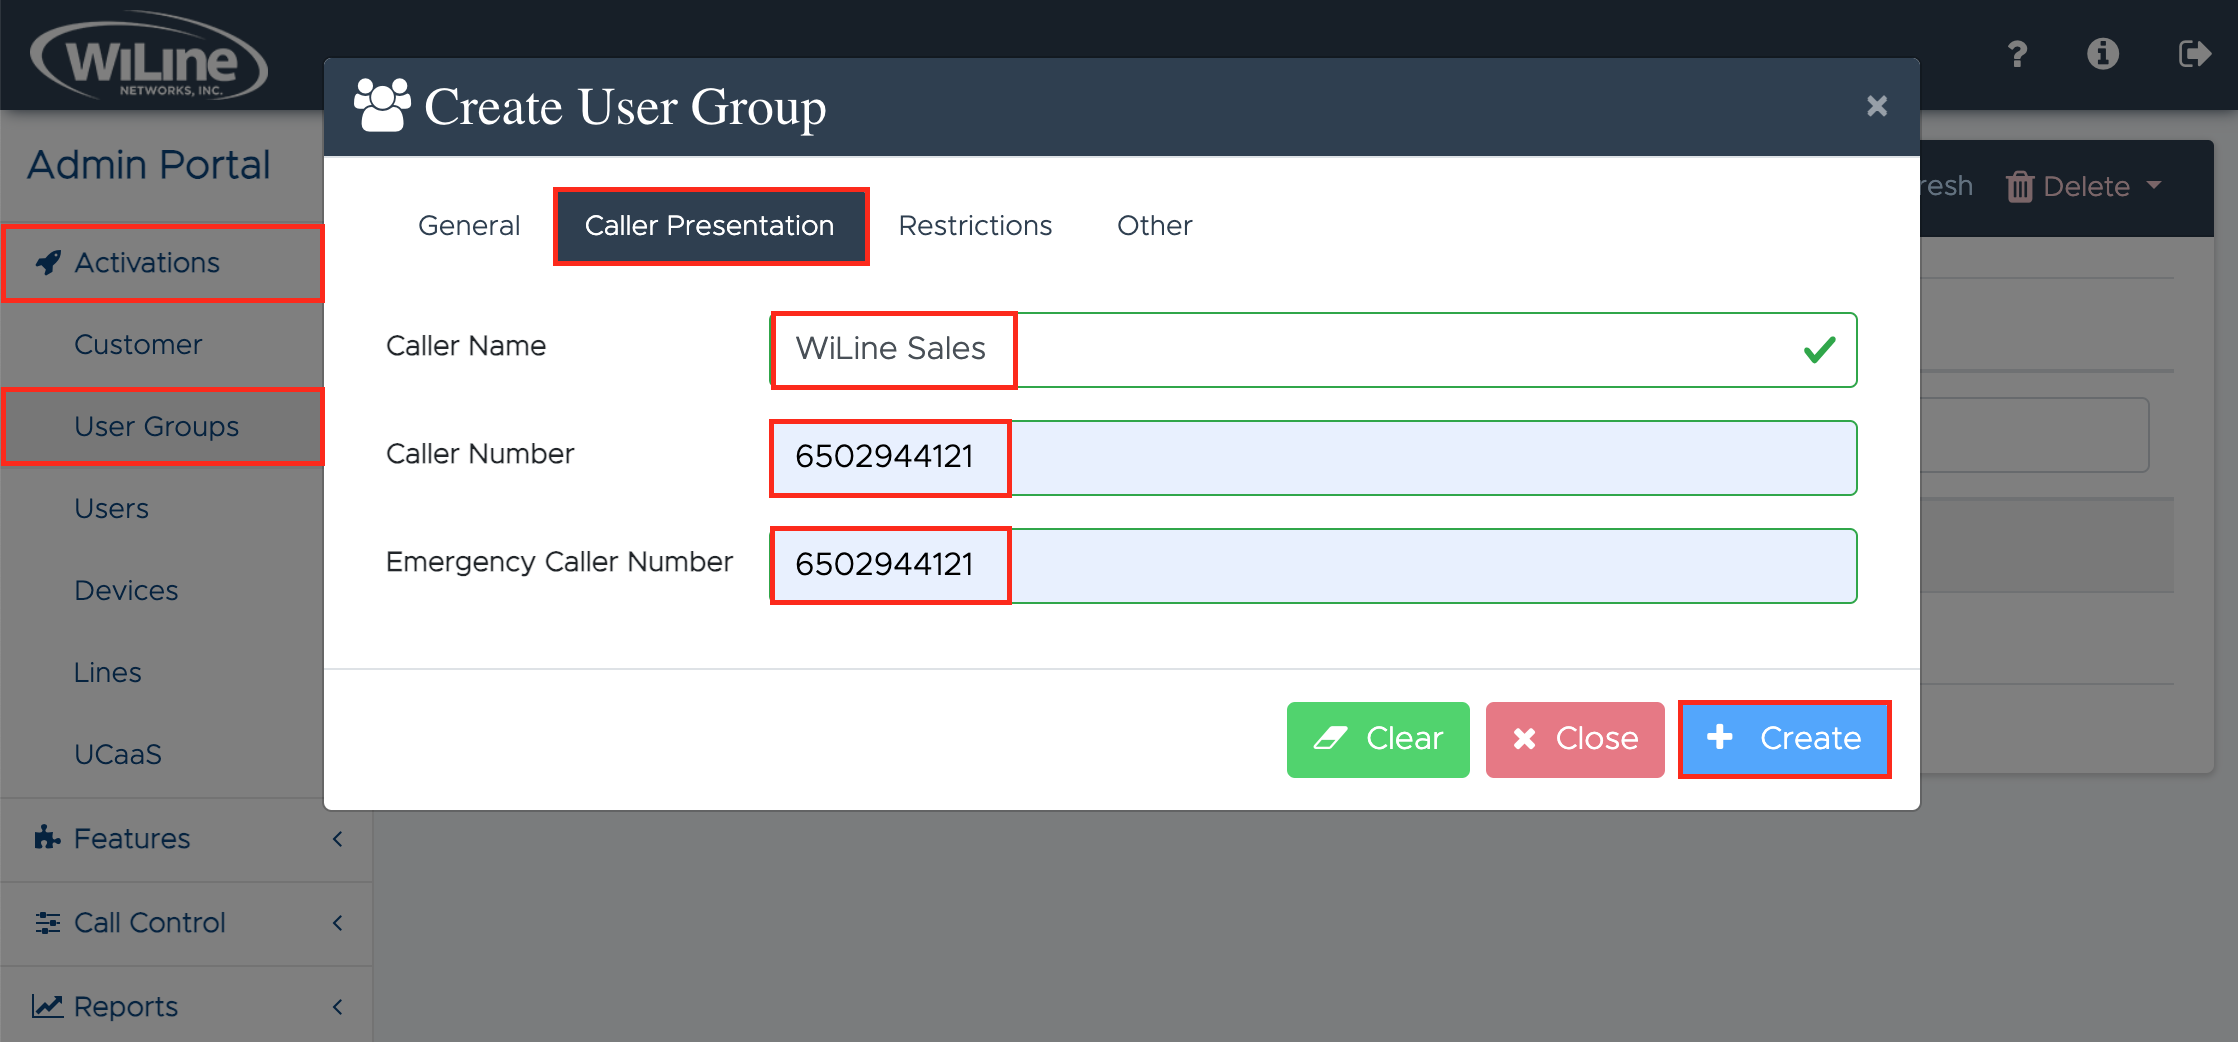
Customize how outbound calls appear to recipients:
- Caller Name: Enter the name that should display for outbound calls made by this group.
E.g.,WiLine Sales - Caller Number: Specify the phone number to be displayed to call recipients.
E.g.,6502944121 - Emergency Caller Number: Assign a phone number to be used specifically for emergency calls, ensuring it aligns with emergency protocols.
E.g.,6502944121
Restriction Settings
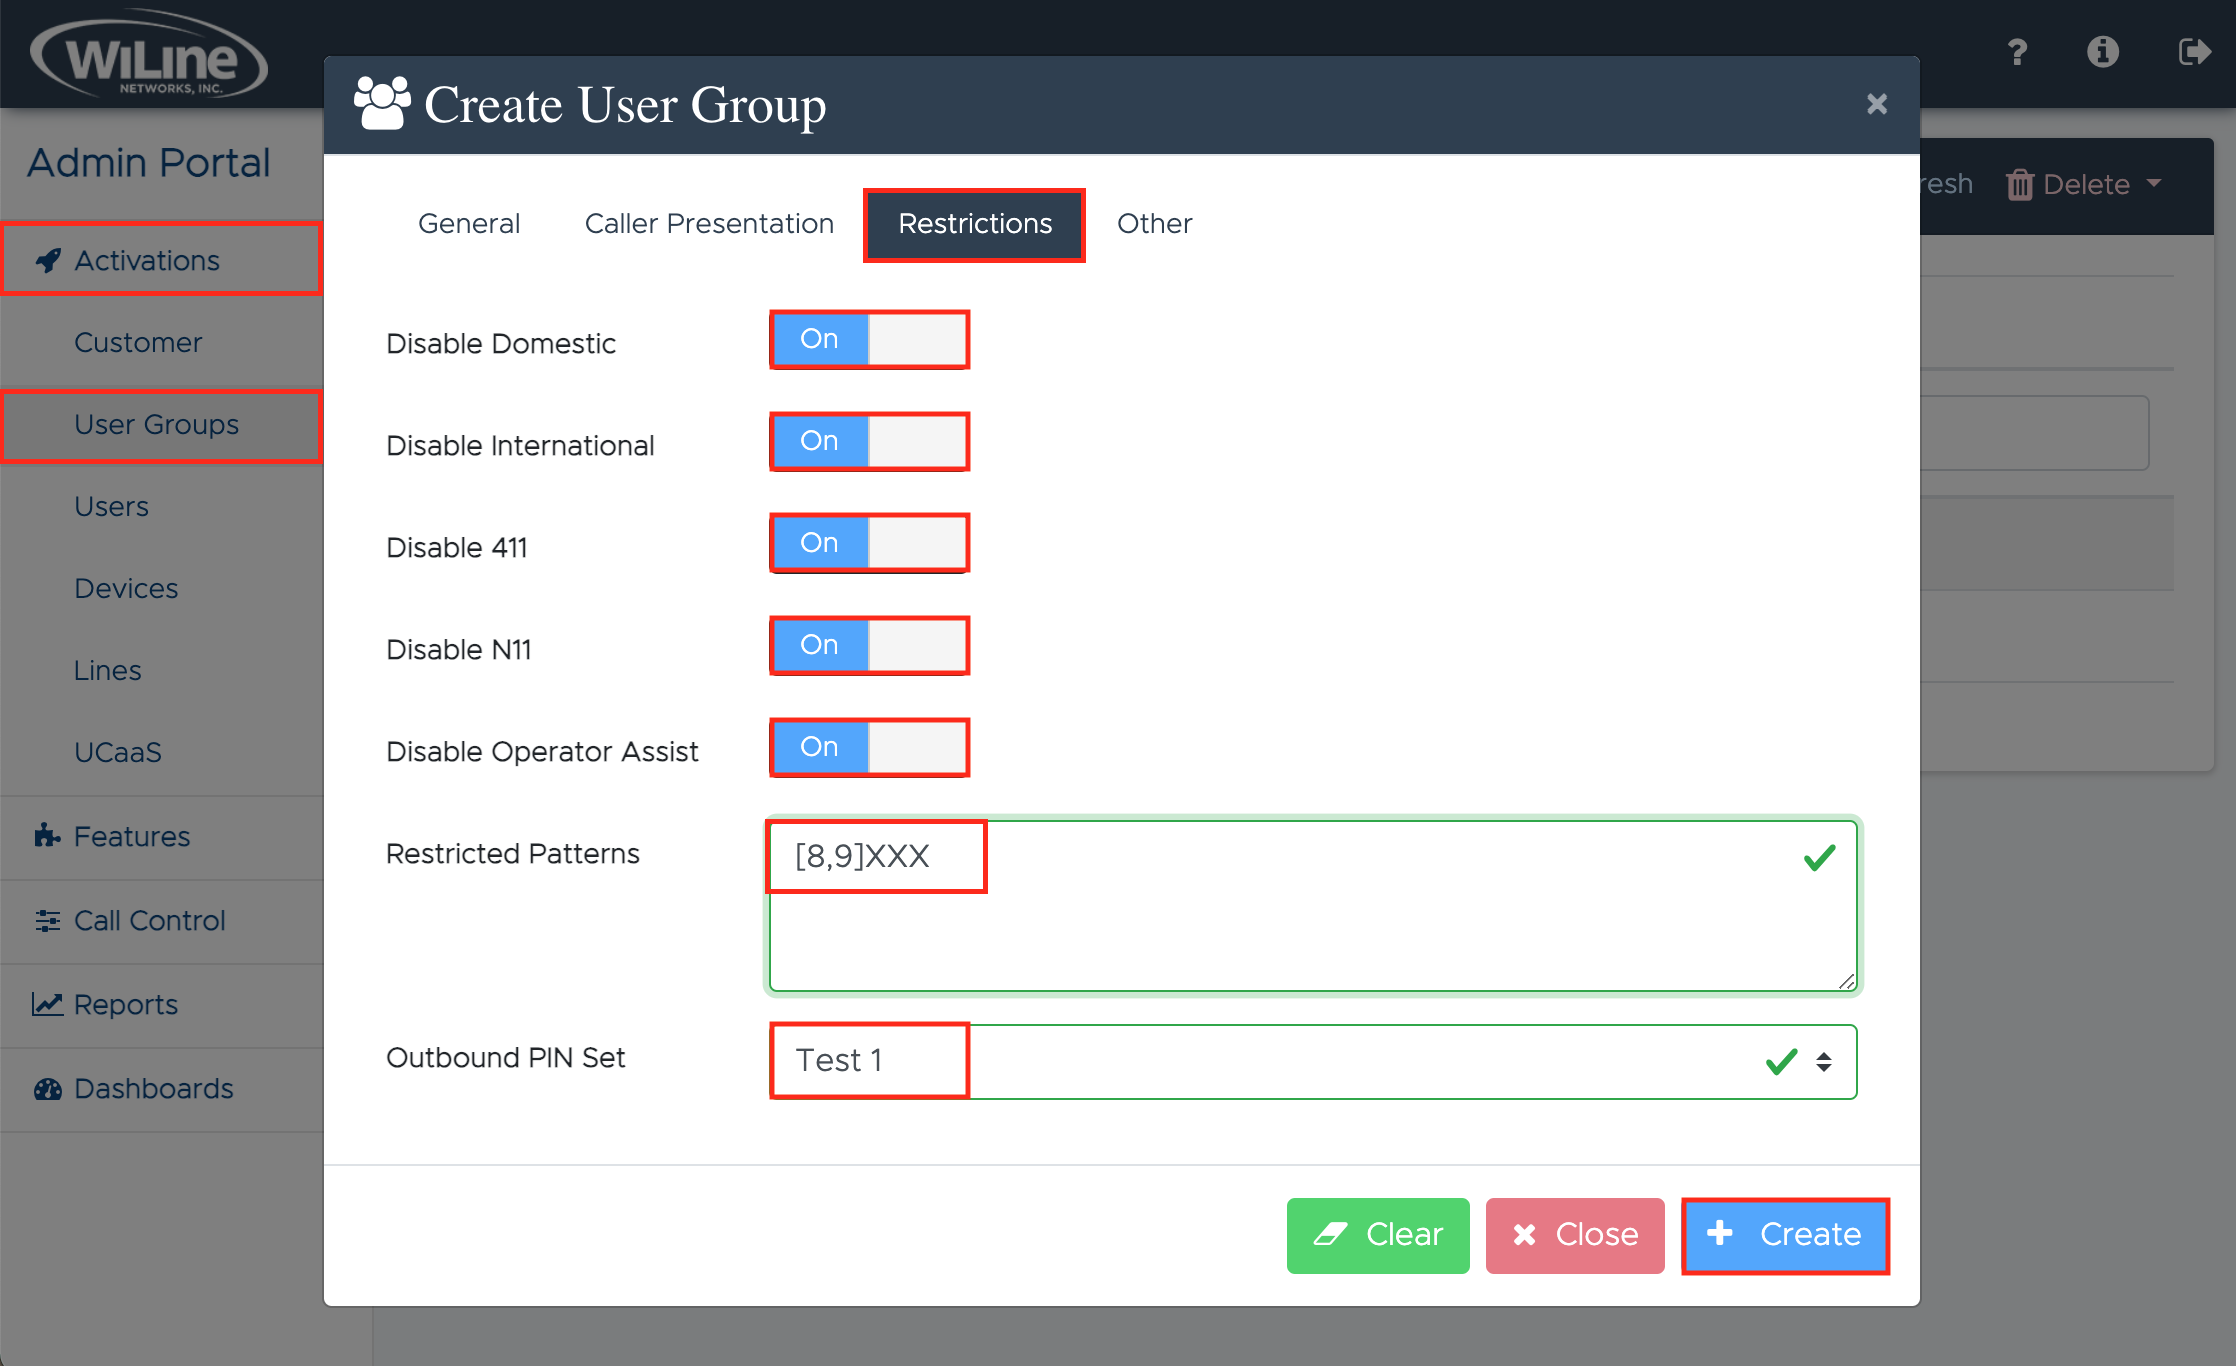
Manage calling restrictions for the user group to enforce security, compliance, and control:
- Disable Domestic: Toggle this setting to restrict all domestic calls.
- Disable International: Toggle this setting to block international calling capabilities.
- Disable 411: Toggle this setting to disable access to directory assistance.
- Disable N11: Prevent access to N11 services, such as 211 or 311.
- Disable Operator Assist: Restrict users from accessing operator assistance.
- Restricted Patterns: Define specific patterns or numbers that users in this group are restricted from calling. When entering a pattern, use allowed characters such as numbers, N, X, Z, [ ], ., !, and , to customize restrictions.
Example: Entering[8,9]XXXrestricts calls starting with the digits 8 and 9, followed by three more digits.
- N: Any digit from 2 to 9.
- X: Any digit from 0 to 9.
- Z: A zero or the digit 1.
- [ ]: A range or set of digits.
- .: Any number of additional digits.
- !: End of a dialed number.
- ,: Pause in the dialing sequence.
- Outbound PIN Set: Assign an outbound PIN to secure calls from unauthorized use. This PIN must be entered to make external calls.
Other Settings
Configure additional group preferences to enhance user experience and network integration:
- Auth PIN: Set an authorization PIN for added security during user authentication.
- Hotel Checkout PIN: Define a PIN for users to check out in hotel environments.
- Preferred Codec: Choose the preferred codec for call quality, such as
G.711orG.729, from the dropdown menu. - Timezone: Select the appropriate timezone for the user group from the dropdown list to standardize timestamps (E.g., America/Los Angeles).
- Time Format: Choose between
hour12andhour24time display formats based on group preferences. - VLAN Tag: Specify the VLAN tag if this user group is part of a network requiring VLAN configuration.
- Distinctive Ringtone for Internal Calls: Select a ringtone from the dropdown to help users distinguish between internal and external calls.
- User Group Call Monitor: Toggle this feature to enable call monitoring for users in this group.
- UCaaS: Enable or disable Unified Communications as a Service (UCaaS) for this user group, as needed.
After completing the required fields, click Create. To reset, click Clear, or Close to exit.
View or Edit a User Group
To view your user groups list, follow these steps:
- Log in to the Admin Portal.
- Navigate to Activations > User Groups from the left-side menu.
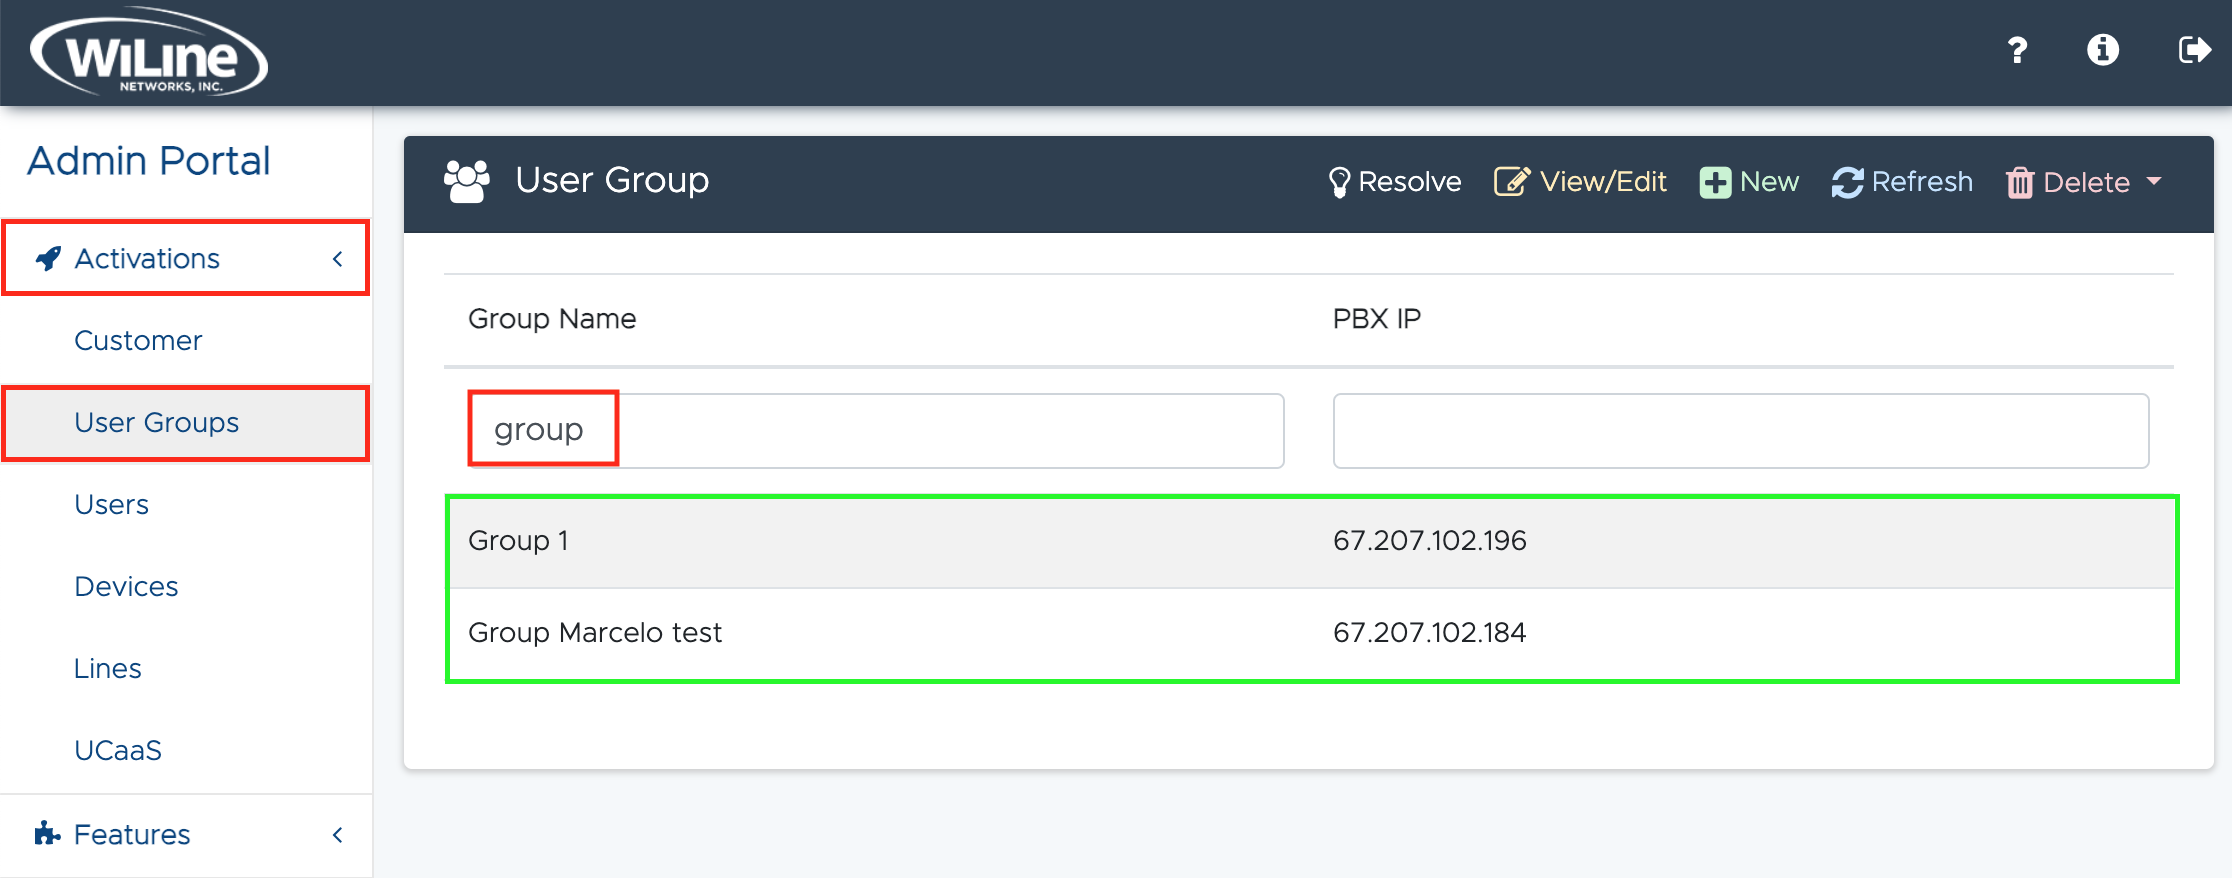
A list of all your created user groups will appear on your dashboard.
- To reorder or filter the results:
- Click the column headers Group Name and PBX IP to organize the results in ascending or descending order.
- To filter or search for specific items, type in the fields under the corresponding headers.
Edit a User Group
To edit a user group:
- Double-click an item from the list, or
- Select a user group andg headers.
Edit a User Group
To edit a user group:
- Double-click an item from the list, or
- Select a user group and click the yellow View/Edit button in the top blue bar.
An Edit User Group pop-up window will open, allowing you to modify the user group details.

-
Follow these steps, similar to the instructions in the Create a New User Group section, to update the user group details:
-
General Settings
- Name: Modify the group name (e.g.,
Sales 2). - Description: Modify the brief description (e.g.,
Sales Team - NYC Office). - Default Area Code: Modify the default area code for outbound calls (e.g.,
415).
- Name: Modify the group name (e.g.,
-
Caller Presentation Settings
- Caller Name: Modify the group name for outbound calls (e.g.,
WiLine Sales). - Caller Number: Modify the phone number displayed to recipients (e.g.,
6496581234). - Emergency Caller Number: Modify the number for emergency calls (e.g.,
6496581234).
- Caller Name: Modify the group name for outbound calls (e.g.,
-
Restrictions Settings
- Toggle settings for domestic, international, 411, N11, and operator assistance.
- Redefine restricted patterns using characters like N, X, Z, [ ], ., !, and , (e.g.,
[8,9]XXX). - Outbound PIN Set: Reassign a PIN for external calls.
-
Other Settings
- Auth PIN: For user authentication.
- Hotel Checkout PIN: For hotel checkouts.
- Preferred Codec: Select codec for call quality (e.g.,
G.711orG.729). - Timezone: Choose the user group’s timezone (e.g., America/Los_Angeles).
- Time Format: Select
hour12orhour24format. - VLAN Tag: Specify if needed.
- Distinctive Ringtone: Choose ringtone for internal calls.
- User Group Call Monitor: Enable monitoring.
- UCaaS: Enable or disable UCaaS.
-
When you're done, click Update. To start over, click Reset, or select Close to exit.
Delete a User Group
To delete a user group, follow these steps:
- Log in to the Admin Portal.
- Navigate to Activations > User Groups from the left-side menu.
- Select the user group from the list.
- Click the red Delete button in the options bar.
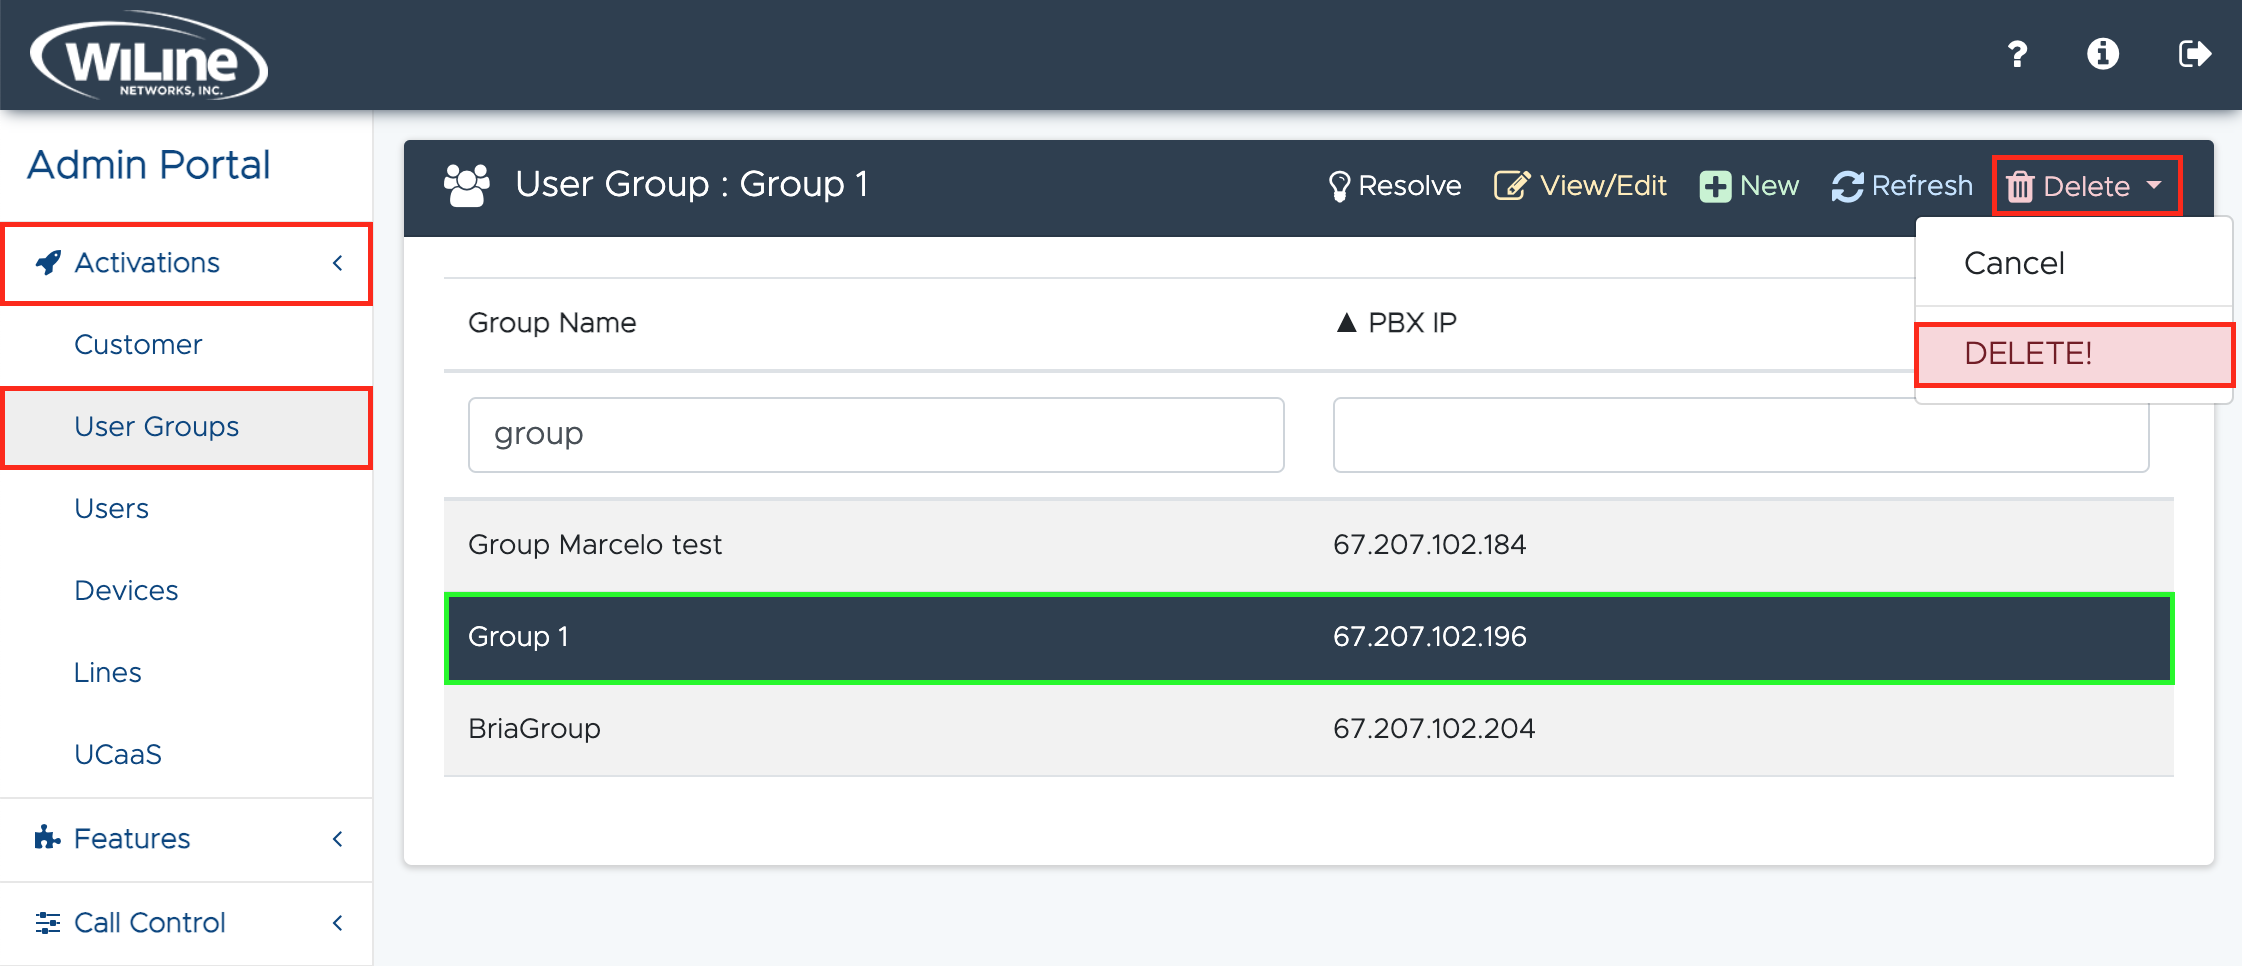
A confirmation pop-up will appear. Click Delete to confirm, or Cancel to stop the process.
You can only delete user groups that you created.
By following these steps, administrators can effectively manage user groups within the Admin Portal, ensuring that your organization maintains control over call preferences and restrictions tailored to the specific needs of different teams.