Send Files
With WiLine UCaaS, you can send and receive files with your contacts. File transfers are saved on your device under the downloads folder, but files are not synced across multiple devices.
Deleting a file transfer message from an IM conversation in WiLine UCaaS does NOT remove the file from your device. Use a file manager to delete files if needed.
Send Photos, Videos, and Files
You can send photos, videos, or other files to a contact who is online. To send multiple files at once, they must be located in the same folder.
Send Files on macOS
-
Open a new or existing IM conversation with the contact.
-
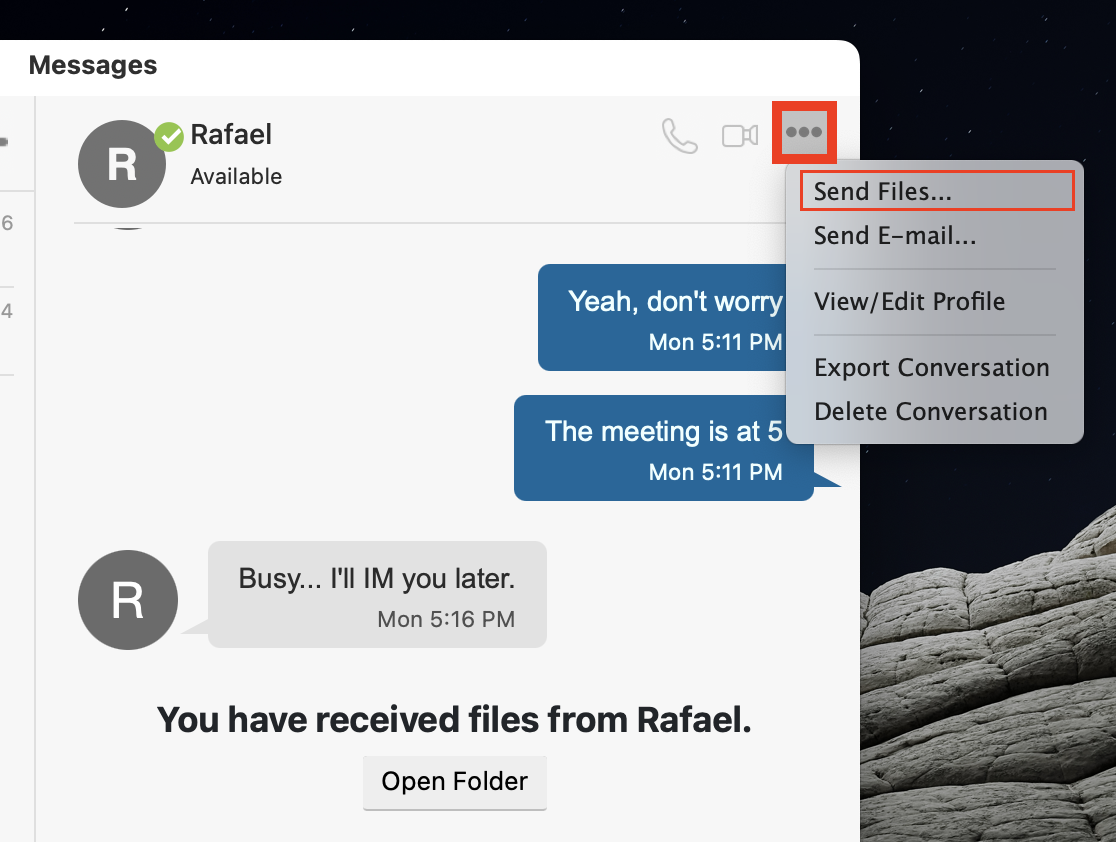
Tap
from the options in the right top corner and select Send Files.... Alternatively, you can simply drag the file to the Compose message field.
Figure 1: Sending Files in a Conversation (macOS).
Send Files on iPhone
- Open a new or existing IM conversation with the contact.
- Tap in Compose Message.
The first time you initiate a file transfer, you’ll need to grant WiLine UCaaS permission to access your photos and files.
- Choose Photo or Video or File based on the type of file you want to send.
- Locate the folder containing the file(s).
- If sending multiple files, ensure all are in the same folder.
- Tap the file(s) you want to send. When finished, tap Done.
- WiLine UCaaS sends a file transfer notification to the recipient, who must accept or decline the files.
File Transfer Statuses
- Waiting: The recipient has not yet accepted the files.
- In Progress: The recipient accepted the files, and the transfer is underway.
- Transfer Complete: The files have been successfully transferred.
- Transfer Declined: The recipient declined the files.
If WiLine UCaaS is minimized during a file transfer, the transfer will pause until the app is brought back to the foreground.
Receive Files
Other users can also send files to you. A file transfer notification will appear in WiLine UCaaS or in your device’s notification center if the app is in the background.
Receive a File (iPhone)
-
Tap on the file transfer notification to open the Messaging tab in WiLine UCaaS.
-
Tap Accept or Decline for each file.
- Accept: The file transfer begins, and WiLine UCaaS shows the transfer progress until completion.
- Decline: Both sender and recipient see Transfer Declined as the status.

Figure 2: Receiving a file transfer notification.
Cancel a File Transfer
Both the sender and the recipient can cancel a file transfer before it completes by following these simple steps:
- Tap Cancel on the file transfer screen.
- Sender: You can cancel the transfer while it shows Waiting (before the recipient accepts) or during In Progress (after acceptance but before completion).
- Recipient: You can cancel the transfer at any time before it completes.
After canceling, the sender will see Transfer Failed, and the recipient will see Transfer Declined as the transfer status.
This feature provides flexibility and control over your file transfers, ensuring efficient and secure communication with contacts in WiLine UCaaS.